API开放平台
API开放平台
项目介绍
背景:
- 前端开发需要用到后台接口
- 使用现成的系统的功能
做一个提供API接口调用的平台,用户可以开通接口调用权限。用户可以使用接口,并且每次调用会进行统计。管理员可以发布接口、下线接口、接入接口,以及可视化接口的调用情况、数据。
- 防止攻击(安全性)
- 不能随便调用 (限制,开通)
- 统计调用 次数
- 计费
- 流量保护
- API接入
业务流程
架构图 :
技术选型
前端:
- Ant Design Pro
- React
- Ant Design Procomponents
- Umi
- Umi Request(Axios的封装)
后端:
- Java SpringBoot
- Spring Boot Starter(SDK开发)
- 网关、限流、日志
需求分析
数据库设计
接口信息表:interface_info
| 字段 | 类型 | 说明 |
|---|---|---|
| id | bigint | 主键id |
| name | varchar(256) | 名称 |
| description | varchar(256) | 描述 |
| url | varchar(512) | 接口地址 |
| requestHeader | text | 请求头 |
| responseHeader | text | 响应头 |
| status | int | 接口状态0-关闭1-开启 |
| method | varchar(256) | 请求类型 |
| userId | bigint | 创建人 |
| isDelete | tinyint | 是否删除 0-未删除 1-删除 |
| createTime | datetime | 创建时间 |
| updateTime | datetime | 更新时间 |
sql语句:
-- auto-generated definition
create table user
(
    id           bigint auto_increment comment 'id'
        primary key,
    userAccount  varchar(256)                           not null comment '账号',
    userPassword varchar(512)                           not null comment '密码',
    unionId      varchar(256)                           null comment '微信开放平台id',
    mpOpenId     varchar(256)                           null comment '公众号openId',
    userName     varchar(256)                           null comment '用户昵称',
    userAvatar   varchar(1024)                          null comment '用户头像',
    userProfile  varchar(512)                           null comment '用户简介',
    userRole     varchar(256) default 'user'            not null comment '用户角色:user/admin/ban',
    createTime   datetime     default CURRENT_TIMESTAMP not null comment '创建时间',
    updateTime   datetime     default CURRENT_TIMESTAMP not null on update CURRENT_TIMESTAMP comment '更新时间',
    isDelete     tinyint      default 0                 not null comment '是否删除'
)
    comment '用户' collate = utf8mb4_unicode_ci;

create index idx_unionId
    on user (unionId);
功能实现
项目初始化
前端初始化
ant design pro:https://pro.ant.design/zh-CN/docs/getting-started/
创建前端项目 :
npm i @ant-design/pro-cli -g
pro create myapp
选择umi4
删除一些测试用的代码
配置eslint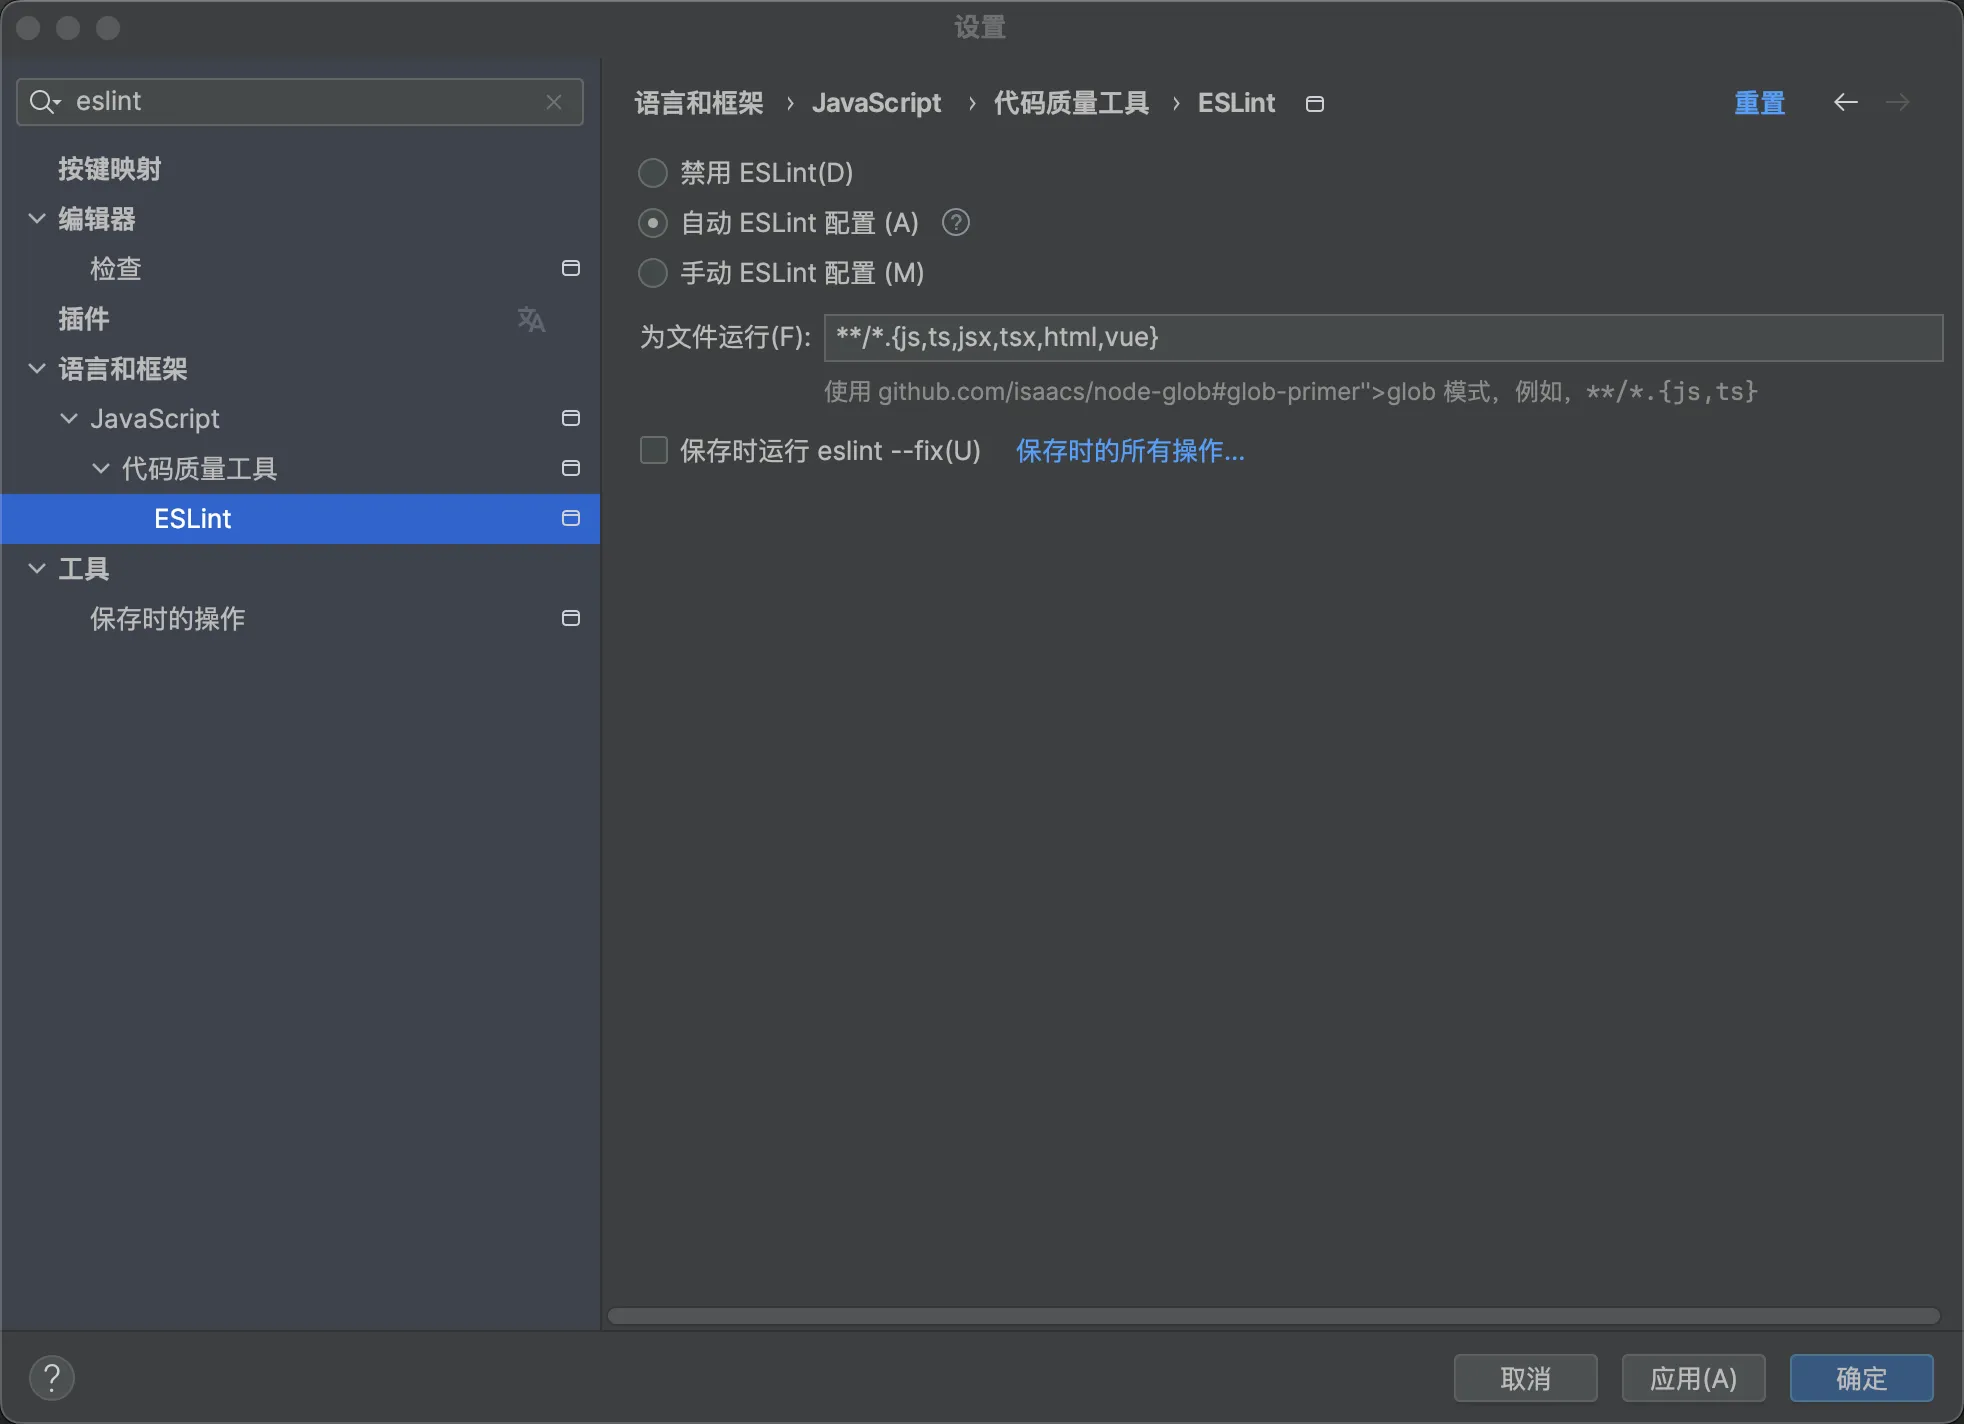
配置prettier格式化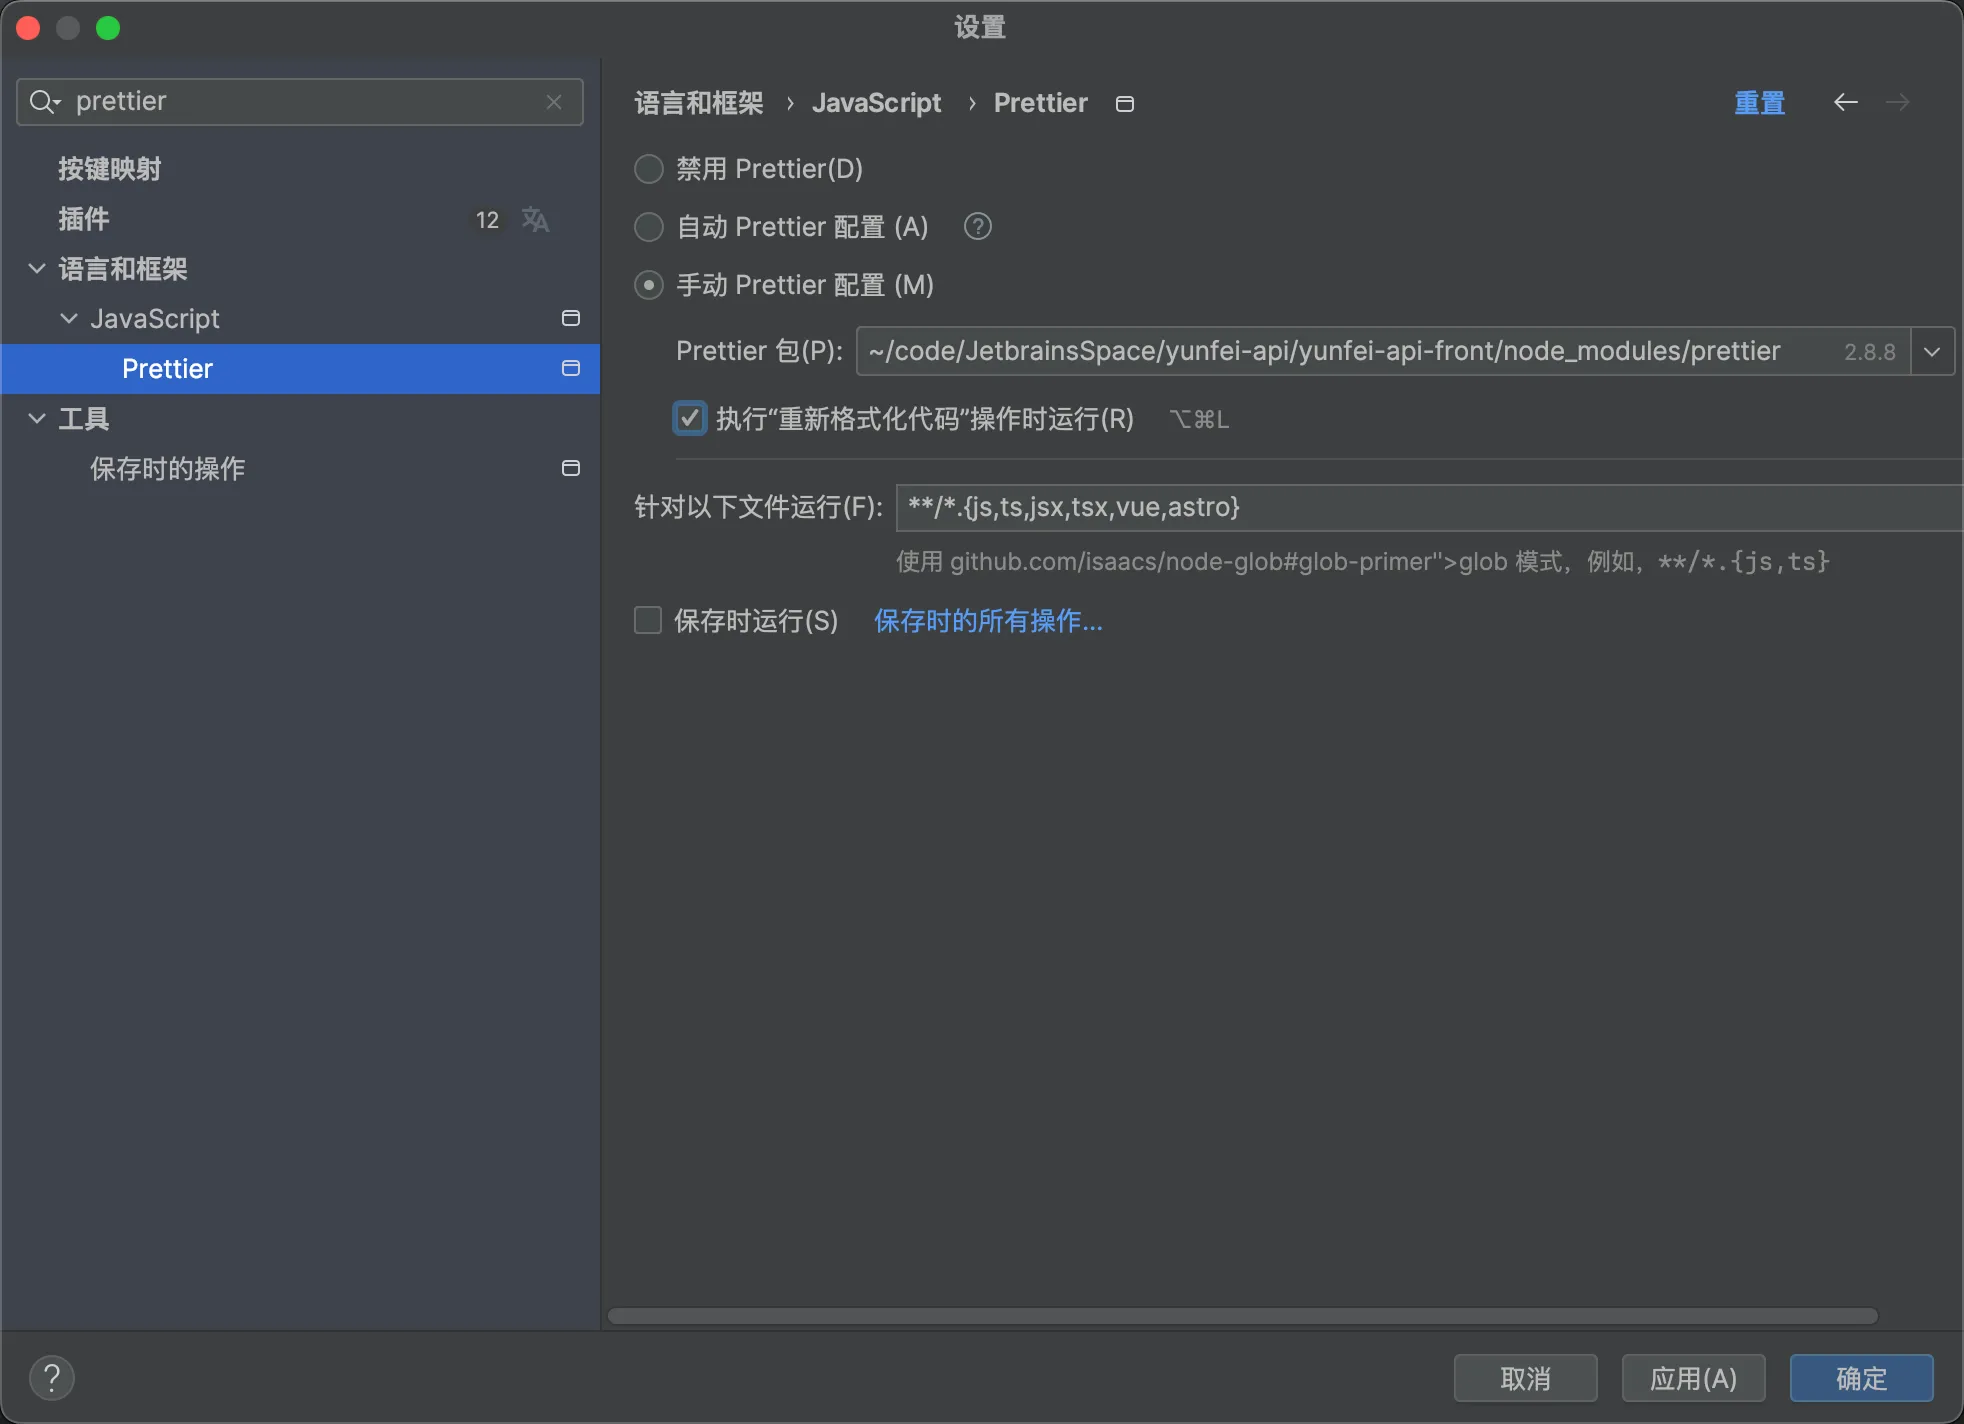
后端初始化
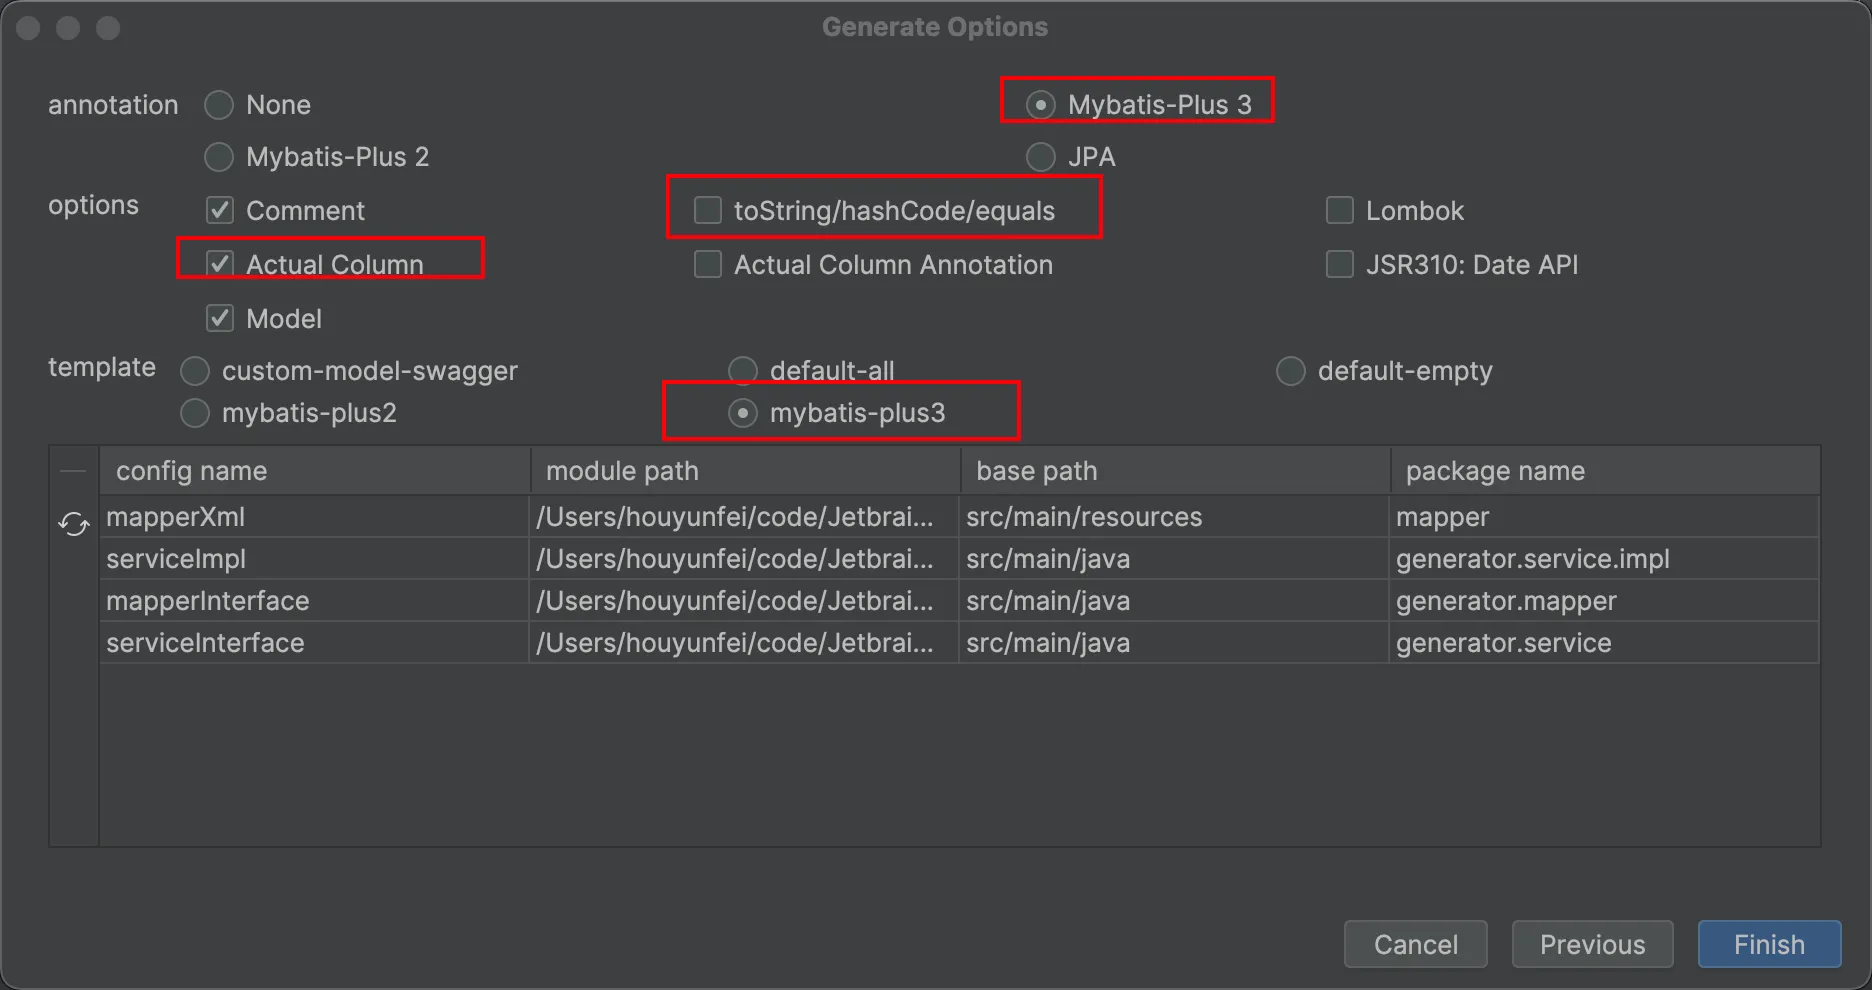
后端代码生成器: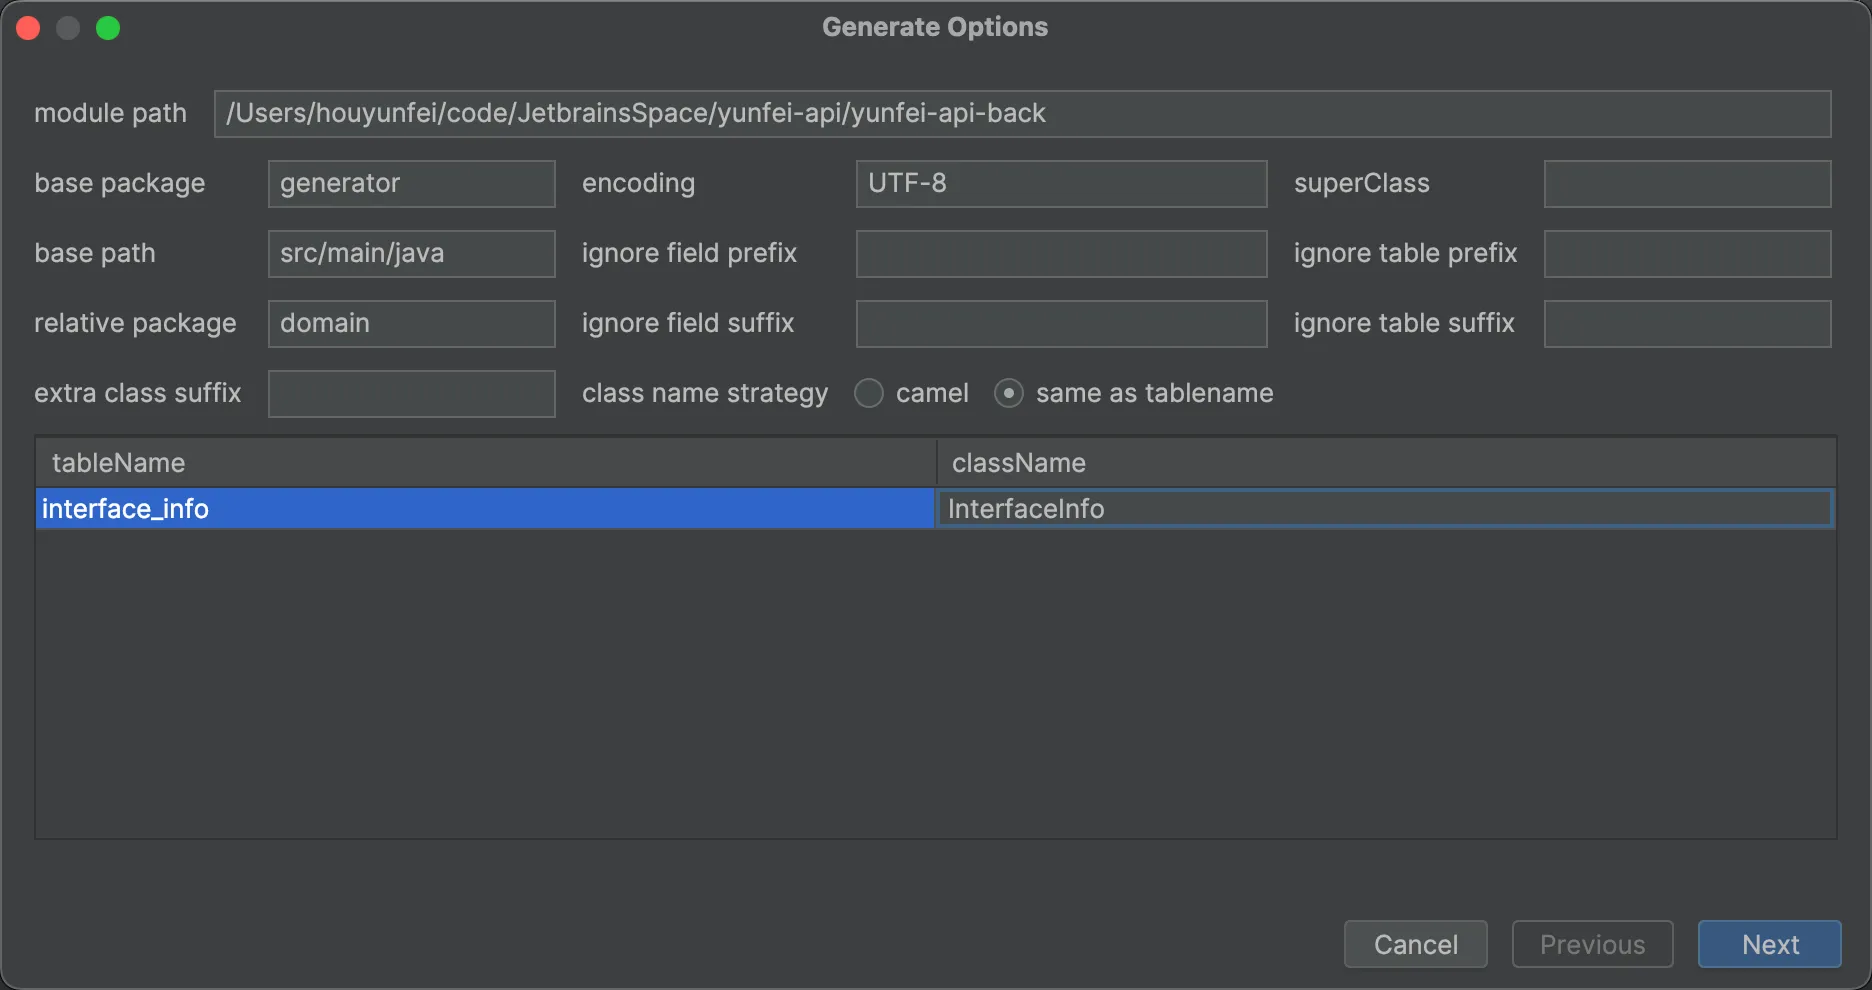
前端开发
修改OpenAPI插件配置 ,位置 config/config.ts:
/**
 * @name openAPI 插件的配置
 * @description 基于 openapi 的规范生成serve 和mock,能减少很多样板代码
 * @doc https://pro.ant.design/zh-cn/docs/openapi/
 */openAPI: [
  {
    requestLibPath: "import { request } from '@umijs/max'",
    schemaPath: 'http://localhost:8101/api/v2/api-docs',  // 本地开发时使用
    projectName: 'yunfei-api-back',
  },
],
此时执行"openapi": "max openapi",命令可以得到API生成的接口代码

配置请求统一处理:
将requestErrorConfig 进行重命名为requestConfig
统一请求
export const requestConfig: RequestConfig = {
  baseURL: 'http://localhost:8101',
}
修改登录逻辑:
const handleSubmit = async (values: API.UserLoginRequest) => {
  try {
    // 登录
    console.log('values:', values);
    const res: API.BaseResponseLoginUserVO_ = await userLoginUsingPost({ ...values });
    if (res.code === 0) {
      const defaultLoginSuccessMessage = '登录成功!';
      message.success(defaultLoginSuccessMessage);
      await fetchUserInfo();
      const urlParams = new URL(window.location.href).searchParams;
      history.push(urlParams.get('redirect') || '/');
      setInitialState({
        loginUser: res.data,
      });
      return;    } else {
      throw new Error(res.message);
    }
  } catch (error) {
    const defaultLoginFailureMessage = '登录失败,请重试!';
    console.log(error);
    message.error(defaultLoginFailureMessage);
  }
};
此时可以登录成功 ,但是页面无法跳转 ,因为ant design pro框架会在每个页面加载的时候先去调用查询当前 用户的接口 ,获取用户信息。
修改app.tsx代码:
interface InitialState {
  loginUser?: API.LoginUserVO;
  fetchUserInfo?: () => Promise<any>;
  settings?: Partial<LayoutSettings>;
}

/**
 * @see  https://umijs.org/zh-CN/plugins/plugin-initial-state
 * */export async function getInitialState(): Promise<InitialState> {
  //当页面首次加载时,获取用户信息
  const state: InitialState = {
    loginUser: undefined,
  };
  const fetchUserInfo = async () => {
    try {
      const res = await getLoginUserUsingGet();
      if (res.data) {
        return res.data;
      }
    } catch (error) {
      history.push(loginPath);
    }
    console.log('fetchUserInfo', state);
    return undefined;  };
  // 白名单里面,直接返回
  const { location } = history;
  console.log('cxk')
  if (WHITE_LIST.includes(location.pathname)) {
    return state;
  }
  const currentUser = await fetchUserInfo();
  console.log('currentUser', currentUser);
  return {
    loginUser: currentUser,
    fetchUserInfo: fetchUserInfo,
    settings: defaultSettings as Partial<LayoutSettings>,
  };
}
编写ProTable表格代码,定义每列的内容,主要修改request请求参数类型以及返回值类型要对应 :
  const columns: ProColumns<API.InterfaceInfo>[] = [
    {
      title: '接口名称',
      dataIndex: 'name',
      valueType: 'text',
      formItemProps: {
        rules: [{
          required: true,
        }]
      }
    },
    {
      title: '描述',
      dataIndex: 'description',
      valueType: 'textarea',
    },
    {
      title: '请求方法',
      dataIndex: 'method',
      valueType: 'text',
    },
    {
      title: 'url',
      dataIndex: 'url',
      valueType: 'text',
    },
    {
      title: '请求参数',
      dataIndex: 'requestParams',
      valueType: 'jsonCode',
    },
    {
      title: '请求头',
      dataIndex: 'requestHeader',
      valueType: 'jsonCode',
    },
    {
      title: '响应头',
      dataIndex: 'responseHeader',
      valueType: 'jsonCode',
    },
    {
      title: '状态',
      dataIndex: 'status',
      hideInForm: true,
      valueEnum: {
        0: {
          text: '关闭',
          status: 'Default',
        },
        1: {
          text: '开启',
          status: 'Processing',
        },
      },
    },
    {
      title: '操作',
      dataIndex: 'option',
      valueType: 'option',
      render: (_, record) => [
        <a
          key="config"
          onClick={() => {
            handleUpdateModalVisible(true);
            setCurrentRow(record);
          }}
        >
          修改
        </a>,
        record.status === 0 ? <a
          key="config"
          onClick={() => {
            handleOnline(record);
          }}
        >
          发布
        </a> : null,
        record.status === 1 ? <Button
          type="text"
          key="config"
          danger
          onClick={() => {
            handleOffline(record);
          }}
        >
          下线
        </Button> : null,
        <Button
          type="text"
          key="config"
          danger
          onClick={() => {
            handleRemove(record);
          }}
        >
          删除
        </Button>,
      ],
    },
  ];

<ProTable<API.RuleListItem, API.PageParams>
  headerTitle={'查询表格'}
  actionRef={actionRef}
  rowKey="key"
  search={{
    labelWidth: 120,
  }}
  toolBarRender={() => [
    <Button
      type="primary"
      key="primary"
      onClick={() => {
        handleModalVisible(true);
      }}
    >
      <PlusOutlined/> 新建
    </Button>,
  ]}
  request={async (
    params,
    sort: Record<string, SortOrder>,
    filter: Record<string, React.ReactText[] | null>,
  ) => {
    const res: any = await listInterfaceInfoByPageUsingGET({
      ...params,
    });
    if (res?.data) {
      return {
        data: res?.data.records || [],
        success: true,
        total: res?.data.total || 0,
      };
    } else {
      return {
        data: [],
        success: false,
        total: 0,
      };
    }
  }}
  columns={columns}
  rowSelection={{
    onChange: (_, selectedRows) => {
      setSelectedRows(selectedRows);
    },
  }}
/>
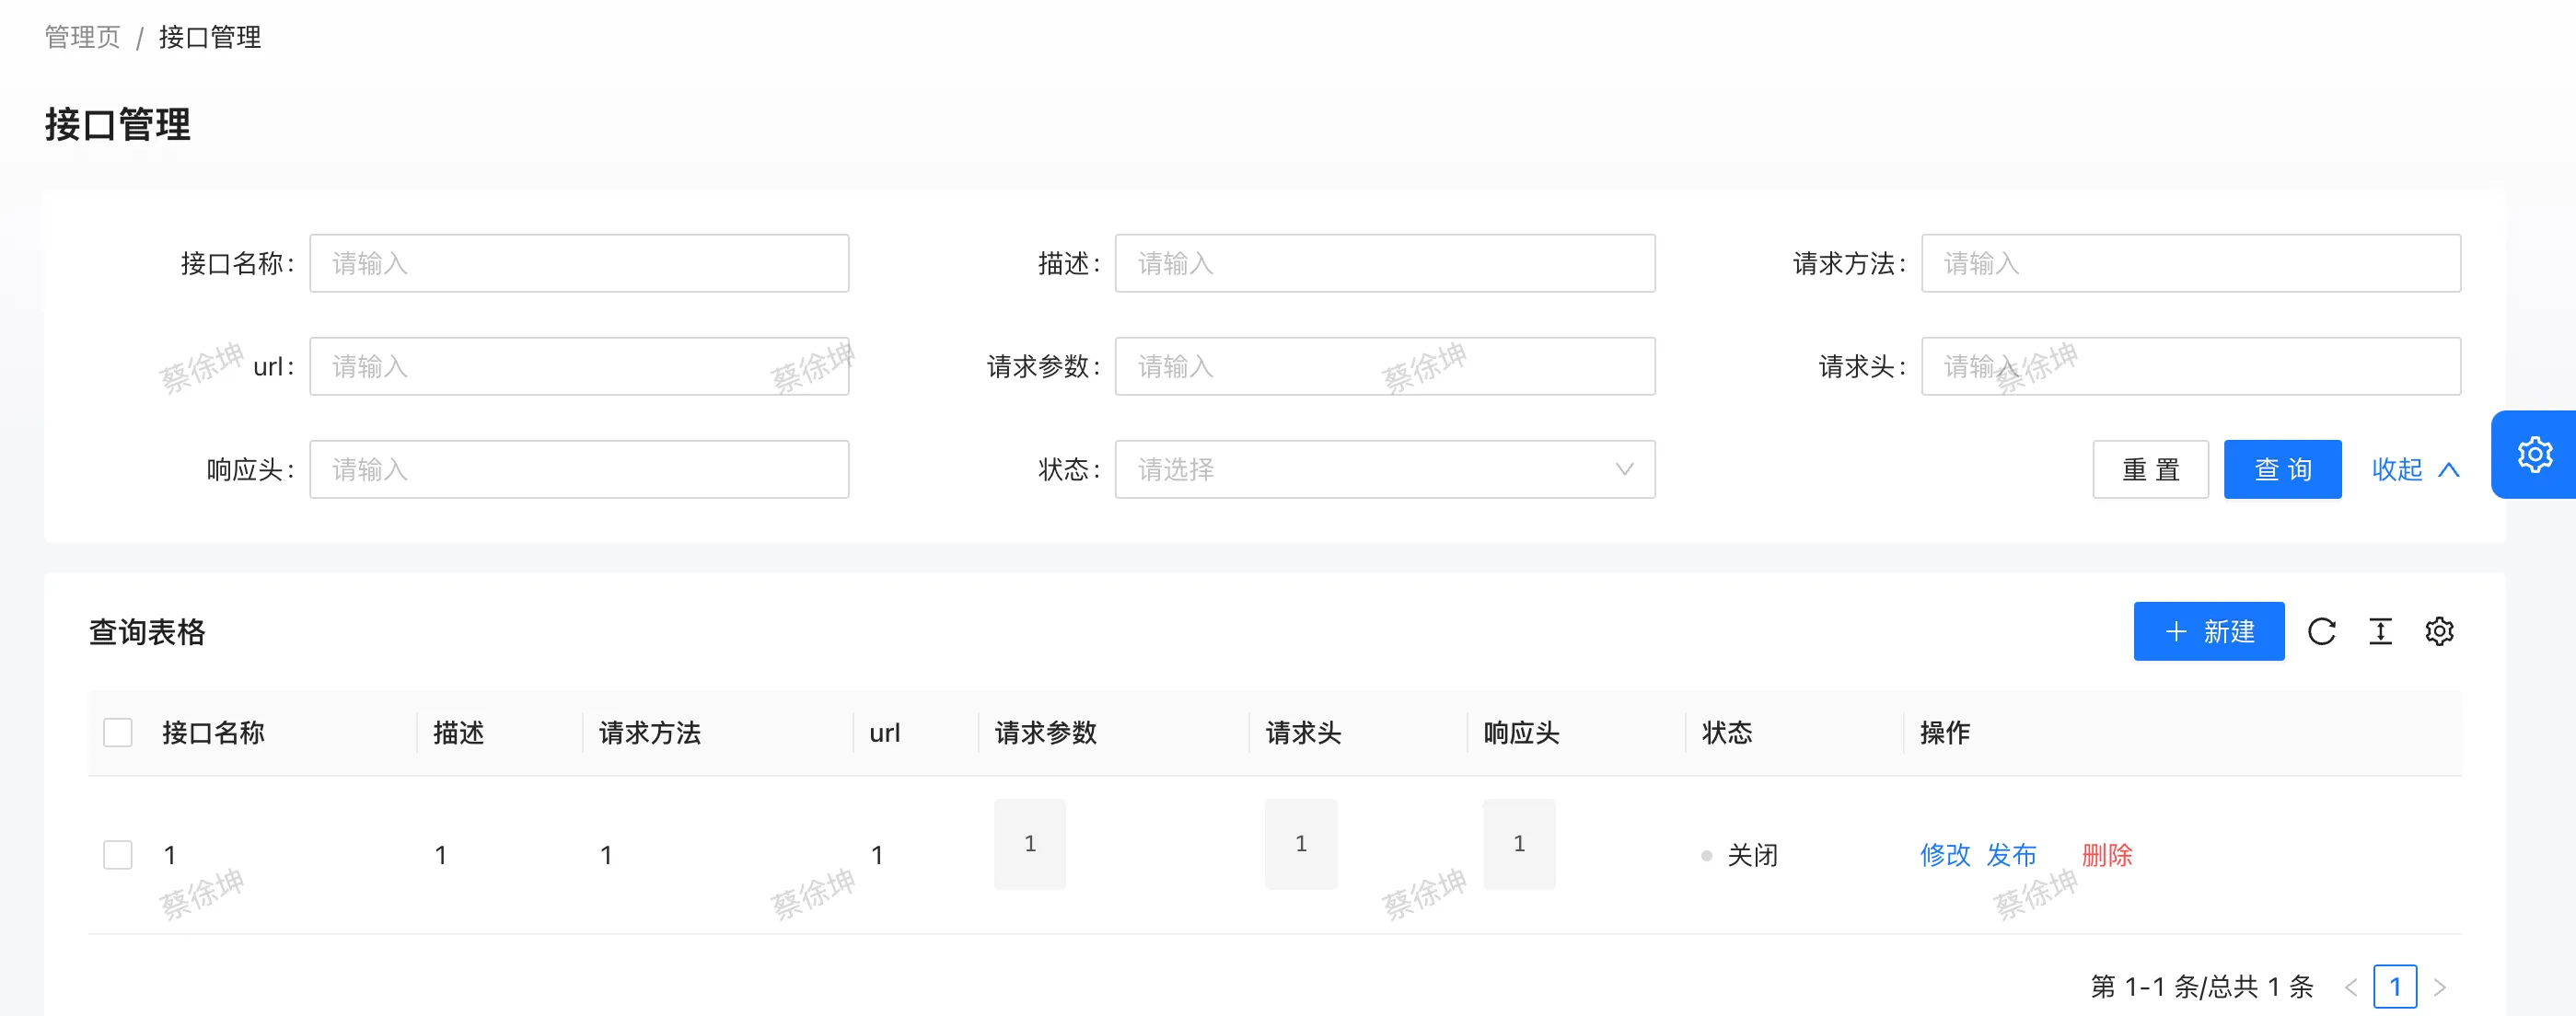
封装创建接口模态框CreateModal.tsx:
export type Props = {
  columns: ProColumns<API.InterfaceInfo>[];
  onCancel: () => void;
  onSubmit: (values: API.InterfaceInfo) => Promise<void>;
  visible: boolean;
};

const CreateModal: React.FC<Props> = (props) => {
  const { visible, columns, onCancel, onSubmit } = props;

  return (
    <Modal visible={visible} footer={null} onCancel={() => onCancel?.()}>
      <ProTable        type="form"
        columns={columns}
        onSubmit={async (value) => {
          onSubmit?.(value);
        }}
      />
    </Modal>  );
};
export default CreateModal;
使用组件:
const [createModalVisible, handleModalVisible] = useState<boolean>(false);
const handleAdd = async (fields: API.InterfaceInfo) => {
  const hide = message.loading('正在添加');
  try {
    await addInterfaceInfoUsingPOST({
      ...fields,
    });
    hide();
    message.success('创建成功');
    handleModalVisible(false);
    return true;  } catch (error: any) {
    hide();
    message.error('创建失败,' + error.message);
    return false;  }
};

<CreateModal
  columns={columns}
  onCancel={() => {
    handleModalVisible(false);
  }}
  onSubmit={(values) => {
    handleAdd(values);
  }}
  visible={createModalVisible}
/>
修改:
export type Props = {
  values: API.InterfaceInfo;
  columns: ProColumns<API.InterfaceInfo>[];
  onCancel: () => void;
  onSubmit: (values: API.InterfaceInfo) => Promise<void>;
  visible: boolean;
};

const UpdateModal: React.FC<Props> = (props) => {
  const { values, visible, columns, onCancel, onSubmit } = props;

  const formRef = useRef<ProFormInstance>();

  useEffect(() => {
    if (formRef) {
      formRef.current?.setFieldsValue(values);
    }
  }, [values])

  return (
    <Modal visible={visible} footer={null} onCancel={() => onCancel?.()}>
      <ProTable        type="form"
        formRef={formRef}
        columns={columns}
        onSubmit={async (value) => {
          onSubmit?.(value);
        }}
      />
    </Modal>  );
};
export default UpdateModal;
需要使用 useEffect来监听值的变化来给表格设置值
SDK开发
模拟接口项目开发
yunfei-api-interface 主要提供模拟接口:
@RestController
@RequestMapping("/name")
public class NameController {

    @GetMapping("/get")
    public String getNameByGet(String name, HttpServletRequest request) {
        System.out.println(request.getHeader("yunfei"));
        return "GET 你的名字是" + name;
    }

    @PostMapping("/post")
    public String getNameByPost(@RequestParam String name) {
        return "POST 你的名字是" + name;
    }

    @PostMapping("/user")
    public String getUsernameByPost(@RequestBody User user, HttpServletRequest request) {
        String result = "POST 用户名字是" + user.getUsername();
        return result;
    }
}
再开发一个Client来调用这些接口
hutool工具库:
https://doc.hutool.cn/pages/index/
public class YunfeiApiClient {
    public static void main(String[] args) {
        YunfeiApiClient client = new YunfeiApiClient();
        client.getNameByGet("yunfei");
        client.getNameByPost("yunfei");
        User user = new User();
        user.setUsername("yunfei");
        client.getUsernameByPost(user);
    }

    public String getNameByGet(String name) {
        HashMap<String, Object> map = new HashMap<>();
        map.put("name", name);
        String res = HttpUtil.get("http://localhost:10002/api/name/get", map);
        System.out.println(res);
        return res;

    }

    public String getNameByPost(String name) {
        HashMap<String, Object> map = new HashMap<>();
        map.put("name", name);
        String res = HttpUtil.post("http://localhost:10002/api/name/post", map);
        System.out.println(res);
        return res;
    }

    public String getUsernameByPost(User user) {
        String json = JSONUtil.toJsonStr(user);
        String res = HttpRequest.post("http://localhost:10002/api/name/user").body(json).execute().body();
        System.out.println(res);
        return res;
    }
}
API签名认证
本质:
- 签发签名
- 使用签名(校验签名)
为什么需要?
- 保证安全性,不能随便一个人调用
怎么实现?
accessKey:调用的标识
secretKey:密钥
密钥 不要在服务器之间直接传递,有可能被拦截
加密方式:对称加密 、非对称加密、md5加密(不可解密)
用户参数+密钥=> 签名算法 =>不可解密的值
怎么知道这个签名对不对 ?
服务端用一摸一样的参数和 算法生成签名,只要和用户传的一致,就表示一致
怎么防止请求重放?
- 加nonce随机数。每个请求只能用一次,服务端要保存用过的随机数
- 加timestamp时间戳,校验时间戳是否过期
签名工具类:
public class SignUtils {
    public static String genSign(String body, String secretKey) {
        Digester digester = new Digester(DigestAlgorithm.SHA256);
        String content = body + "." + secretKey;
        return digester.digestHex(content);
    }
}
在发起请求的代码中 ApiClient:
    String accessKey;
    String secretKey;

    public YunfeiApiClient(String accessKey, String secretKey) {
        this.accessKey = accessKey;
        this.secretKey = secretKey;
    }

    private Map<String, String> getHeaderMap(String body) {
        Map<String, String> headerMap = new HashMap<>();
        headerMap.put("accessKey", accessKey);
        //一定不能直接传递 secretKey//        headerMap.put("secretKey", secretKey);
        headerMap.put("nonce", RandomUtil.randomNumbers(4));
        headerMap.put("timestamp", String.valueOf(System.currentTimeMillis()));
        headerMap.put("sign", SignUtils.genSign(body, secretKey));
        headerMap.put("body", body);
        return headerMap;
    }

    public String getUsernameByPost(User user) {
        String json = JSONUtil.toJsonStr(user);
        String res = HttpRequest.post("http://localhost:10002/api/name/user")
                .addHeaders(getHeaderMap(json))
                .body(json).execute()
                .body();
        System.out.println(res);
        return res;
    }
接口校验密钥,这里应该从数据库查:
@PostMapping("/user")
public String getUsernameByPost(@RequestBody User user, HttpServletRequest request) {
    String accessKey = request.getHeader("accessKey");
    String nonce = request.getHeader("nonce");
    String timestamp = request.getHeader("timestamp");
    String sign = request.getHeader("sign");
    String body = request.getHeader("body");
    String serverSign = SignUtils.genSign(body, "abcdefgh");
    if (!sign.equals(serverSign)) {
        throw new RuntimeException("无权限");
    }
    xxx
}
客户端SDK开发
如果客户每次都要写这么多代码,会变得很麻烦,因此需要写SDK,让用户输入accessKey和secretKey就可以直接调用
开发一个简单的SDK,开发者只需要关心调用哪些接口 ,传递哪些参数,就跟调用自己的代码一样简单。可以直接在application.yml中写配置,自动创建客户端
开发starter步骤:
新建一个项目,添加依赖
		<dependency>
			<groupId>org.springframework.boot</groupId>
			<artifactId>spring-boot-configuration-processor</artifactId>
			<optional>true</optional>
		</dependency>
这个插件 可以自动生成配置代码提示
一定要删除maven 的xml文件中的build内容
客户端配置
/**
 * 客户端配置
 */
@Configuration
@ConfigurationProperties("yunfeiapi.client")
@Data
@ComponentScan
public class YunfeiApiClientConfig {

    private String accessKey;

    private String secretKey;

    @Bean
    public YunfeiApiClient yunfeiapiClient() {
        return new YunfeiApiClient(accessKey, secretKey);
    }
}
将之前的内容复制到新的sdk模块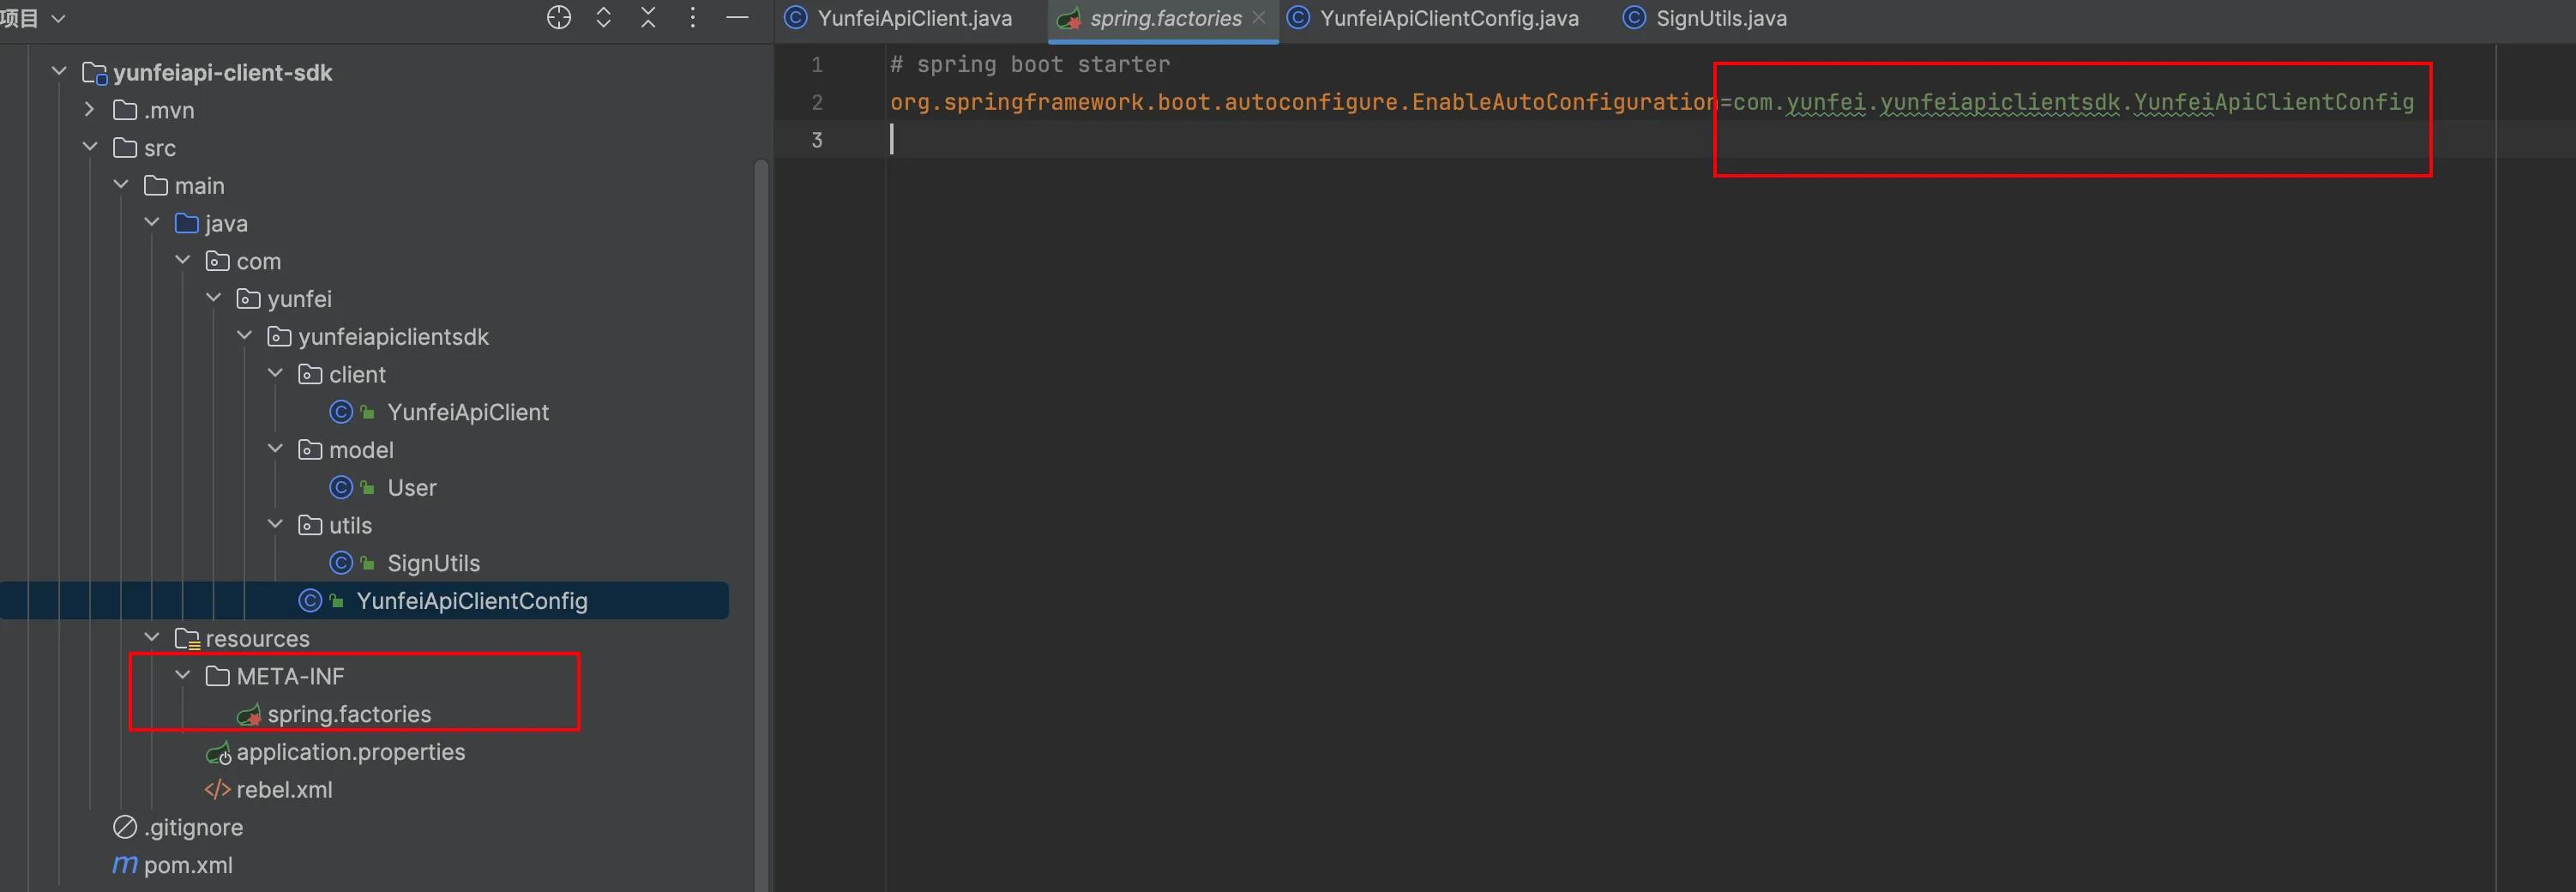
在resourcs目录下面创建一个 META-INF文件夹,里面放spring.factories文件,写上配置类
# spring boot starter
org.springframework.boot.autoconfigure.EnableAutoConfiguration=com.yunfei.yunfeiapiclientsdk.YunfeiApiClientConfig
在将改项目进行打包install到本地 ,注意不要启动测试,因为没有主类了。
测试sdk是否可用
在interface模块中加入sdk依赖
        <dependency>
            <groupId>com.yunfei</groupId>
            <artifactId>yunfeiapi-client-sdk</artifactId>
            <version>0.0.1</version>
        </dependency>
在配置文件中添加配置:
yunfeiapi:
  client:
    access-key: yunfei
    secret-key: abcdefgh
测试:
因为接口调用需要访问10002接口开放的接口,因此后台需要 运行这个服务 ,然后 再启动测试
@SpringBootTest
class yunfeiApiInterfaceApplicationTests {

    @Resource
    private YunfeiApiClient yunfeiapiClient;

    @Test
    void contextLoads() {
        String result = yunfeiapiClient.getNameByGet("yunfei");
        User user = new User();
        user.setUsername("woshinibaba");
        String usernameByPost = yunfeiapiClient.getUsernameByPost(user);
        System.out.println(result);
        System.out.println(usernameByPost);
    }
}
运行结果:
将secretKey换为错误的secret-key: abcdefghdaw
接口功能管理
接口发布/下线
发布接口 :
- 校验接口是否存在
- 判断接口是否可用
- 修改数据库中的状态字段为1
下线接口(仅管理员)
- 检验接口是否存在
- 修改状态字段为0
后端代码 :
    /**
     * 发布
     *
     * @param idRequest
     * @param request
     * @return
     */
    @PostMapping("/online")
    @AuthCheck(mustRole = "admin")
    public BaseResponse<Boolean> onlineInterfaceInfo(@RequestBody IdRequest idRequest,
                                                     HttpServletRequest request) {
        if (idRequest == null || idRequest.getId() <= 0) {
            throw new BusinessException(ErrorCode.PARAMS_ERROR);
        }
        long id = idRequest.getId();
        // 判断是否存在
        InterfaceInfo oldInterfaceInfo = interfaceInfoService.getById(id);
        if (oldInterfaceInfo == null) {
            throw new BusinessException(ErrorCode.NOT_FOUND_ERROR);
        }
        // 判断该接口是否可以调用
        com.yunfei.yunfeiapiclientsdk.model.User user = new com.yunfei.yunfeiapiclientsdk.model.User();
        user.setUsername("test");
        String username = yunfeiapiClient.getUsernameByPost(user);
        if (StringUtils.isBlank(username)) {
            throw new BusinessException(ErrorCode.SYSTEM_ERROR, "接口验证失败");
        }
        // 仅本人或管理员可修改
        InterfaceInfo interfaceInfo = new InterfaceInfo();
        interfaceInfo.setId(id);
        interfaceInfo.setStatus(InterfaceInfoStatusEnum.ONLINE.getValue());
        boolean result = interfaceInfoService.updateById(interfaceInfo);
        return ResultUtils.success(result);
    }

    /**
     * 下线
     *
     * @param idRequest
     * @param request
     * @return
     */
    @PostMapping("/offline")
    @AuthCheck(mustRole = "admin")
    public BaseResponse<Boolean> offlineInterfaceInfo(@RequestBody IdRequest idRequest,
                                                      HttpServletRequest request) {
        if (idRequest == null || idRequest.getId() <= 0) {
            throw new BusinessException(ErrorCode.PARAMS_ERROR);
        }
        long id = idRequest.getId();
        // 判断是否存在
        InterfaceInfo oldInterfaceInfo = interfaceInfoService.getById(id);
        if (oldInterfaceInfo == null) {
            throw new BusinessException(ErrorCode.NOT_FOUND_ERROR);
        }
        // 仅本人或管理员可修改
        InterfaceInfo interfaceInfo = new InterfaceInfo();
        interfaceInfo.setId(id);
        interfaceInfo.setStatus(InterfaceInfoStatusEnum.OFFLINE.getValue());
        boolean result = interfaceInfoService.updateById(interfaceInfo);
        return ResultUtils.success(result);
    }
浏览接口 /查看接口文档,申请签名
主页接口浏览页面:
const Index: React.FC = () => {
  const [loading, setLoading] = useState(false);
  const [list, setList] = useState<API.InterfaceInfo[]>([]);
  const [total, setTotal] = useState<number>(0);

  const loadData = async (current = 1, pageSize = 5) => {
    setLoading(true);
    try {
      const res = await listInterfaceInfoByPageUsingGET({
        current,
        pageSize,
      });
      setList(res?.data?.records ?? []);
      setTotal(res?.data?.total ?? 0);
    } catch (error: any) {
      message.error('请求失败,' + error.message);
    }
    setLoading(false);
  };

  // 这个函数会在组件挂载后执行一次
  useEffect(() => {
    loadData();
  }, []);

  return (
    <PageContainer title="在线接口开放平台">
      <List
        className="my-list"
        loading={loading}
        itemLayout="horizontal"
        dataSource={list}
        renderItem={(item) => {
          const apiLink = `/interface_info/${item.id}`;
          return (
            <List.Item actions={[<a key={item.id} href={apiLink}>查看</a>]}>
              <List.Item.Meta
                title={<a href={apiLink}>{item.name}</a>}
                description={item.description}
              />
            </List.Item>
          );
        }}
        pagination={{
          // eslint-disable-next-line @typescript-eslint/no-shadow
          showTotal(total: number) {
            return '总数:' + total;
          },
          pageSize: 5,
          total,
          onChange(page, pageSize) {
            loadData(page, pageSize);
          },
        }}
      />
    </PageContainer>
  );
};
页面效果 如下:

查看接口文档:
/**
 * 主页
 * @constructor
 */
const Index: React.FC = () => {
  const [loading, setLoading] = useState(false);
  const [data, setData] = useState<API.InterfaceInfo>();
  const [invokeRes, setInvokeRes] = useState<any>();
  const [invokeLoading, setInvokeLoading] = useState(false);

  const params = useParams();

  const loadData = async () => {
    if (!params.id) {
      message.error('参数不存在');
      return;
    }
    setLoading(true);
    try {
      const res = await getInterfaceInfoByIdUsingGET({
        id: Number(params.id),
      });
      setData(res.data);
    } catch (error: any) {
      message.error('请求失败,' + error.message);
    }
    setLoading(false);
  };

  useEffect(() => {
    loadData();
  }, []);

  const onFinish = async (values: any) => {
    if (!params.id) {
      message.error('接口不存在');
      return;
    }
    setInvokeLoading(true);
    try {
      const res = await invokeInterfaceInfoUsingPOST({
        id: params.id,
        ...values,
      });
      setInvokeRes(res.data);
      message.success('请求成功');
    } catch (error: any) {
      message.error('操作失败,' + error.message);
    }
    setInvokeLoading(false);
  };

  return (
    <PageContainer title="查看接口文档">
      <Card>
        {data ? (
          <Descriptions title={data.name} column={1}>
            <Descriptions.Item label="接口状态">{data.status ? '开启' : '关闭'}</Descriptions.Item>
            <Descriptions.Item label="描述">{data.description}</Descriptions.Item>
            <Descriptions.Item label="请求地址">{data.url}</Descriptions.Item>
            <Descriptions.Item label="请求方法">{data.method}</Descriptions.Item>
            <Descriptions.Item label="请求参数">{data.requestParams}</Descriptions.Item>
            <Descriptions.Item label="请求头">{data.requestHeader}</Descriptions.Item>
            <Descriptions.Item label="响应头">{data.responseHeader}</Descriptions.Item>
            <Descriptions.Item label="创建时间">{data.createTime}</Descriptions.Item>
            <Descriptions.Item label="更新时间">{data.updateTime}</Descriptions.Item>
          </Descriptions>
        ) : (
          <>接口不存在</>
        )}
      </Card>
      <Divider/>
      <Card title="在线测试">
        <Form name="invoke" layout="vertical" onFinish={onFinish}>
          <Form.Item label="请求参数" name="userRequestParams">
            <Input.TextArea/>
          </Form.Item>
          <Form.Item wrapperCol={{span: 16}}>
            <Button type="primary" htmlType="submit">
              调用
            </Button>
          </Form.Item>
        </Form>
      </Card>
      <Divider/>
      <Card title="返回结果" loading={invokeLoading}>
        {invokeRes}
      </Card>
    </PageContainer>
  );
};

export default Index;
分配签名:
在注册的时候分配用户的accessKey,secretKey
            // 3. 分配 accessKey, secretKey
            String accessKey = DigestUtil.md5Hex(SALT + userAccount + RandomUtil.randomNumbers(5));
            String secretKey = DigestUtil.md5Hex(SALT + userAccount + RandomUtil.randomNumbers(8));
            // 4. 插入数据
            User user = new User();
            user.setUserAccount(userAccount);
            user.setUserPassword(encryptPassword);
            user.setAccessKey(accessKey);
            user.setSecretKey(secretKey);
            boolean saveResult = this.save(user);
扩展:用户可以申请更换签名
在线调试
请求参数的类型:
[
{"name":"username","type":"string"}
]
前端开发:
const Index: React.FC = () => {
  const [loading, setLoading] = useState(false);
  const [data, setData] = useState<API.InterfaceInfo>();
  const [invokeRes, setInvokeRes] = useState<any>();
  const [invokeLoading, setInvokeLoading] = useState(false);

  const params = useParams();

  const loadData = async () => {
    if (!params.id) {
      message.error('参数不存在');
      return;    }
    setLoading(true);
    try {
      const res = await getInterfaceInfoByIdUsingGET({
        id: Number(params.id),
      });
      setData(res.data);
    } catch (error: any) {
      message.error('请求失败,' + error.message);
    }
    setLoading(false);
  };

  useEffect(() => {
    loadData();
  }, []);

  const onFinish = async (values: any) => {
    if (!params.id) {
      message.error('接口不存在');
      return;    }
    setInvokeLoading(true);
    try {
      const res = await invokeInterfaceInfoUsingPOST({
        id: params.id,
        ...values,
      });
      setInvokeRes(res.data);
      message.success('请求成功');
    } catch (error: any) {
      message.error('操作失败,' + error.message);
    }
    setInvokeLoading(false);
  };

  return (
    <PageContainer title="查看接口文档">
      <Card>        {data ? (
          <Descriptions title={data.name} column={1}>
            <Descriptions.Item label="接口状态">{data.status ? '开启' : '关闭'}</Descriptions.Item>
            <Descriptions.Item label="描述">{data.description}</Descriptions.Item>
            <Descriptions.Item label="请求地址">{data.url}</Descriptions.Item>
            <Descriptions.Item label="请求方法">{data.method}</Descriptions.Item>
            <Descriptions.Item label="请求参数">{data.requestParams}</Descriptions.Item>
            <Descriptions.Item label="请求头">{data.requestHeader}</Descriptions.Item>
            <Descriptions.Item label="响应头">{data.responseHeader}</Descriptions.Item>
            <Descriptions.Item label="创建时间">{data.createTime}</Descriptions.Item>
            <Descriptions.Item label="更新时间">{data.updateTime}</Descriptions.Item>
          </Descriptions>        ) : (
          <>接口不存在</>
        )}
      </Card>
      <Divider/>      <Card title="在线测试">
        <Form name="invoke" layout="vertical" onFinish={onFinish}>
          <Form.Item label="请求参数" name="userRequestParams">
            <Input.TextArea/>          </Form.Item>          <Form.Item wrapperCol={{span: 16}}>
            <Button type="primary" htmlType="submit">
              调用
            </Button>
          </Form.Item>        </Form>      </Card>      <Divider/>      <Card title="返回结果" loading={invokeLoading}>
        {invokeRes}
      </Card>
    </PageContainer>  );
};

export default Index;
效果: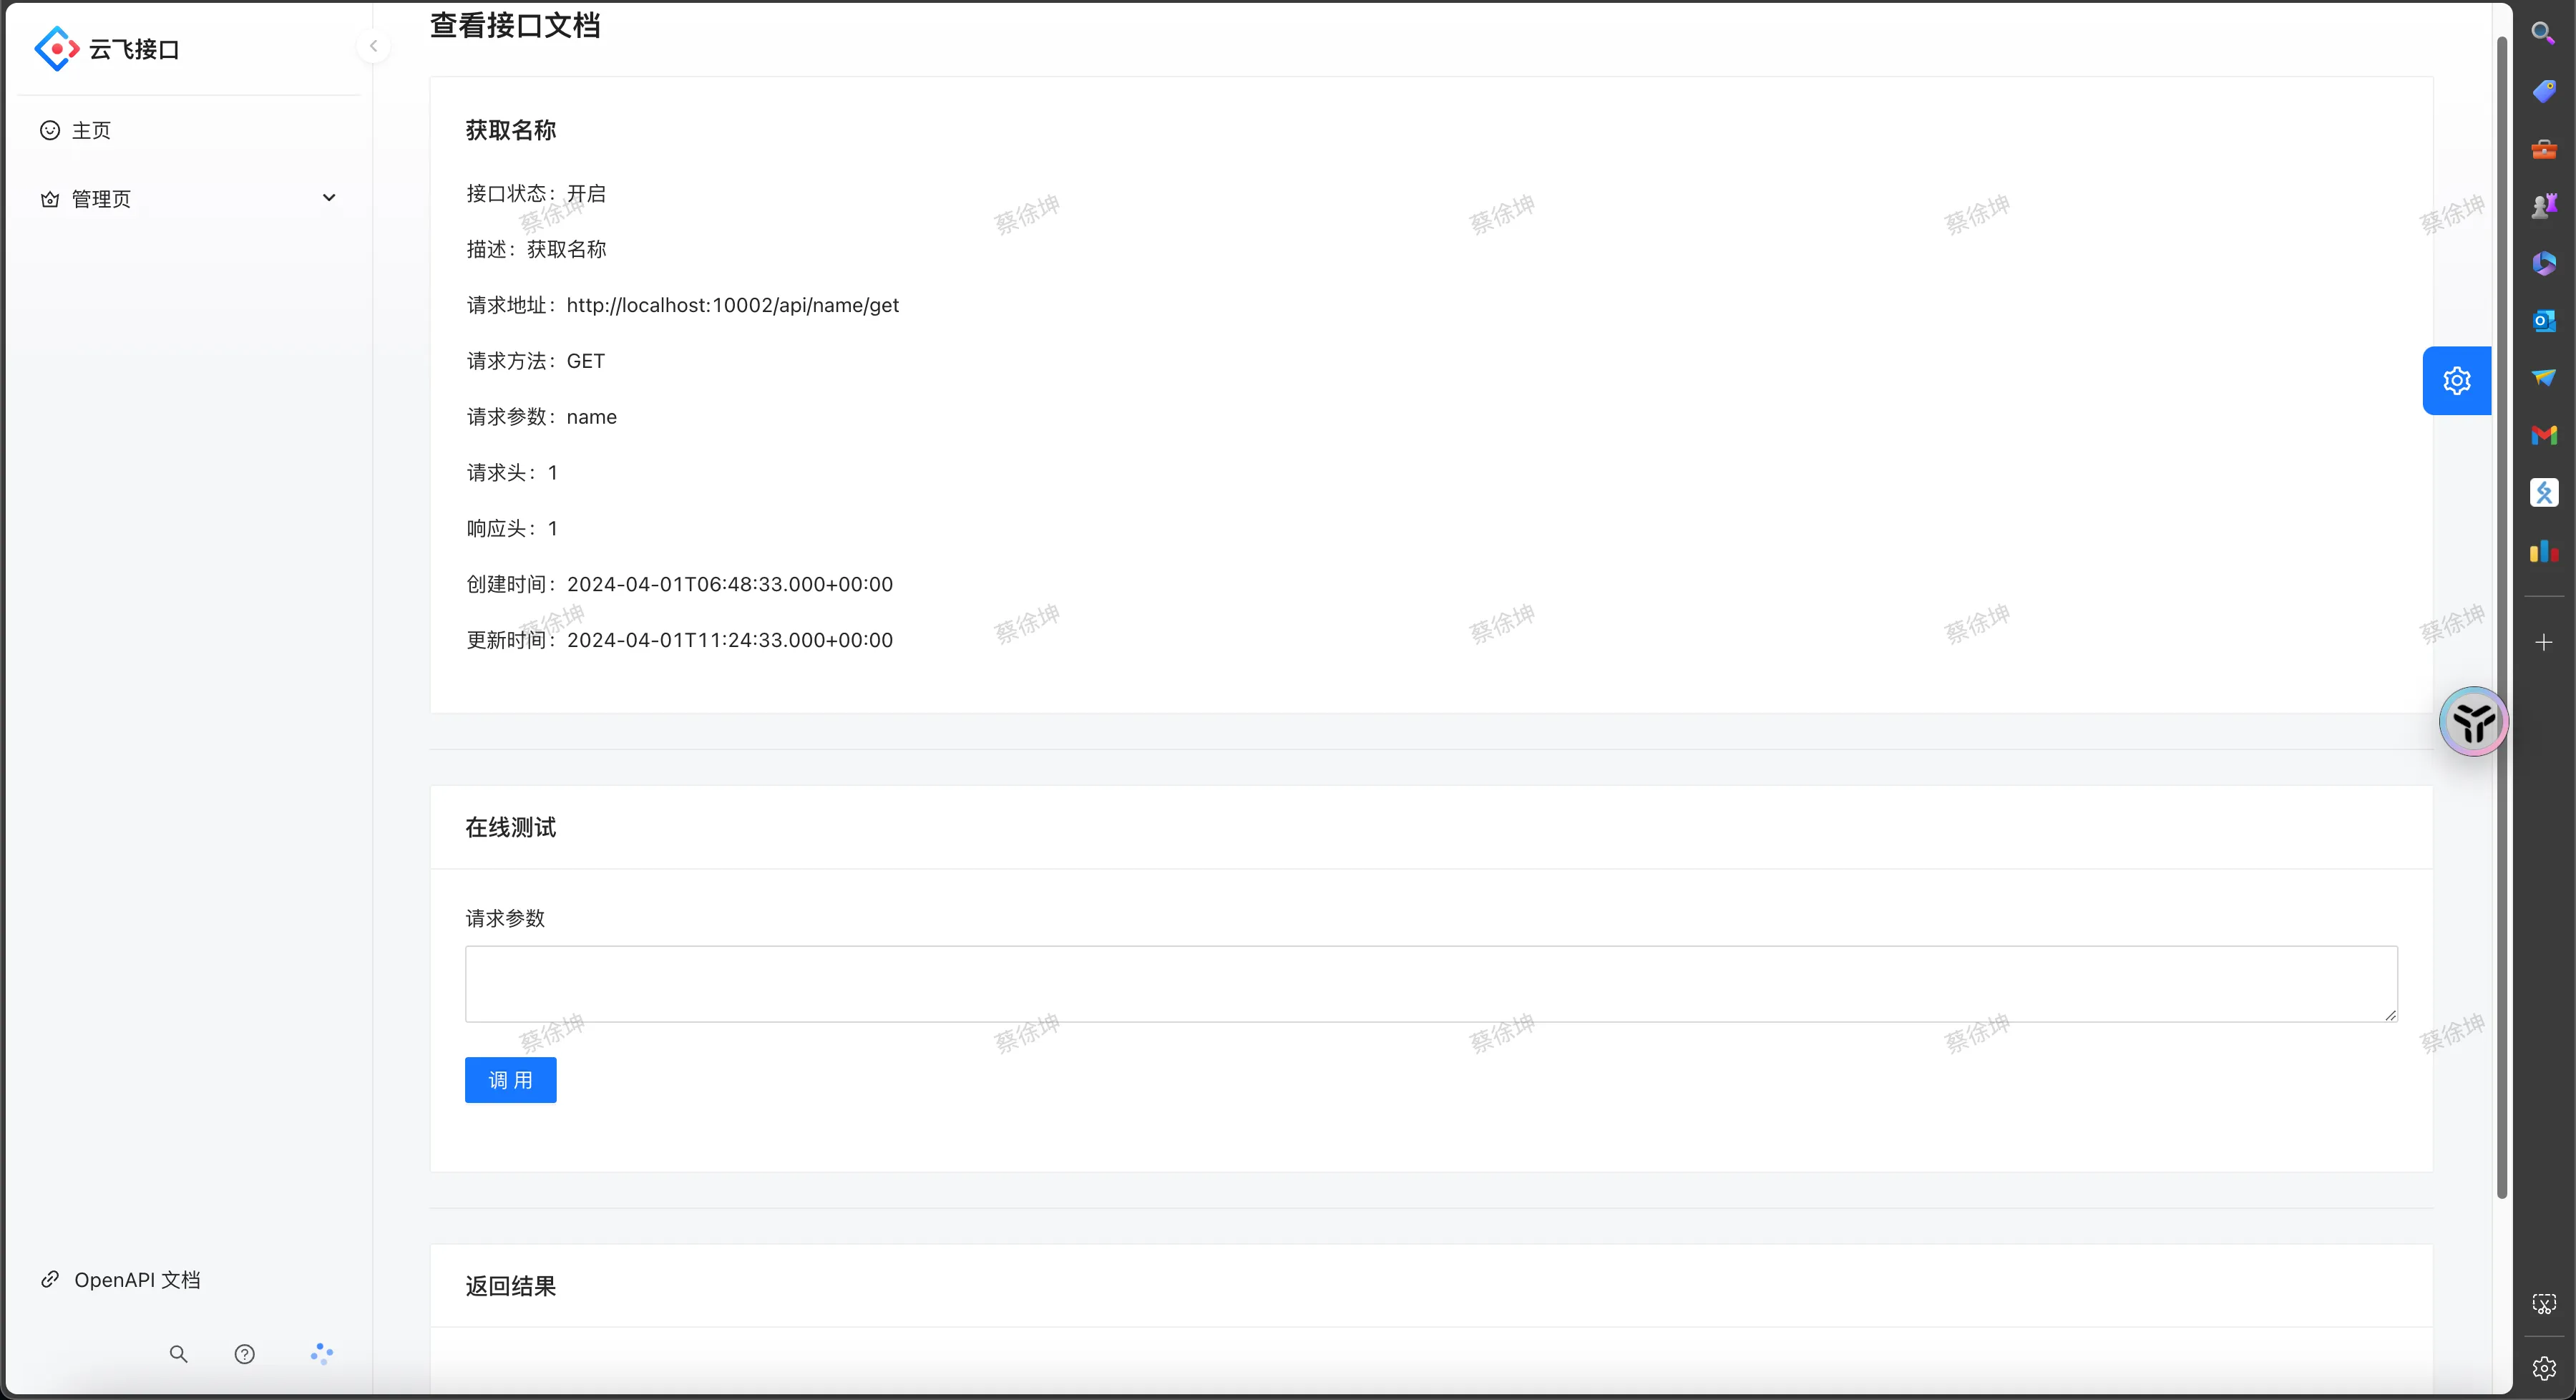
优化:可以做类似knife4j的效果
在线调试后端:
    /**
     * 测试调用
     *
     * @param interfaceInfoInvokeRequest
     * @param request
     * @return
     */
    @PostMapping("/invoke")
    public BaseResponse<Object> invokeInterfaceInfo(@RequestBody InterfaceInfoInvokeRequest interfaceInfoInvokeRequest,
                                                     HttpServletRequest request) {
        if (interfaceInfoInvokeRequest == null || interfaceInfoInvokeRequest.getId() <= 0) {
            throw new BusinessException(ErrorCode.PARAMS_ERROR);
        }
        long id = interfaceInfoInvokeRequest.getId();
        String userRequestParams = interfaceInfoInvokeRequest.getUserRequestParams();
        // 判断是否存在
        InterfaceInfo oldInterfaceInfo = interfaceInfoService.getById(id);
        if (oldInterfaceInfo == null) {
            throw new BusinessException(ErrorCode.NOT_FOUND_ERROR);
        }
        if (oldInterfaceInfo.getStatus() == InterfaceInfoStatusEnum.OFFLINE.getValue()) {
            throw new BusinessException(ErrorCode.PARAMS_ERROR, "接口已关闭");
        }
        User loginUser = userService.getLoginUser(request);
        String accessKey = loginUser.getAccessKey();
        String secretKey = loginUser.getSecretKey();
        YunfeiApiClient tempClient = new YunfeiApiClient(accessKey, secretKey);
        Gson gson = new Gson();
       com.yunfei.yunfeiapiclientsdk.model.User user = gson.fromJson(userRequestParams, com.yunfei.yunfeiapiclientsdk.model.User.class);
        String usernameByPost = tempClient.getUsernameByPost(user);
        return ResultUtils.success(usernameByPost);
    }
系统架构优化
统计用户调用接口次数
开发接口调用次数统计,用户每次调用成功,次数+1
业务流程:
- 用户每次调用接口成功,次数+1
- 给用户分配或用户自主申请接口调用次数
用户接口关系表user_interface_info:
| 字段 | 类型 | 说明 |
|---|---|---|
| id | bigint | 主键 |
| userId | bigint | 调用用户id |
| interfaceInfoId | bigint | 接口id |
| totalNum | int | 总调用次数 |
| leftNum | int | 剩余调用次数 |
| status | int | 0-正常 1-禁用 |
| createTime | datetime | 创建时间 |
| updateTime | datetime | 更新时间 |
| isDelete | tinyint | 是否删除 |
接口次数+1
后端代码:
    @Override
    public boolean invokeCount(long interfaceInfoId, long userId) {
        // 判断
        if (interfaceInfoId <= 0 || userId <= 0) {
            throw new BusinessException(ErrorCode.PARAMS_ERROR);
        }
        UpdateWrapper<UserInterfaceInfo> updateWrapper = new UpdateWrapper<>();
        updateWrapper.eq("interfaceInfoId", interfaceInfoId);
        updateWrapper.eq("userId", userId);

//        updateWrapper.gt("leftNum", 0);
        updateWrapper.setSql("leftNum = leftNum - 1, totalNum = totalNum + 1");
        return this.update(updateWrapper);
    }
如何在每次调用接口的时候统计次数?
- 使用AOP
- 网关
AOP切面:
使用AOP切面的优点:独立于接口,在每个接口调用后统计次数+1
AOP切面的缺点:只存在于单个项目中,如果每个团队都要开发自己的模拟接口,那么都要写一个切面
网关:
统一去处理一些问题
API网关
网关的作用:
- 路由: 网关可以根据请求的目标地址将请求路由到相应的后端服务。
- 鉴权: 网关可以对请求进行身份验证和权限验证,确保只有经过授权的用户可以访问特定资源。
- 跨域: 网关可以处理跨域请求,允许客户端从不同的源(域)访问服务端资源。
- 缓存: 网关可以缓存经常请求的数据,减少对后端服务的请求,提高系统性能。
- 流量染色: 网关可以对流量进行标记,以便后续的分析和处理、一般在请求头中加新的请求头。
- 访问控制: 网关可以根据配置规则对请求进行访问控制,包括允许或拒绝特定条件下的请求、DDos。
- 统一业务处理: 网关可以对请求进行统一的预处理和后处理,如请求参数处理、响应格式统一等。
- 发布控制: 网关可以控制服务的发布,确保新版本的服务在就绪后才会接收到流量。
- 负载均衡: 网关可以将请求分发到多个后端服务实例,以平衡负载并提高系统的可用性和性能。
- 接口保护:
- 限制请求:对请求进行限制,以防止恶意或异常请求。
- 信息脱敏:对返回给客户端的数据进行脱敏处理,保护用户隐私。
- 降级(熔断):在系统负载过高或出现故障时,暂时关闭或降级服务,以防止系统崩溃。
- 限流:对请求进行限流,以避免过载和性能下降。(令牌桶算法、漏桶算法、RedisLimitHandler)
- 超时时间:设置请求超时时间,防止长时间的请求占用资源。
- 统一日志: 网关可以记录所有请求和响应的日志,方便监控和故障排查。
- 统一文档: 网关可以生成和管理服务的文档,提供统一的接口文档给开发者参考。
负载均衡:uri从固定地址改成:lb:xxx
发布控制:灰度发布,比如上线新接口,先给新接口分配20%的流量,老接口80%,再慢慢调整比重。
网关分类:
- 全局网关(接入层网关):作用是负载均衡、请求日志等,不和业务逻辑绑定
- 业务网关(微服务网关):会有一些业务逻辑,作用是将请求转发到不同的业务/项目/接口/服务
实现:
- Nginx(全局网关)、Kong网关(API网关)
- Spring Cloud Gateway(取代了Zuul)性能高、可以用Java代码来写逻辑
Spring Cloud Gateway:https://spring.io/projects/spring-cloud-gateway/
路由(根据什么条件,转发请求到哪里)
断言:一组规则、条件,用来确定如何转发路由
过滤器:对请求进行一系列的处理,比如添加请求头、添加请求参数
处理流程:
- 客户端发起请求
- Handler Mapping:根据断言,去将请求转发到对应的路由
- Web Handler:处理请求(一层层过滤器)
- 实际调用
两种配置方式:
- 编程式
- 配置式
网关全部日志开启:
logging:
  level:
    org:
      springframework:
        cloud:
          gateway: trace
断言:
- After在x时间之后
- Before在x时间之前
- Between在x时间之间
- 请求类别
- 请求头(包含Cookie)
- 查询参数
- 客户端地址
- 权重
过滤器:
基本功能:对请求头、请求参数、响应头的增删改查
- 添加请求头
- 添加请求参数
- 添加响应头
- 降级
- 限流
- 重试
具体实现:
前缀匹配路由
所有路径为:/api/**的请求进行转发,转发到 http://localhost:10002/api/**
比如网关请求http://localhost:10001/api/name/get?name=cxk转发到http://localhost:10002/api/name/get?name=cxk
interface后端端口为:10002
网关后端端口为:10001
routes:
  - id: api_route
    uri: http://localhost:10002
    predicates:
      - Path=/api/**
    filters:
      - AddRequestHeader=yunfei, swag
      - AddRequestParameter=name, dog
      - name: CircuitBreaker
        args:
          name: myCircuitBreaker
          fallbackUri: forward:/fallback
@GetMapping("/get")
public String getNameByGet(String name, HttpServletRequest request) {
    System.out.println(request.getHeader("yunfei"));
    String name1 = request.getParameter("name");
    System.out.println("name1="+name1);
    return "GET 你的名字是" + name;
}
降级:
        <dependency>
            <groupId>org.springframework.cloud</groupId>
            <artifactId>spring-cloud-starter-circuitbreaker-reactor-resilience4j</artifactId>
        </dependency>
使用GlobalFilter全局拦截处理
业务逻辑:
- 用户发送请求到API网关
- 请求日志
- (黑白名单)
- 用户鉴权(判断ak、sk是否合法)
- 请求的模拟接口是否存在?
- 请求转发,调用模拟接口
- 响应日志
- 调用成功,接口调用次数+1
- 调用失败,返回一个规范的错误码
具体实现:
前缀匹配路由:所有路径为:/api/的请求进行转发,转发到 http://localhost:10002/api/**
比如网关请求http://localhost:10001/api/name/get?name=cxk转发到http://localhost:10002/api/name/get?name=cxk
interface后端端口为:10002
网关后端端口为:10001
gateway:
  default-filters:
    - AddResponseHeader=source, yunfei
  routes:
    - id: api_route
      uri: http://localhost:10002
      predicates:
        - Path=/api/**
网关代码:
/**
 * 全局过滤
 *
 * * */@Slf4j
@Component
public class CustomGlobalFilter implements GlobalFilter, Ordered {

    @DubboReference
    private InnerUserService innerUserService;

    @DubboReference
    private InnerInterfaceInfoService innerInterfaceInfoService;

    @DubboReference
    private InnerUserInterfaceInfoService innerUserInterfaceInfoService;

    private static final List<String> IP_WHITE_LIST = Arrays.asList("127.0.0.1","0:0:0:0:0:0:0:1%0");

    private static final String INTERFACE_HOST = "http://localhost:10002";

    @Override
    public Mono<Void> filter(ServerWebExchange exchange, GatewayFilterChain chain) {
        // 1. 请求日志
        ServerHttpRequest request = exchange.getRequest();
        String path = INTERFACE_HOST + request.getPath().value();
        String method = request.getMethod().toString();
        log.info("请求唯一标识:" + request.getId());
        log.info("请求路径:" + path);
        log.info("请求方法:" + method);
        log.info("请求参数:" + request.getQueryParams());
        String sourceAddress = request.getLocalAddress().getHostString();
        log.info("请求来源地址:" + sourceAddress);
        log.info("请求来源地址:" + request.getRemoteAddress());
        ServerHttpResponse response = exchange.getResponse();
        // 2. 访问控制 - 黑白名单
        if (!IP_WHITE_LIST.contains(sourceAddress)) {
            response.setStatusCode(HttpStatus.FORBIDDEN);
            return response.setComplete();
        }
        // 3. 用户鉴权(判断 ak、sk 是否合法)
        HttpHeaders headers = request.getHeaders();
        String accessKey = headers.getFirst("accessKey");
        String nonce = headers.getFirst("nonce");
        String timestamp = headers.getFirst("timestamp");
        String sign = headers.getFirst("sign");
        String body = headers.getFirst("body");
        // todo 实际情况应该是去数据库中查是否已分配给用户
        User invokeUser = null;
        try {
            invokeUser = innerUserService.getInvokeUser(accessKey);
        } catch (Exception e) {
            log.error("getInvokeUser error", e);
        }
        if (invokeUser == null) {
            return handleNoAuth(response);
        }
//        if (!"yunfei".equals(accessKey)) {
//            return handleNoAuth(response);
//        }
        if (Long.parseLong(nonce) > 10000L) {
            return handleNoAuth(response);
        }
        // 时间和当前时间不能超过 5 分钟
        Long currentTime = System.currentTimeMillis() / 1000;
        final Long FIVE_MINUTES = 60 * 5L;
        if ((currentTime - Long.parseLong(timestamp)) >= FIVE_MINUTES) {
            return handleNoAuth(response);
        }
        // 实际情况中是从数据库中查出 secretKey        String secretKey = invokeUser.getSecretKey();
        String serverSign = SignUtils.genSign(body, secretKey);
        if (sign == null || !sign.equals(serverSign)) {
            return handleNoAuth(response);
        }
        // 4. 请求的模拟接口是否存在,以及请求方法是否匹配
        InterfaceInfo interfaceInfo = null;
        try {
            interfaceInfo = innerInterfaceInfoService.getInterfaceInfo(path, method);
        } catch (Exception e) {
            log.error("getInterfaceInfo error", e);
        }
        if (interfaceInfo == null) {
            return handleNoAuth(response);
        }
    }

    /**
     * 处理响应
     *
     * @param exchange
     * @param chain
     * @return
     */
    public Mono<Void> handleResponse(ServerWebExchange exchange, GatewayFilterChain chain, long interfaceInfoId, long userId) {
        try {
            ServerHttpResponse originalResponse = exchange.getResponse();
            // 缓存数据的工厂
            DataBufferFactory bufferFactory = originalResponse.bufferFactory();
            // 拿到响应码
            HttpStatus statusCode = originalResponse.getStatusCode();
            if (statusCode == HttpStatus.OK) {
                // 装饰,增强能力
                ServerHttpResponseDecorator decoratedResponse = new ServerHttpResponseDecorator(originalResponse) {
                    // 等调用完转发的接口后才会执行
                    @Override
                    public Mono<Void> writeWith(Publisher<? extends DataBuffer> body) {
                        log.info("body instanceof Flux: {}", (body instanceof Flux));
                        if (body instanceof Flux) {
                            Flux<? extends DataBuffer> fluxBody = Flux.from(body);
                            // 往返回值里写数据
                            // 拼接字符串
                            return super.writeWith(
                                    fluxBody.map(dataBuffer -> {
                                        // 7. 调用成功,接口调用次数 + 1 invokeCount                                        try {
                                            innerUserInterfaceInfoService.invokeCount(interfaceInfoId, userId);
                                        } catch (Exception e) {
                                            log.error("invokeCount error", e);
                                        }
                                        byte[] content = new byte[dataBuffer.readableByteCount()];
                                        dataBuffer.read(content);
                                        DataBufferUtils.release(dataBuffer);//释放掉内存
                                        // 构建日志
                                        StringBuilder sb2 = new StringBuilder(200);
                                        List<Object> rspArgs = new ArrayList<>();
                                        rspArgs.add(originalResponse.getStatusCode());
                                        String data = new String(content, StandardCharsets.UTF_8); //data
                                        sb2.append(data);
                                        // 打印日志
                                        log.info("响应结果:" + data);
                                        return bufferFactory.wrap(content);
                                    }));
                        } else {
                            // 8. 调用失败,返回一个规范的错误码
                            log.error("<--- {} 响应code异常", getStatusCode());
                        }
                        return super.writeWith(body);
                    }
                };
                // 设置 response 对象为装饰过的
                return chain.filter(exchange.mutate().response(decoratedResponse).build());
            }
            return chain.filter(exchange); // 降级处理返回数据
        } catch (Exception e) {
            log.error("网关处理响应异常" + e);
            return chain.filter(exchange);
        }
    }

    @Override
    public int getOrder() {
        return -1;
    }

    public Mono<Void> handleNoAuth(ServerHttpResponse response) {
        response.setStatusCode(HttpStatus.FORBIDDEN);
        return response.setComplete();
    }
}
分布式改造
网关业务逻辑:
问题:网关项目比较纯净,没有操作数据库的包,并且还要调用我们之前写过的代码?复制粘贴维护麻烦。
理想:直接请求到其他项目的方法
怎么调用其他项目的方法
- 复制代码,环境,依赖
- HTTP请求,提供一个接口,供其他项目调用
- RPC
- 把公共代码打jar包,其他项目引用,客户端SDK
HTTP请求怎么调用
- 提供方开发一个接口
- 调用方使用HTTP请求
RPC远程调用
作用:像调用本地方法一样调用远程方法
对开发者更透明,减少了很多额沟通成本
RPC向远程服务器发送请求时,未必要使用HTTP协议
Dubbo框架
https://cn.dubbo.apache.org/zh-cn/overview/quickstart/
两种使用方式:
- Spring Boot代码(注解+编程式):写Jav妾口,服务提供者和消费者都去引用这个接口
- IDL(接口调用语言):创建一个公共的接口定义文件,服务提供者和消费者读取这个文件。优点是跨语言,所有的框架都认识
整合运用:
- backend项目作为服务提供者,提供3个方法:
- 实际情况应该是去数据库中查是否已分配给用户
- 从数据库中查询模拟接口是否存在,以及请求方法是否匹配(还可以校验请求参数)
- 调用成功,接口调用次数+1 invokeCount
- gateway项目作为服务调用者,调用这3个方法
nacos做注册中心
注意:
- 服务接口类必须要在同一个包下,建议是抽象出一个公共项目(放接口、实体类等)
- 设置注解(比如启动类的EnableDubbo、接口大现类和Bean引用的注解)
- 添加配置
- 服务调用项目和提供者项目尽量引入相同的依赖和配置
yunfei-api-back项目中:
        <!-- https://mvnrepository.com/artifact/org.apache.dubbo/dubbo -->
        <dependency>
            <groupId>org.apache.dubbo</groupId>
            <artifactId>dubbo</artifactId>
            <version>3.0.9</version>
        </dependency>
        <dependency>
            <groupId>com.alibaba.nacos</groupId>
            <artifactId>nacos-client</artifactId>
            <version>2.1.0</version>
        </dependency>
配置
dubbo:
  application:
    name: dubbo-springboot-demo-provider
  protocol:
    name: dubbo
    port: -1
  registry:
    id: nacos-registry
    address: nacos://localhost:8848
yunfei-api-gateway模块下面:
        <!-- https://mvnrepository.com/artifact/org.apache.dubbo/dubbo -->
        <dependency>
            <groupId>org.apache.dubbo</groupId>
            <artifactId>dubbo</artifactId>
            <version>3.0.9</version>
        </dependency>
        <dependency>
            <groupId>com.alibaba.nacos</groupId>
            <artifactId>nacos-client</artifactId>
            <version>2.1.0</version>
        </dependency>
配置:
dubbo:
  application:
    name: dubbo-springboot-demo-provider
  protocol:
    name: dubbo
    port: -1
  registry:
    id: nacos-registry
    address: nacos://localhost:8848
主类开启,每个要远程调用的主类都要
@EnableDubbo
public class MyApplication
在公共模块中编写接口yunfei-api-common:
public interface InnerInterfaceInfoService {
    /**
     * 从数据库中查询模拟接口是否存在(请求路径、请求方法、请求参数)
     */
    InterfaceInfo getInterfaceInfo(String path, String method);
}
public interface InnerUserInterfaceInfoService {

    /**
     * 调用接口统计
     * @param interfaceInfoId
     * @param userId
     * @return
     */
    boolean invokeCount(long interfaceInfoId, long userId);
}
public interface InnerUserService {

    /**
     * 数据库中查是否已分配给用户秘钥(accessKey)
     * @param accessKey
     * @return
     */
    User getInvokeUser(String accessKey);
}
在yunfei-api-back项目中实现这些接口的具体内容。
@DubboService
public class InnerInterfaceInfoServiceImpl implements InnerInterfaceInfoService
在网关项目中就可以进行调用了:
@DubboReference
private InnerUserService innerUserService;
