Android开发
Android
考试复习
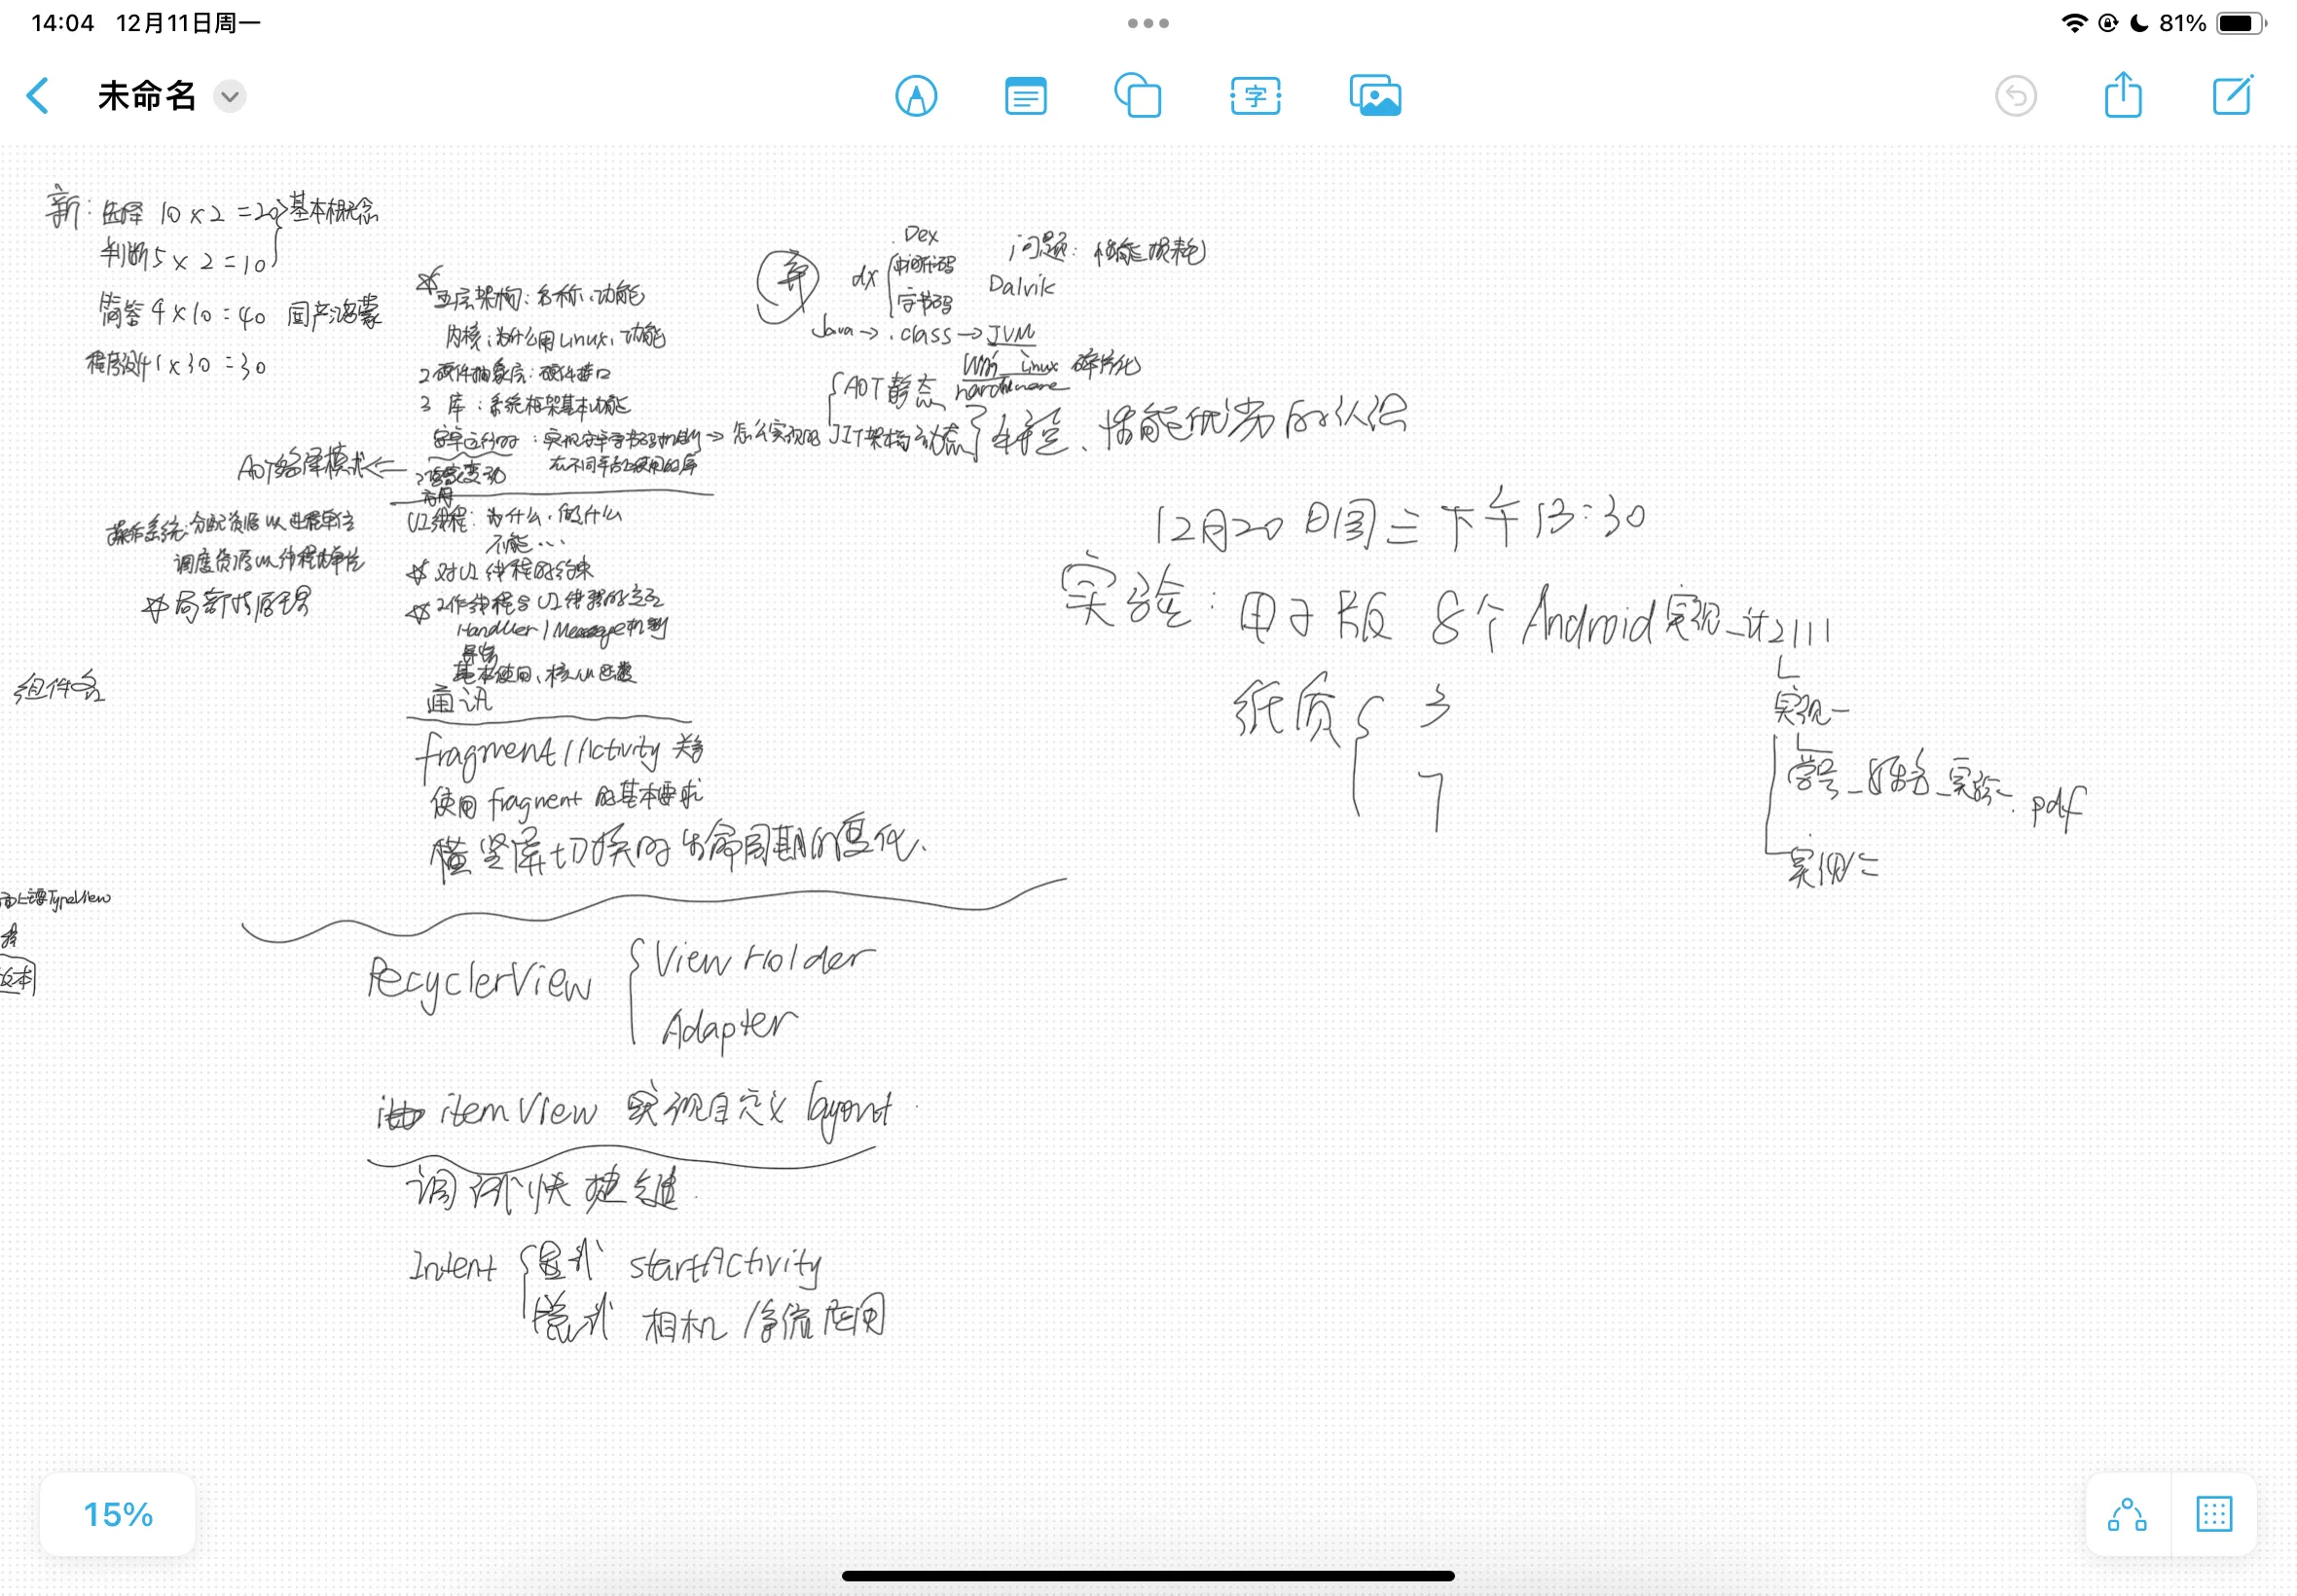
简答题
五层架构
官网:https://developer.android.google.cn/guide/platform?hl=zh-cn

从上往下:
- 应用层(System Apps):系统应用层,系统内置的应用程序以及非系统级的应用程序,如相机,日历,支付宝,微信
- 应用架构层(Java API Framework):为开发人员提供了开发应用程序所需要的API,这一层是由Java代码编写的,可以称为Java Framework,如Activity Manager,Resource Manager
- 系统运行库:Native C/C++ Libraries:C/C++程序库,Android Runtime:Android运行时库。许多核心 Android 系统组件和服务(例如 ART 和 HAL)构建自原生代码,需要以 C 和 C++ 编写的原生库。Android 平台提供 Java 框架 API 以向应用显示其中部分原生库的功能。Android Runtime:运行时库 , Dalvik虚拟机是Google等厂商合作开发的Android移动设备平台的核心组成部分之一
- Hardware Abstraction Layer:硬件抽象层(HAL):提供标准界面,向更高级别的 Java API 框架显示设备硬件功能。
- Linux Kernel:Linux内核层。Android 的核心系统服务基于Linux 内核,在此基础上添加了部分Android专用的驱动。系统的安全性、内存管理、进程管理、网络协议栈和驱动模型等都依赖于该内核。
进程与线程
官网:https://developer.android.google.cn/guide/components/processes-and-threads?hl=zh-cn
当应用组件启动且该应用未运行任何其他组件时,Android 系统会使用单个执行线程为应用启动新的 Linux 进程。默认情况下,同一应用的所有组件会在相同的进程和线程(称为“主”线程)中运行。
启动应用时,系统会为该应用创建一个称为“main”(主线程)的执行线程。此线程非常重要,因为其负责将事件分派给相应的界面微件,其中包括绘图事件。此外,应用与 Android 界面工具包组件(来自 android.widget 和 android.view 软件包的组件)也几乎都在该线程中进行交互。因此,主线程有时也称为界面线程。但在一些特殊情况下,应用的主线程可能并非其界面线程
系统不会为每个组件实例创建单独的线程。在同一进程中运行的所有组件均在界面线程中进行实例化,并且对每个组件的系统调用均由该线程进行分派。因此,响应系统回调的方法(例如,报告用户操作的 onKeyDown() 或生命周期回调方法)始终在进程的界面线程中运行。例如,当用户轻触屏幕上的按钮时,应用的界面线程会将轻触事件分派给微件,而微件转而会设置其按下状态,并将失效请求发布到事件队列中。界面线程从队列中取消该请求,并通知该微件对其自身进行重绘。
当应用执行繁重的任务以响应用户交互时,除非您正确实现应用,否则这种单线程模式可能会导致性能低下。具体地讲,如果界面线程需要处理所有任务,则执行耗时较长的操作(例如,网络访问或数据库查询)将会阻塞整个界面线程。一旦被阻塞,线程将无法分派任何事件,包括绘图事件。从用户的角度来看,应用会显示为挂起状态。更糟糕的是,如果界面线程被阻塞超过几秒钟时间(目前大约是 5 秒钟),用户便会看到令人厌烦的“应用无响应”(ANR) 对话框。如果引起用户不满,他们可能就会决定退出并卸载此应用。
此外,Android 界面工具包并非线程安全工具包。所以您不得通过工作线程操纵界面,而只能通过界面线程操纵界面。因此,Android 的单线程模式必须遵守两条规则:
- 不要阻塞 UI 线程
- 不要在 UI 线程之外访问 Android UI 工具包
考试要考这两点
使用 AsyncTask
AsyncTask 允许对界面执行异步操作。它会先阻塞工作线程中的操作,然后在界面线程中发布结果,而无需您亲自处理线程和/或处理程序。
如要使用该类,您必须创建 AsyncTask 的子类并实现 doInBackground() 回调方法,该方法会在后台线程池中运行。如要更新界面,您应实现 onPostExecute()(该方法会传递 doInBackground() 返回的结果并在界面线程中运行),以便安全更新界面。然后,您可以通过从界面线程调用 execute() 来运行任务。
public class MainActivity extends AppCompatActivity {

    private ProgressBar bar = null;
    private String filename;
    private DownloadTask downloadtask = null;

    @Override
    protected void onCreate(Bundle savedInstanceState) {
        super.onCreate(savedInstanceState);
        // 设置布局文件
        setContentView(R.layout.activity_main);
        // 初始化进度条
        bar = (ProgressBar) findViewById(R.id.progressBar);
    }

    // 点击下载按钮触发的方法
    public void onDownload(View v) {
        // 设置要下载的文件名
        filename = "test.bmp";
        // 创建并执行下载任务
        downloadtask = new DownloadTask();
        downloadtask.execute(filename);
    }

    // 点击取消按钮触发的方法
    public void onCancel(View v) {
        // 取消当前下载任务
        downloadtask.cancel(false);
    }

    // 自定义的异步任务类,继承自AsyncTask
    class DownloadTask extends AsyncTask<String, Integer, Boolean> {
        // 后台线程执行文件下载操作
        @Override
        protected Boolean doInBackground(String... params) {
            // 输出日志,表示开始下载文件
            Log.i("MyTest", "开始下载文件:" + params[0]);
            // 模拟文件下载过程,循环执行100次
            for (int i = 1; i <= 100; i++) {
                // 检查任务是否被取消
                if (isCancelled()) {
                    return false;
                }
                // 输出日志,表示下载进度
                Log.i("MyTest", "下载进度:" + i);
                try {
                    // 模拟文件下载过程中的延迟
                    Thread.sleep(20);
                } catch (InterruptedException e) {
                    // 异常处理
                    e.printStackTrace();
                }
                // 以当前的i模拟已经下载的文件大小,通知UI更新下载进度
                publishProgress(i);
            }
            // 下载完成,返回true
            return true;
        }

        // 执行任务前的准备工作
        @Override
        protected void onPreExecute() {
            super.onPreExecute();
        }

        // 任务执行完成后的处理
        @Override
        protected void onPostExecute(Boolean result) {
            // 根据下载结果显示相应的提示信息
            if (result) {
                Toast.makeText(getApplicationContext(), "文件下载成功", Toast.LENGTH_LONG).show();
            } else {
                Toast.makeText(getApplicationContext(), "文件下载失败", Toast.LENGTH_LONG).show();
            }
            super.onPostExecute(result);
        }

        // 更新下载进度时调用,用于更新UI上的ProgressBar
        @Override
        protected void onProgressUpdate(Integer... values) {
            bar.setProgress(values[0]);
            super.onProgressUpdate(values);
        }

        // 任务被取消时的处理
        @Override
        protected void onCancelled(Boolean result) {
            // 显示取消下载的提示信息
            Toast.makeText(getApplicationContext(), "文件下载取消", Toast.LENGTH_SHORT).show();
            // 将ProgressBar重置为0
            bar.setProgress(0);
            super.onCancelled(result);
        }
    }
}
线程安全:
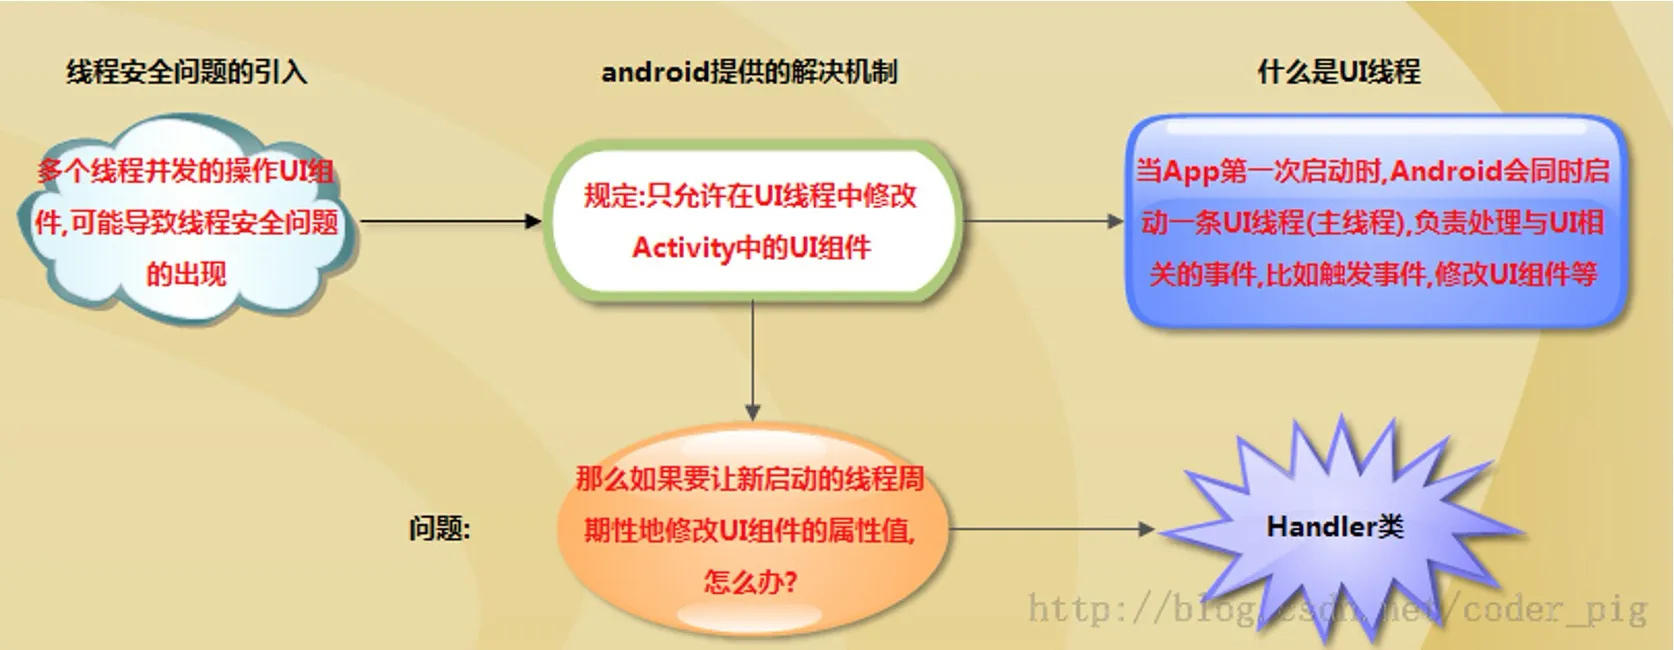
博客:连接
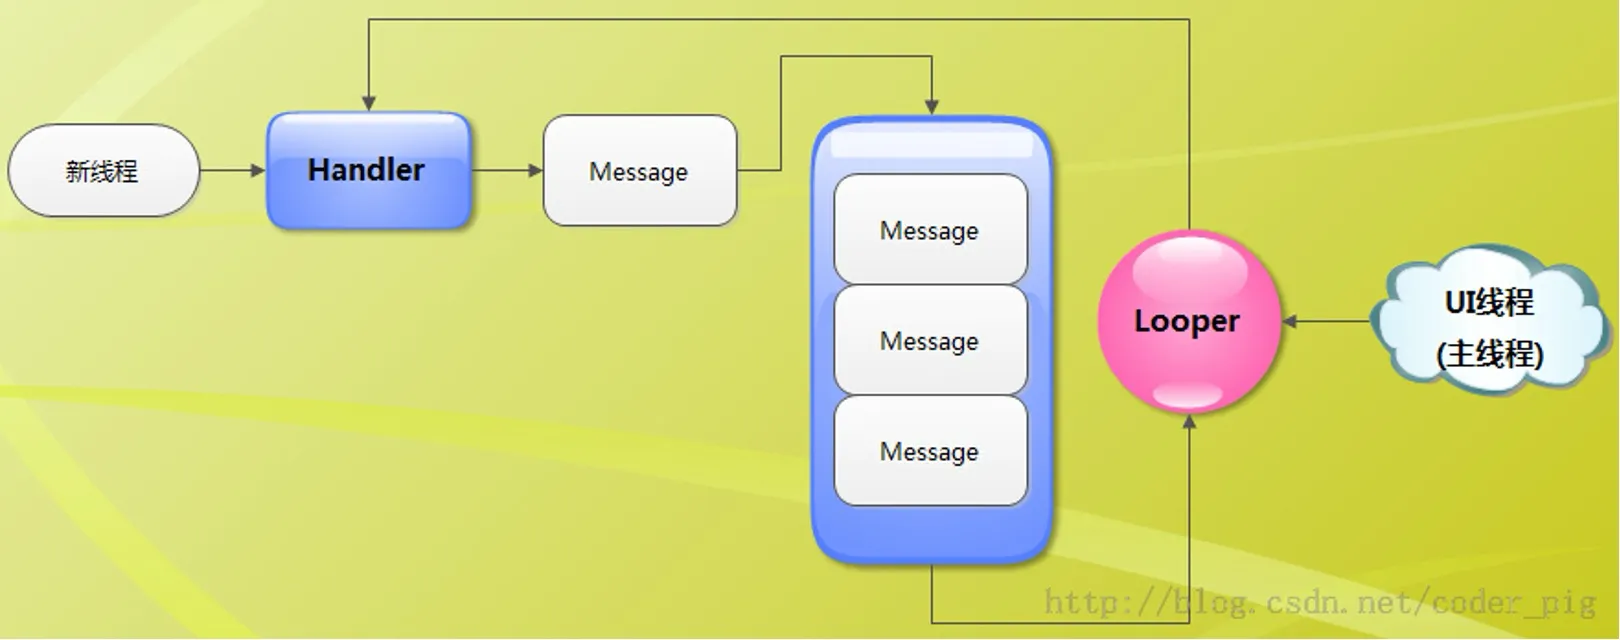
public class MainActivity2 extends AppCompatActivity {


    private TextView cxk;
    private int count =1;

    @Override
    protected void onCreate(Bundle savedInstanceState) {
        super.onCreate(savedInstanceState);
        setContentView(R.layout.activity_main2);

        cxk = findViewById(R.id.text);

        new Timer().schedule(new TimerTask() {
            @Override
            public void run() {
                myHandler.sendEmptyMessage(1);
            }
        }, 0,200);
    }

    final  Handler myHandler = new Handler() {
        @Override
        //重写handleMessage方法,根据msg中what的值判断是否执行后续操作
        public void handleMessage(Message msg) {
            if (msg.what == 1) {
                //更新UI
                String res=String.valueOf(count++);
                cxk.setText(res);
            }
        }
    };
}
JVM
官网:https://source.android.google.cn/docs/core/runtime/jit-compiler?hl=zh-cn

华为的:https://developer.harmonyos.com/cn/develop/arkCompiler/

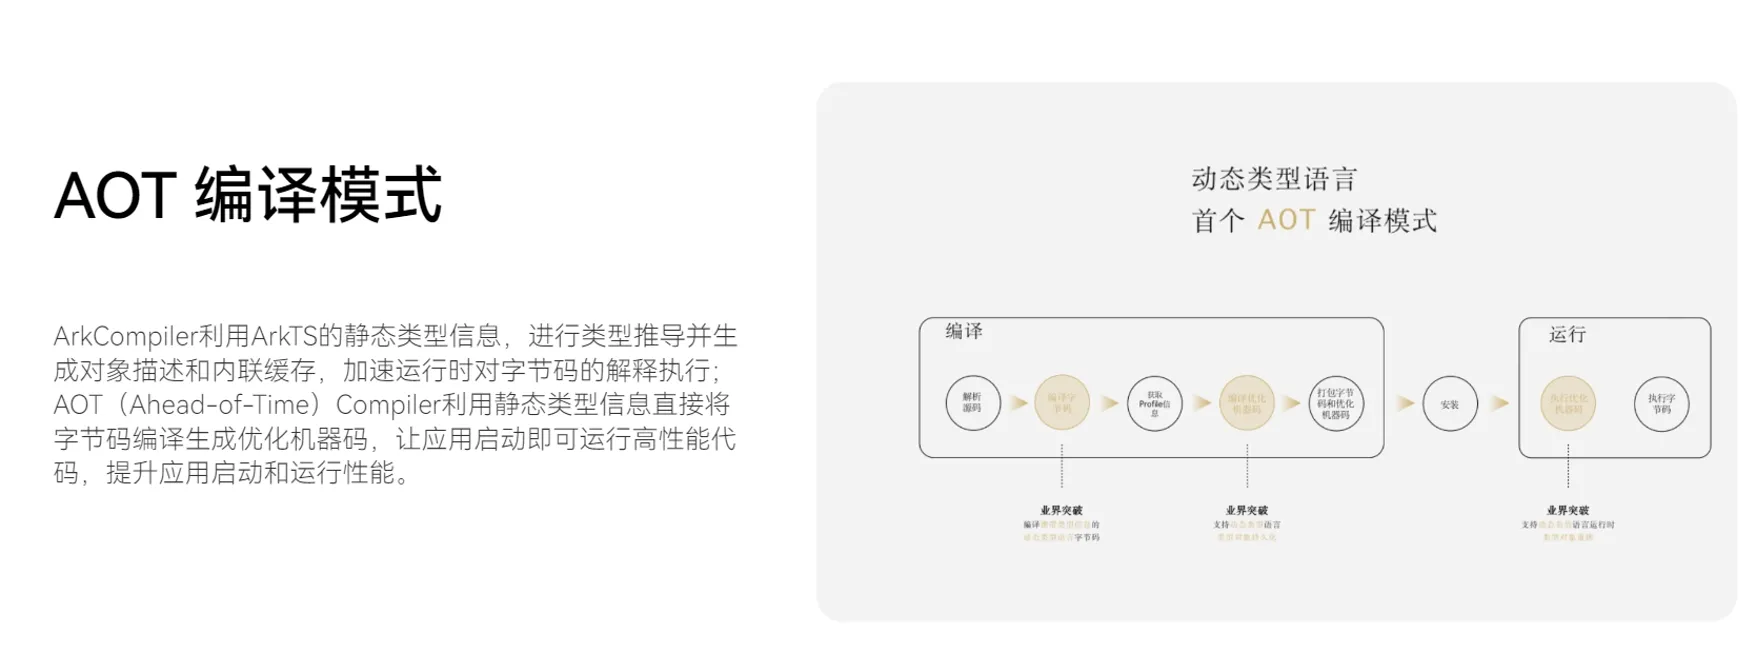
相关内容:https://zhuanlan.zhihu.com/p/53723652
在编译打包生成APK文件时,会有这样一个流程:
- Java编译器将Java文件编译为class文件
- dx工具将编译输出的类文件转换为dex文件(Android虚拟机不支持class文件)
而Android虚拟机有两种:Dalvik和ART,JIT与AOT是虚拟机为了提高运行效率等采用的不同的编译策略。
JIT意思是Just In Time Compiler,就是即时编译技术,与Dalvik虚拟机相关。
Dalvik虚拟机可以看做是一个Java虚拟机。在 Android系统初期,每次运行程序的时候,Dalvik负责将dex翻译为机器码交由系统调用。这样有一个缺陷:每次执行代码,都需要Dalvik将操作码代码翻译为机器对应的微处理器指令,然后交给底层系统处理,运行效率很低。
为了提升效率Android在2.2版本中添加了JIT编译器,当App运行时,每当遇到一个新类,JIT编译器就会对这个类进行即时编译,经过编译后的代码,会被优化成相当精简的原生型指令码(即native code),这样在下次执行到相同逻辑的时候,速度就会更快。JIT 编译器可以对执行次数频繁的 dex/odex 代码进行编译与优化,将 dex/odex 中的 Dalvik Code(Smali 指令集)翻译成相当精简的 Native Code 去执行,JIT 的引入使得 Dalvik 的性能提升了 3~6 倍。
AOT是指"Ahead Of Time",与"Just In Time"不同,从字面来看是说提前编译。
JIT是运行时编译,是动态编译,可以对执行次数频繁的dex代码进行编译和优化,减少以后使用时的翻译时间,虽然可以加快Dalvik运行速度,但是有一个很大的问题:将dex翻译为本地机器码也要占用时间。 所以Google在4.4推出了全新的虚拟机运行环境ART(Android RunTime),用来替换Dalvik(4.4上ART和Dalvik共存,用户可以手动选择,5.0 后Dalvik被替换)。
AOT 是静态编译,应用在安装的时候会启动 dex2oat 过程把 dex预编译成 ELF 文件,每次运行程序的时候不用重新编译。 ART 对 Garbage Collection(GC)过程的也进行了改进:
- 只有一次 GC 暂停(Dalvik 需要两次)
- 在 GC 保持暂停状态期间并行处理
- 在清理最近分配的短时对象这种特殊情况中,回收器的总 GC 时间更短
- 优化了垃圾回收的工效,能够更加及时地进行并行垃圾回收,这使得 GC_FOR_ALLOC 事件在典型用例中极为罕见
- 压缩 GC 以减少后台内存使用和碎片
Fragment
生命周期:

切换横竖屏之后生命周期变化:
博客:https://blog.csdn.net/jaynm/article/details/104560439
默认生命周期:onCreate -->onStart–>onResumeo -->onPause -->onStop -->onDestroy
调试快捷键
博客:https://blog.csdn.net/ljc1026774829/article/details/80493699
| 快捷键 | 介绍 |
|---|---|
| F7 | 进入函数 |
| Shift + F7 | 进入函数,如果断点所在行上有多个方法调用,会弹出进入哪个方法 |
| F8 | 进入下一步,如果当前行断点是一个方法,则不进入当前方法体内 |
| F9 | 恢复程序运行,但是如果该断点下面代码还有断点则停在下一个断点上 |
| F10 | 执行到光标处 |
| Alt + F8 | 选中对象,弹出可输入计算表达式调试框,查看该输入内容的调试结果 |
| Shift + F8 | 跳出当前函数 |
Intent意图
博客:https://blog.csdn.net/JMW1407/article/details/114932159
程序设计题
考实验 五、六
实验五
MainActivity
public class MainActivity extends AppCompatActivity {

    @Override
    protected void onCreate(Bundle savedInstanceState) {
        super.onCreate(savedInstanceState);
        setContentView(R.layout.activity_main);
        FragmentManager fm = getSupportFragmentManager();
        Fragment fragment = fm.findFragmentById(R.id.fragment_list);
        if (fragment == null) {
            fragment = new StudentListFragment();
            fm.beginTransaction()
                    .add(R.id.fragment_list, fragment)
                    .commit();
        }
    }
}
Student
public class Student {
    private String id;
    private String name;
    private String phone;
    private Integer imageId;

    //of构造方法
    public static Student of(String id, String name, String phone, Integer imageId) {
        return new Student(id, name, phone, imageId);
    }

    public Student(String id, String name, String phone, Integer imageId) {
        this.id = id;
        this.name = name;
        this.phone = phone;
        this.imageId = imageId;
    }

    public String getId() {
        return id;
    }

    public void setId(String id) {
        this.id = id;
    }

    public String getName() {
        return name;
    }

    public void setName(String name) {
        this.name = name;
    }

    public String getPhone() {
        return phone;
    }

    public void setPhone(String phone) {
        this.phone = phone;
    }

    public Integer getImageId() {
        return imageId;
    }

    public void setImageId(Integer imageId) {
        this.imageId = imageId;
    }
}
StudentListFragment
public class StudentListFragment extends Fragment {
    private EditText inputId;
    private EditText inputName;
    private EditText inputPhone;
    private ImageView inputImage;
    private Button inputAdd;
    private StudentAdapter studentAdapter;
    private List<Student> students;
    private RecyclerView recyclerView;
    @Override
    public void onCreate(Bundle savedInstanceState) {
        super.onCreate(savedInstanceState);
        setRetainInstance(true);
    }

    @Override
    public View onCreateView(LayoutInflater inflater, ViewGroup container, Bundle savedInstanceState) {
        View view = inflater.inflate(R.layout.fragment_student_list, container, false);
        init(view);
        updateUI();
        return view;
    }

    private void updateUI() {
        students = new ArrayList<>();
        Student student = Student.of("21200107230", "蔡徐坤", "12345678901", R.drawable.cxk2);
        students.add(student);
        studentAdapter = new StudentAdapter();
        recyclerView.setAdapter(studentAdapter);
    }

    @Override
    public void onResume() {
        super.onResume();
        updateUI();
    }

    private void init(View view) {
        recyclerView = view.findViewById(R.id.student_list_recycler_view);
        recyclerView.setLayoutManager(new LinearLayoutManager(getActivity()));

        inputId = view.findViewById(R.id.input_id);
        inputName = view.findViewById(R.id.input_name);
        inputPhone = view.findViewById(R.id.input_phone);
        inputImage = view.findViewById(R.id.input_image);

        inputAdd = view.findViewById(R.id.btn_add);
        inputAdd.setOnClickListener(new View.OnClickListener() {
            @Override
            public void onClick(View v) {
                String id = inputId.getText().toString();
                String name = inputName.getText().toString();
                String phone = inputPhone.getText().toString();
                Integer image = R.drawable.cxk;
                Student student = Student.of(id, name, phone, image);
                students.add(student);
                studentAdapter.notifyDataSetChanged();
                clearInput();
            }
        });
    }

    private void clearInput() {
        inputId.setText("");
        inputName.setText("");
        inputPhone.setText("");
    }

    private class StudentAdapter extends RecyclerView.Adapter<StudentHolder> {
        @NonNull
        @Override
        public StudentHolder onCreateViewHolder(@NonNull ViewGroup parent, int viewType) {
            View view = View.inflate(getContext(), R.layout.item_student, null);
            return new StudentHolder(view);
        }

        @Override
        public void onBindViewHolder(@NonNull StudentHolder holder, @SuppressLint("RecyclerView") int position) {
            holder.showId.setText(students.get(position).getId());
            holder.showName.setText(students.get(position).getName());
            holder.showPhone.setText(students.get(position).getPhone());
            holder.showImage.setImageResource(students.get(position).getImageId());

            //删除按钮
            holder.btnDelete.setOnClickListener(new View.OnClickListener() {
                @Override
                public void onClick(View v) {
                    students.remove(position);
                    studentAdapter.notifyDataSetChanged();
                }
            });

            //拨打电话按钮
            holder.btnPhone.setOnClickListener(new View.OnClickListener() {
                @Override
                public void onClick(View v) {
                    //跳转到拨号界面
                    String phone = students.get(position).getPhone();
                    Intent intent = new Intent(Intent.ACTION_DIAL, Uri.parse("tel:" + phone));
                    startActivity(intent);
                }
            });
        }

        @Override
        public int getItemCount() {
            return students.size();
        }
    }

    public class StudentHolder extends RecyclerView.ViewHolder {
        private TextView showId;
        private TextView showName;
        private TextView showPhone;
        private ImageView showImage;
        private Button btnDelete;
        private Button btnPhone;

        public StudentHolder(@NonNull View itemView) {
            super(itemView);
            showId = itemView.findViewById(R.id.show_id);
            showName = itemView.findViewById(R.id.show_name);
            showPhone = itemView.findViewById(R.id.show_phone);
            showImage = itemView.findViewById(R.id.show_image);
            btnDelete = itemView.findViewById(R.id.btn_del);
            btnPhone = itemView.findViewById(R.id.btn_phone);
        }
    }
}
布局
activity_main.xml
<?xml version="1.0" encoding="utf-8"?>
<androidx.constraintlayout.widget.ConstraintLayout
        xmlns:android="http://schemas.android.com/apk/res/android"
        xmlns:tools="http://schemas.android.com/tools"
        android:layout_width="match_parent"
        android:layout_height="match_parent"
        android:id="@+id/fragment_list"
        tools:context=".MainActivity">
</androidx.constraintlayout.widget.ConstraintLayout>
fragment_student_list
<?xml version="1.0" encoding="utf-8"?>
<androidx.constraintlayout.widget.ConstraintLayout
        xmlns:android="http://schemas.android.com/apk/res/android"
        xmlns:app="http://schemas.android.com/apk/res-auto"
        xmlns:tools="http://schemas.android.com/tools"
        android:layout_width="match_parent"
        android:layout_height="match_parent"
        android:orientation="vertical"
        android:id="@+id/fragment_container"
        tools:context=".StudentListFragment">

    <TextView
            android:text="电话:"
            android:layout_width="46dp"
            android:layout_height="34dp"
            app:layout_constraintTop_toTopOf="parent"
            app:layout_constraintStart_toStartOf="parent"
            android:layout_marginTop="148dp"
            android:layout_marginStart="16dp"
            android:id="@+id/textView17"
            android:textSize="16sp"/>

    <TextView
            android:text="学号:"
            android:layout_width="46dp"
            android:layout_height="34dp"
            app:layout_constraintTop_toTopOf="parent"
            app:layout_constraintStart_toStartOf="parent"
            android:layout_marginTop="16dp"
            android:layout_marginStart="16dp"
            android:id="@+id/textView16"
            android:textSize="16sp"/>

    <ImageView
            android:src="@drawable/cxk"
            android:layout_width="107dp"
            android:layout_height="104dp"
            tools:src="@tools:sample/avatars"
            app:layout_constraintTop_toTopOf="parent"
            android:layout_marginTop="16dp"
            android:layout_marginEnd="16dp"
            app:layout_constraintEnd_toEndOf="parent"
            android:id="@+id/input_image"/>

    <Button
            android:text="添加学生"
            android:layout_width="104dp"
            android:layout_height="51dp"
            android:id="@+id/btn_add"
            app:layout_constraintEnd_toEndOf="parent"
            android:layout_marginEnd="16dp"
            app:layout_constraintTop_toTopOf="parent"
            android:layout_marginTop="128dp"/>

    <TextView
            android:text="姓名:"
            android:layout_width="46dp"
            android:layout_height="34dp"
            app:layout_constraintTop_toTopOf="parent"
            app:layout_constraintStart_toStartOf="parent"
            android:layout_marginTop="84dp"
            android:layout_marginStart="16dp"
            android:id="@+id/textView14"
            android:textSize="16sp"/>

    <EditText
            android:layout_width="wrap_content"
            android:layout_height="wrap_content"
            android:inputType="textPersonName"
            android:ems="10"
            android:id="@+id/input_id"
            app:layout_constraintTop_toTopOf="parent"
            app:layout_constraintStart_toStartOf="parent"
            android:layout_marginTop="4dp"
            android:layout_marginStart="76dp"/>

    <EditText
            android:layout_width="wrap_content"
            android:layout_height="wrap_content"
            android:inputType="textPersonName"
            android:ems="10"
            android:id="@+id/input_name"
            app:layout_constraintStart_toStartOf="parent"
            app:layout_constraintTop_toTopOf="parent"
            android:layout_marginTop="72dp"
            android:layout_marginStart="76dp"/>

    <EditText
            android:layout_width="wrap_content"
            android:layout_height="wrap_content"
            android:inputType="textPersonName"
            android:ems="10"
            android:id="@+id/input_phone"
            app:layout_constraintStart_toStartOf="parent"
            android:layout_marginStart="76dp"
            app:layout_constraintTop_toTopOf="parent"
            android:layout_marginTop="136dp"/>

    <androidx.recyclerview.widget.RecyclerView
            android:id="@+id/student_list_recycler_view"
            android:layout_width="404dp"
            android:layout_height="461dp"
            app:layout_constraintStart_toStartOf="parent"
            android:layout_marginStart="4dp"
            app:layout_constraintTop_toBottomOf="@+id/input_phone"
            android:layout_marginTop="44dp"/>

</androidx.constraintlayout.widget.ConstraintLayout>
item_student.xml
<?xml version="1.0" encoding="utf-8"?>
<androidx.constraintlayout.widget.ConstraintLayout
        xmlns:android="http://schemas.android.com/apk/res/android"
        xmlns:app="http://schemas.android.com/apk/res-auto"
        xmlns:tools="http://schemas.android.com/tools"
        android:layout_width="match_parent"
        android:layout_height="match_parent">

    <ImageView
            android:layout_width="89dp"
            android:layout_height="98dp"
            tools:srcCompat="@tools:sample/avatars"
            app:layout_constraintTop_toTopOf="parent"
            app:layout_constraintStart_toStartOf="parent"
            android:id="@+id/show_image"
            android:layout_marginTop="12dp"
            android:layout_marginStart="4dp"/>

    <TextView
            android:text="TextView"
            android:layout_width="181dp"
            android:layout_height="25dp"
            app:layout_constraintTop_toTopOf="parent"
            android:id="@+id/show_id"
            app:layout_constraintStart_toStartOf="parent"
            android:layout_marginTop="12dp"
            android:layout_marginStart="100dp"/>

    <TextView
            android:text="TextView"
            android:layout_width="181dp"
            android:layout_height="27dp"
            android:id="@+id/show_name"
            app:layout_constraintStart_toStartOf="parent"
            app:layout_constraintTop_toTopOf="parent"
            android:layout_marginTop="44dp"
            android:layout_marginStart="100dp"/>

    <TextView
            android:text="TextView"
            android:layout_width="180dp"
            android:layout_height="30dp"
            app:layout_constraintStart_toStartOf="parent"
            android:id="@+id/show_phone"
            app:layout_constraintTop_toTopOf="parent"
            android:layout_marginTop="80dp"
            android:layout_marginStart="100dp"/>

    <Button
            android:text="删除学生"
            android:layout_width="97dp"
            android:layout_height="43dp"
            app:layout_constraintTop_toTopOf="parent"
            android:id="@+id/btn_del"
            app:layout_constraintEnd_toEndOf="parent"
            android:layout_marginTop="12dp"
            android:layout_marginEnd="28dp"
            app:layout_constraintStart_toEndOf="@+id/show_id"
            app:layout_constraintHorizontal_bias="1.0"/>

    <Button
            android:text="拨打电话"
            android:layout_width="98dp"
            android:layout_height="47dp"
            android:id="@+id/btn_phone"
            app:layout_constraintTop_toTopOf="parent"
            app:layout_constraintEnd_toEndOf="parent"
            android:layout_marginTop="60dp"
            android:layout_marginEnd="28dp"/>

</androidx.constraintlayout.widget.ConstraintLayout>
实验六
activity_main.xml activity_student.xml ContactUtils.java fragment_student_list.xml item_student.xml MainActivity.java PermissionUtil.java Student.java StudentActivity.java StudentConstant.java StudentDao.java StudentListFragment.java
基础环境
- 请结合android的体系结构说明,为什么Android选择Java作为上层应用的开发语言。
答:Android选择Java作为上层应用的开发语言有以下几个原因:
(1) 广泛的开发者社区:Java是一种历史悠久、成熟稳定的编程语言,并且拥有庞大的开发者社区。选择Java作为Android的上层应用开发语言,可以吸引更多的开发者参与到Android生态系统中,为Android平台开发丰富多样的应用程序。
(2) 跨平台支持:Java是一种基于虚拟机的编程语言,具有跨平台的特性。通过使用Java开发Android应用,可以在不同的硬件架构和操作系统上运行,实现跨设备的兼容性和可移植性。
(3) 强大的库和框架支持:Java拥有丰富的第三方库和框架,可以大幅简化Android应用开发过程。许多重要的Android库,如Android SDK、支持网络通信的OkHttp、图像加载库Glide等都是用Java编写的。这些库和框架提供了强大的功能和工具,帮助开发者快速构建高质量的Android应用。
(4) 内存管理和垃圾回收:Java具有自动内存管理和垃圾回收机制,大大降低了开发者在内存管理方面的工作量。这对于移动设备来说尤为重要,因为Android系统需要在有限的资源下运行多个应用程序,Java的内存管理机制可以提高系统的资源利用效率和性能。
(5) 安全性和稳定性:Java具有严格的安全性和稳定性标准,在处理异常和错误时具有较高的健壮性。选择Java作为开发语言,可以提供更为可靠和安全的应用程序,并减少潜在的安全漏洞和风险。
- 请说明Android Studio和 Android SDK的关系。
答:Android Studio是一款官方提供的集成开发环境(IDE),用于开发基于Android平台的应用程序。而 Android SDK(Software Development Kit)是一套开发Android应用程序所需的软件开发工具包,包括编译器、调试器、API库和开发工具等。Android Studio和 Android SDK之间存在着强烈的联系和依赖关系,Android Studio需要使用 Android SDK中提供的工具和资源来构建和调试Android应用程序。具体来说,在Android Studio中,开发者可以通过SDK Manager管理已安装的Android SDK版本,并在开发过程中使用其中包含的API库和工具。同时,Android Studio还提供了一个Project Structure Dialog,用于设置项目的SDK版本和构建工具版本等参数。
- AVD Manager, SDK Mannager, DDMS分别是干什么的?
答:
(1) AVD Manager(Android Virtual Device Manager)是Android开发工具中的一部分,用于管理模拟器和虚拟设备。它允许开发者创建、配置和管理Android虚拟设备,用于在开发过程中模拟不同的硬件环境和Android版本。开发者可以使用AVD Manager创建多个虚拟设备,每个设备可以模拟不同的屏幕尺寸、分辨率、操作系统版本等特性,以便进行应用程序的兼容性测试和UI布局的适配。
(2) SDK Manager(Software Development Kit Manager)是Android开发工具中的一个重要组件,用于管理和下载Android SDK的组件和工具。通过SDK Manager,开发者可以查看可用的SDK版本、安装、更新和卸载特定的SDK组件,如平台工具、构建工具、系统图像等。SDK Manager还提供了额外的支持库和扩展组件,用于集成各种功能和API到Android应用程序中。
(3) DDMS(Dalvik Debug Monitor Server)是Android开发工具中的调试工具,用于在开发过程中监控和调试Android设备或模拟器上的应用程序。DDMS提供了一系列功能,包括查看实时的系统日志信息、查看和管理设备的文件系统、监视内存使用情况、模拟电话和短信、执行代码跟踪和性能分析等。开发者可以使用DDMS进行应用程序的调试和性能优化,以及解决潜在的问题和错误。
- 请结合HelloWorld程序说明Android中是如何基于MVC模式进行开发的?
答:
(1) 模型层负责处理数据的获取、存储和处理。在HelloWorld程序中,可以定义一个Model类,用于保存和管理应用程序的数据。例如,可以创建一个名为HelloWorldModel的类,并在其中定义一个成员变量用于存储"Hello, World!"这个字符串。
(2) 视图层负责展示数据和与用户交互。在Android中,可以使用布局文件(XML)来定义视图的外观和布局。在HelloWorld程序中,可以创建一个布局文件(例如activity_main.xml),其中包含一个TextView用于显示"Hello, World!"消息。
(3) 控制器层负责处理用户输入和更新视图。在Android中,可以使用Activity或Fragment作为控制器的角色。在HelloWorld程序中,可以创建一个MainActivity类,负责处理用户交互,并将数据显示到TextView上。
简单控件
TextView
设置文本内容
- 在xml文件中直接使用text属性
    <TextView
            android:id="@+id/hello"
            android:layout_width="wrap_content"
            android:layout_height="wrap_content"
            android:text="hello,world"/>
- 在values目录下面的strings.xml中定义,然后使用
strings.xml:
<resources>
    <string name="app_name">chapter03</string>
    <string name="hello">hello,world</string>
</resources>
    <TextView
            android:layout_width="wrap_content"
            android:layout_height="wrap_content"
            android:text="@string/hello"/>
- 在Java代码中进行设置
        TextView textView = findViewById(R.id.hello);
        textView.setText("Hello Android");
设置文本大小
一些单位说明:
| 名称 | 说明 |
|---|---|
| px像素 | 跟随 屏幕大小和像素数量的关系变化,一个像素点为1px。 |
| Resolution分辨率 | 指屏幕的垂直和水平方向的像素数量,例如1920*1080 |
| Dpi像素密度 | 每英寸距离中有多少个像素点。 |
| Density(密度) | 每平方英寸中含有的像素点数量。 |
| Dip / dp (设备独立像素) | dp,长度单位,同一个单位在不同的设备上有不同的显示效果,具体 效果根据设备的密度有关 |
| sp | 专门用来设置字体大小,手机设置内可以调整 |
- 在Java代码中使用setTextSize设置大小
        TextView textView = findViewById(R.id.hello2);
        textView.setTextSize(30);
- 在xml中指定:
    <TextView
            android:id="@+id/hello2"
            android:textSize="30dp"
            android:layout_width="wrap_content"
            android:layout_height="wrap_content"
            android:text="@string/hello"/>
设置文本颜色
- Java代码中设置setTextColor
        TextView textView = findViewById(R.id.hello2);
        textView.setTextSize(30);
        textView.setTextColor(0xffff0000);//设置颜色,十六进制的颜色值
        textView.setTextColor(Color.RED); //设置系统内置的颜色
- xml中设置
    <TextView
            android:id="@+id/hello2"
            android:textSize="30dp"
            android:layout_width="wrap_content"
            android:layout_height="wrap_content"
            android:textColor="#000000"
            android:text="@string/hello"/>
- 使用资源文件colors.xml
<resources>
    <color name="purple_200">#FFBB86FC</color>
    <color name="purple_500">#FF6200EE</color>
    <color name="purple_700">#FF3700B3</color>
    <color name="teal_200">#FF03DAC5</color>
    <color name="teal_700">#FF018786</color>
    <color name="black">#FF000000</color>
    <color name="white">#FFFFFFFF</color>
</resources>


设置如下属性:
android:textColor="@color/black"
视图显示
视图宽高
- match_parent与上级试图一致
- wrap_content 内容自适应
- dp为大小
视图间距
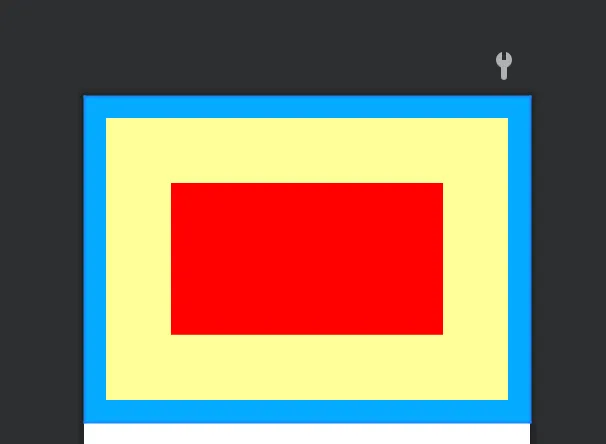
- layout_margin 设置视图的外边距
- padding 设置视图的内边距
<!--    父级蓝色背景-->
<LinearLayout
        xmlns:android="http://schemas.android.com/apk/res/android"
        xmlns:tools="http://schemas.android.com/tools"
        android:layout_width="match_parent"
        android:layout_height="300dp"
        android:orientation="vertical"
        android:background="#00AAFF"
        tools:context=".ViewMarginActivity">
    <!--    中间为黄色-->
    <LinearLayout
            android:layout_width="match_parent"
            android:layout_height="match_parent"
            android:layout_margin="20dp"
            android:background="#FFFF99"
            android:padding="60dp">

        <!--        子级红色背景-->
        <View
                android:layout_width="match_parent"
                android:layout_height="match_parent"
                android:background="#FF0000"/>
    </LinearLayout>
</LinearLayout>
运行结果:
视图的对齐方式
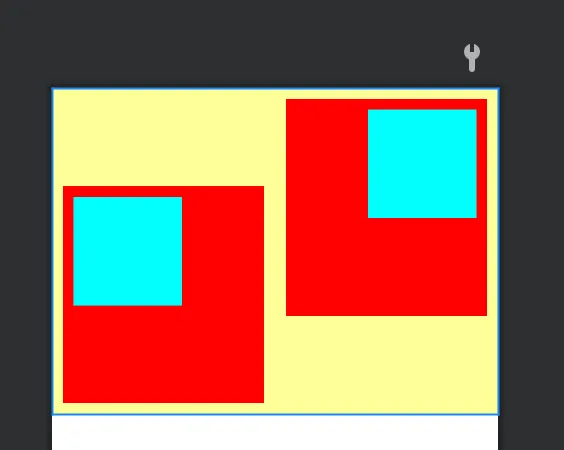
- layout_gravity 是当前视图往上级视图的哪个方向对齐,并非当前视图的内部 对齐
- gravity y设定了下级视图相对于当前视图的对齐方式
<?xml version="1.0" encoding="utf-8"?>
<LinearLayout
        xmlns:android="http://schemas.android.com/apk/res/android"
        xmlns:tools="http://schemas.android.com/tools"
        android:layout_width="match_parent"
        android:layout_height="300dp"
        android:background="#ffff99"
        tools:context=".ViewGravityActivity">

    <!--    第一个子控件为红色,在上级视图中朝下对齐,下级视图靠左对齐-->
    <LinearLayout
            android:layout_width="0dp"
            android:layout_height="200dp"
            android:layout_weight="1"
            android:background="#ff0000"
            android:layout_margin="10dp"
            android:padding="10dp"
            android:layout_gravity="bottom"
            android:gravity="left"
            >

        <View
                android:layout_width="100dp"
                android:layout_height="100dp"
                android:background="#00ffff"
                />

    </LinearLayout>

<!--    第二个子控件为红色,在上级视图中朝上对齐,下级视图靠右对齐-->
    <LinearLayout
            android:layout_width="0dp"
            android:layout_height="200dp"
            android:layout_weight="1"
            android:background="#ff0000"
            android:layout_margin="10dp"
            android:padding="10dp"
            android:layout_gravity="top"
            android:gravity="right"
            >
        <View
                android:layout_width="100dp"
                android:layout_height="100dp"
                android:background="#00ffff"
                />

    </LinearLayout>

</LinearLayout>
运行结果:
常用布局
- 线性布局LinearLayout
orientation 排列方向:
- horizontal 水平 默认
- vertical 垂直
layout_weight 权重大小
一旦设置了 layout_weight属性值,便要求layout_width填0dp或者layout_height填0dp。如果layout_width填 0dp,则layout_weight表示水平方向的权重,下级视图会从左往右分割线性布局;如果layout_height填 0dp,则layout_weight表示垂直方向的权重,下级视图会从上往下分割线性布局。
    <LinearLayout
            android:layout_width="match_parent"
            android:layout_height="wrap_content"
            >

        <TextView
                android:layout_width="0dp"
                android:layout_height="wrap_content"
                android:layout_weight="1"
                android:text="第一个"/>
        <TextView
                android:layout_width="0dp"
                android:layout_height="wrap_content"
                android:layout_weight="1"
                android:text="第二个"/>
    </LinearLayout>
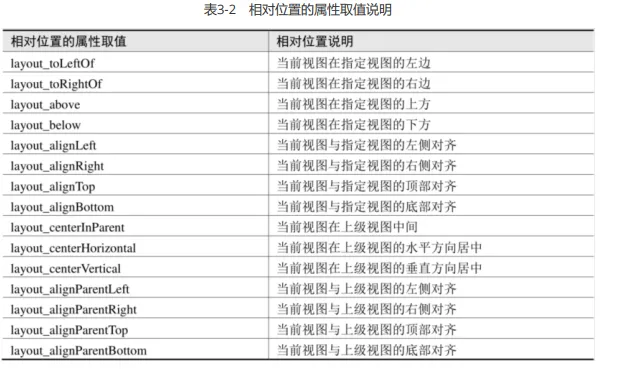
- 相对布局RelativeLayout
相对布局的下级视图位置则由其他视图决定
image-20231204125724577
<RelativeLayout xmlns:android="http://schemas.android.com/apk/res/android"
                android:layout_width="match_parent"
                android:layout_height="150dp">

    <TextView
            android:layout_width="wrap_content"
            android:layout_height="wrap_content"
            android:layout_centerInParent="true"
            android:text="我在中间"/>

    <TextView
            android:layout_width="wrap_content"
            android:layout_height="wrap_content"
            android:layout_centerHorizontal="true"
            android:text="我在水平中间"
            />

    <TextView
            android:layout_width="wrap_content"
            android:layout_height="wrap_content"
            android:layout_centerVertical="true"
            android:text="我在垂直中间"
            />

    <TextView
            android:layout_width="wrap_content"
            android:layout_height="wrap_content"
            android:layout_alignParentLeft="true"
            android:text="我跟上级左边对齐"
            />

    <TextView
            android:layout_width="wrap_content"
            android:layout_height="wrap_content"
            android:layout_alignParentRight="true"
            android:text="我跟上级右边对齐"
            />

    <TextView
            android:layout_width="wrap_content"
            android:layout_height="wrap_content"
            android:layout_alignParentTop="true"
            android:text="我跟上级顶部对齐"
            />

    <TextView
            android:layout_width="wrap_content"
            android:layout_height="wrap_content"
            android:layout_alignParentBottom="true"
            android:text="我跟上级底部对齐"
            />
</RelativeLayout>
- 网格布局GridLayout
网格布局默认从左往右、从上到下排列,它先从第一行从左往右放置下级视图,塞满之后另起一行放置 其余的下级视图,如此循环往复直至所有下级视图都放置完毕
- columnCount指定了网格的列数, 即每行能放多少个视图;
- rowCount指定了网格的行数,即每列能放多少个视图
<?xml version="1.0" encoding="utf-8"?>
<GridLayout
        xmlns:android="http://schemas.android.com/apk/res/android"
        xmlns:tools="http://schemas.android.com/tools"
        android:layout_width="match_parent"
        android:layout_height="match_parent"
        tools:context=".GridLayoutActivity"
        android:columnCount="2"
        android:rowCount="2"
        >
</GridLayout>
- 滚动视图ScrollView(垂直) 和HorizontalScrollView(水平)
- 垂直方向滚动时,layout_width属性值设置为match_parent,layout_height属性值设置为 wrap_content。
- 水平方向滚动时,layout_width属性值设置为wrap_content,layout_height属性值设置为 match_parent。
    水平滚动如下:
	<HorizontalScrollView
            android:layout_width="wrap_content"
            android:layout_height="200dp">
        <LinearLayout
                android:layout_width="wrap_content"
                android:layout_height="match_parent">
            <View
                    android:layout_width="300dp"
                    android:layout_height="wrap_content"
                    android:background="#ff0000"/>
            <View
                    android:layout_width="300dp"
                    android:layout_height="wrap_content"
                    android:background="#ffff00"/>
        </LinearLayout>
    </HorizontalScrollView>
按钮显示
按钮的源码public class Button extends TextView 可以看到是继承自TextView
- 字体默认大写
- 有背景颜色等
设置点击事件
- xml中使用onClick
    <Button
            android:layout_width="wrap_content"
            android:layout_height="wrap_content"
            android:text="cxk"
            android:onClick="doClick"
            />
java代码:
    public void doClick(View view) {
    }
- 在Java中设置
点击监听器:
使用ambda表达式
        Button button = findViewById(R.id.button);
        button.setOnClickListener(v -> {
            System.out.println("点击了按钮");
        });
匿名内部类
        button.setOnClickListener(new View.OnClickListener() {
            @Override
            public void onClick(View v) {
                System.out.println("点击了按钮");
            }
        });
让自己这个类继承
public class ButtonActivity extends AppCompatActivity implements View.OnClickListener{
    @Override
    public void onClick(View view) {
        switch (view.getId()) {
            case R.id.button:
                System.out.println("点击了按钮");
                break;
            default:
                break;
        }
    }
}
button.setOnClickListener(this);
长按按钮
        button.setOnLongClickListener(v -> {
            System.out.println("长按了按钮");
            return true;
        });
启动按钮与禁用按钮:
xml中
android:enabled="false"
java中
button.setEnabled(false);
图像显示ImageView
图片位置通常在:res/drawable/**目录 中
例如在 res/drable/cxk.jpg 为一张图片
可以 使用scaleType进行设置缩放类型
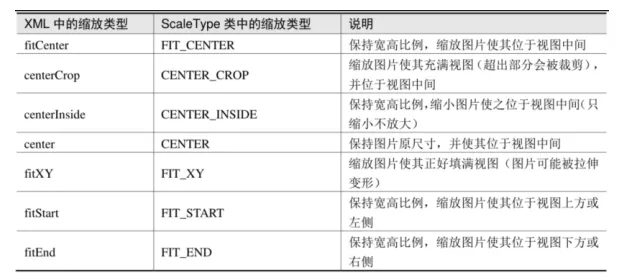
    <ImageView
            android:id="@+id/img"
            android:layout_width="wrap_content"
            android:layout_height="wrap_content"
            android:src="@drawable/cxk"
            android:scaleType="fitCenter"
            />
使用Java代码设置
        ImageView imageView = findViewById(R.id.img);
        imageView.setImageResource(R.drawable.cxk);
Activity
Activity跳转
        Button button = findViewById(R.id.button);
        button.setOnClickListener(v -> {
            //跳转到FinishActivity 使用Intent
            Intent intent = new Intent(this, FinishActivity.class);
            startActivity(intent);
        });
返回,结束 当前 activity:
        Button button = findViewById(R.id.back);
        button.setOnClickListener(v -> finish());
生命周期
生命周期图如下:

public class StartActivity extends AppCompatActivity {
    public static final String TAG = "蔡徐坤";
    @Override
    protected void onCreate(Bundle savedInstanceState) {
        super.onCreate(savedInstanceState);
        setContentView(R.layout.activity_start);
        Button button = findViewById(R.id.button);
        button.setOnClickListener(v -> {
            //跳转到MainActivity
            Intent intent = new Intent(this, FinishActivity.class);
            startActivity(intent);
        });
        Log.d(TAG, " Create StartActivity");
    }

    @Override
    protected void onStart() {
        super.onStart();
        Log.d(TAG, " Start StartActivity");
    }

    @Override
    protected void onResume() {
        super.onResume();
        Log.d(TAG, " Resume StartActivity");
    }

    @Override
    protected void onPause() {
        super.onPause();
        Log.d(TAG, " Pause StartActivity");
    }

    @Override
    protected void onStop() {
        super.onStop();
        Log.d(TAG, " Stop StartActivity");
    }

    @Override
    protected void onRestart() {
        super.onRestart();
        Log.d(TAG, " Restart StartActivity");
    }

    @Override
    protected void onDestroy() {
        super.onDestroy();
        Log.d(TAG, " Destroy StartActivity");
    }
}
刚启动

跳转到其他页面 :

返回 :

生命周期说明:
- onCreate:会在系统首次创建 Activity 时触发,在 Activity 的整个生命周期中只应发生一次
- onStart:当 Activity 进入“已开始”状态时,系统会调用此回调
- onResume:Activity 会在进入“已恢复”状态时来到前台
- onPause:此方法表示 Activity 不再位于前台(尽管在用户处于多窗口模式时 Activity 仍然可见)
- onStop:如果您的 Activity 不再对用户可见,说明其已进入“已停止”状态,因此系统将调用
onStop()回调 - onRestart:重启,重新加载内存中的页面数据
- onDestroy:销毁 Activity 之前,系统会先调用
启动模式
Activity栈,默认为先进后出,在配置文件中可以指定启动模式:
android:launchMode="c"
standard
先进先出
栈顶复用singleTop
可以复用栈顶Activity,如果栈顶是我们 需要的,不会创建 新的Activity,适合开启渠道多、多应用开启调用的 Activity
栈内复用模式 singleTask
如果 task 栈内存在目标 Activity 实例,则将 task 内的对应 Activity 实例之上的所有 Activity 弹出栈,并将对 应 Activity 置于栈顶,适合用在主界面,耗费系统资源的Activity
全局唯一模式 singleInstance
为目标 Activity 创建一个新的 Task 栈,将目标 Activity 放入新的 Task,并让目标 Activity获得焦点。新的 Task 有且只有这一个 Activity 实例。 如果已经创建过目标 Activity 实例,则 不会创建新的 Task,而是将以前创建过的 Activity 唤醒。
消息传递
显示Intent
直接指定来源活动与目标活动,属于精确匹配
//构造 函数中指定
Intent intent = new Intent(this, FinishActivity.class);
startActivity(intent);
//使用setClass指定
Intent intent = new Intent();
intent.setClass(this, FinishActivity.class);
//调用setComponent
Intent intent = new Intent();
ComponentName component = new ComponentName(this, FinishActivity.class);
intent.setComponent(component);
隐式Intent
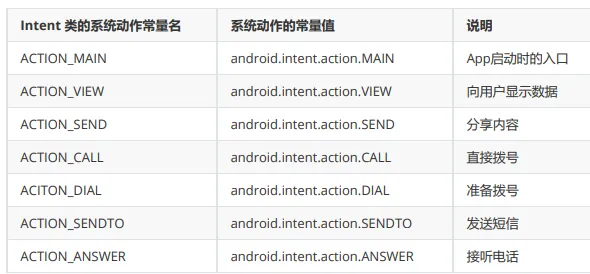
没有明确指定要跳转的目标活动,只给出一个动作字符串让系统自动匹配,属于模糊 匹配
跳到拨号页面:
        button.setOnClickListener(v -> {
            Intent intent = new Intent();
            intent.setAction(Intent.ACTION_DIAL);//拨号
            Uri uri = Uri.parse("tel:10086");
            intent.setData(uri);
            startActivity(intent);
        });
Intent.ACTION_DIAL里面的内容为:public static final String *ACTION_DIAL* = "android.intent.action.DIAL";
这个内容可以在xml中设置:<action android:name="android.intent.action.MAIN"/>
向下一个Activity发送数据
发送消息:
        button.setOnClickListener(view -> {
            Intent intent = new Intent(this, ReceiveActivity.class);
            Bundle bundle = new Bundle();
            bundle.putString("name", "张三");
            bundle.putInt("age", 18);
            intent.putExtras(bundle);
            startActivity(intent);
        });
接收消息:
        TextView textView = findViewById(R.id.text_receive);
        Bundle bundle = getIntent().getExtras();
        String name = bundle.getString("name");
        int age = bundle.getInt("age");
        textView.setText("姓名:" + name + ",年龄:" + age);
也可以直接使用intent,不使用bundle
        button.setOnClickListener(view -> {
            Intent intent = new Intent(this, ReceiveActivity.class);
            intent.putExtra("name", "张三");
            intent.putExtra("age", 18);
            startActivity(intent);
        });
        TextView textView = findViewById(R.id.text_receive);
        String name = getIntent().getStringExtra("name");
        int age = getIntent().getIntExtra("age", 0);
        textView.setText("姓名:" + name + ",年龄:" + age);
向上一个Activity发送数据
过时的方法:
- 上一个页面打包好请求数据,调用startActivityForResult方法执行跳转动作
- 下一个页面接收并解析请求数据,进行相应处理
- 下一个页面在返回上一个页面时,打包应答数据并调用setResult方法返回数据包裹
- 上一个页面重写方法onActivityResult,该方法的输入参数包含请求代码和结果代码
最新的方法:
第一个页面发送 消息,在 onActivityResult里面用来接收下一个页面传递过来的消息
        ActivityResultLauncher<Intent> register = registerForActivityResult(new ActivityResultContracts.StartActivityForResult(), new ActivityResultCallback<ActivityResult>() {
            @Override
            public void onActivityResult(ActivityResult result) {
                TextView tv = findViewById(R.id.tv_request);
                Intent intent = result.getData();
                if (intent != null && result.getResultCode() == Activity.RESULT_OK) {
                    String resultStr = intent.getStringExtra("result");
                    tv.setText(resultStr);
                }
            }
        });
        Button button = findViewById(R.id.btn_request);
        button.setOnClickListener(view -> {
            Intent intent = new Intent(this, ResponseActivity.class);
            intent.putExtra("name", "张三");
            register.launch(intent);
        });
第二个页面接收和发送消息
        TextView tv = findViewById(R.id.tv_response);
        String name = getIntent().getStringExtra("name");
        tv.setText(name);

        Button button = findViewById(R.id.btn_response);
        button.setOnClickListener(view -> {
            Intent intent = new Intent();
            intent.putExtra("result", "这是返回的结果");
            setResult(Activity.RESULT_OK, intent); //返回上一个页面  Activity.RESULT_OK表示成功
            finish();
        });
数据存储
共享参数SharedPreferences
SharedPreferences是Android的一个轻量级存储工具,它采用的存储结构是Key-Value的键值对方式
保存共享参数键值对信息的文件路径为:/data/data/应用包名/shared_prefs/文件名.xml
        SharedPreferences preferences = getSharedPreferences("config", Context.MODE_PRIVATE);

        Button button = findViewById(R.id.button);
        button.setOnClickListener(view -> {
            SharedPreferences.Editor edit = preferences.edit();
            edit.putString("name", "张三");
            edit.putInt("age", 18);
            edit.putBoolean("isMan", true);
            edit.apply();
        });
结果:

读取:
        String name = preferences.getString("name", "默认值");
        int age = preferences.getInt("age", 0);
        boolean isMan = preferences.getBoolean("isMan", false);
        String str = "name=" + name + ",age=" + age + ",isMan=" + isMan;
        Toast.makeText(this, str, Toast.LENGTH_SHORT).show();
数据库SQLite
数据库管理器SQLiteDatabase
SQLiteDatabase便是 Android提供的SQLite数据库管理器,开发者可以在活动页面代码调用openOrCreateDatabase方法获 取数据库实例
创建和删除数据库
        Button button = findViewById(R.id.btn_create);
        button.setOnClickListener(v -> {
            //创建数据库
            String mDataBaseName = getFilesDir() + "/cxk.db";
            SQLiteDatabase db = openOrCreateDatabase(mDataBaseName, MODE_PRIVATE, null);
            String msg = db != null ? "创建数据库成功" : "创建数据库失败";
            Toast.makeText(this, msg, Toast.LENGTH_SHORT).show();
        });

        Button button2 = findViewById(R.id.btn_delete);
        button2.setOnClickListener(v -> {
            //删除数据库
            String mDataBaseName = getFilesDir() + "/cxk.db";
            boolean delete = deleteDatabase(mDataBaseName);
            String msg = delete ? "删除数据库成功" : "删除数据库失败";
            Toast.makeText(this, msg, Toast.LENGTH_SHORT).show();
        });
数据库帮助器SQLiteOpenHelper
创建类继承SQLiteOpenHelper实现里面的方法,在 onCreate创建数据库,还需要一个构造函数
public class UserDBHelper extends SQLiteOpenHelper {
    public static final String DB_NAME = "user.db";
    public static final int DB_VERSION = 1;
    public static final String TABLE_NAME = "user_info";
    public UserDBHelper(Context context) {
        super(context, DB_NAME, null, DB_VERSION);
    }

    @Override
    public void onCreate(SQLiteDatabase db) {
        String sql = "create table " + TABLE_NAME + " (id integer primary key autoincrement, name, age,phone)";
        db.execSQL(sql);
    }

    @Override
    public void onUpgrade(SQLiteDatabase sqLiteDatabase, int i, int i1) {

    }

    public UserDBHelper(@Nullable Context context, @Nullable String name, @Nullable SQLiteDatabase.CursorFactory factory, int version) {
        super(context, name, factory, version);
    }
}
利用单例模式,获取唯一实例:
    public static UserDBHelper mHelper = null;
    private SQLiteDatabase mRDB;
    private SQLiteDatabase mWDB;

    //利用单例模式获取唯一的数据库操作对象
    public static UserDBHelper getInstance(Context context) {
        if (mHelper == null) {
            mHelper = new UserDBHelper(context);
        }
        return mHelper;
    }


    //打开连接
    public SQLiteDatabase openReadLink() {
        if (mRDB == null) {
            mRDB = mHelper.getReadableDatabase();
        }
        return mRDB;
    }

    public SQLiteDatabase openWriteLink() {
        if (mWDB == null) {
            mWDB = mHelper.getWritableDatabase();
        }
        return mWDB;
    }

    public void closeLink() {
        if (mRDB != null && mRDB.isOpen()) {
            mRDB.close();
            mRDB = null;
        }
        if (mWDB != null && mWDB.isOpen()) {
            mWDB.close();
            mWDB = null;//垃圾回收
        }
    }
对实体类的一些操作(增删改查):
    public long insert(User user) {
        ContentValues values = new ContentValues();
        values.put("name", user.getName());
        values.put("age", user.getAge());
        values.put("phone", user.getPhone());
        long result = mWDB.insert(TABLE_NAME, null, values);
        return result;
    }

    public long deleteByName(String name) {
        long result = mWDB.delete(TABLE_NAME, "name=?", new String[]{name});
        return result;
    }

    public long update(User user) {
        ContentValues values = new ContentValues();
        values.put("name", user.getName());
        values.put("age", user.getAge());
        values.put("phone", user.getPhone());
        long result = mWDB.update(TABLE_NAME, values, "name=?", new String[]{user.getName()});
        return result;
    }

    public List<User> queryAll() {
        List<User> users = new ArrayList<>();

        Cursor cursor = mRDB.query(TABLE_NAME, null, null,
                null, null, null, null);
        while (cursor.moveToNext()) {
            int id = cursor.getInt(0);
            String name = cursor.getString(1);
            int age = cursor.getInt(2);
            String phone = cursor.getString(3);
            User user = new User(id, name, age, phone);
            users.add(user);
        }
        return users;
    }
在Activity中使用:
public class SQLiteHelperActivity extends AppCompatActivity {

    private UserDBHelper userDBHelper;

    @Override
    protected void onCreate(Bundle savedInstanceState) {
        super.onCreate(savedInstanceState);
        setContentView(R.layout.activity_sqlite_helper);
        Button btnInsert = findViewById(R.id.button2);
        btnInsert.setOnClickListener(view -> {
            User user = new User("张三", 20, "12345678901");
            long insert = userDBHelper.insert(user);
            if (insert > 0) {
                ToastUtil.show(this, "插入成功");
            }
        });
    }

    @Override
    protected void onStart() {
        super.onStart();
        userDBHelper = UserDBHelper.getInstance(this);
        userDBHelper.openWriteLink();
        userDBHelper.openReadLink();
    }

    @Override
    protected void onStop() {
        super.onStop();
        userDBHelper.closeLink();
    }
}
Application生命周期
在清单文件中指定自己创建的Application:
android:name=".MyApplication"
定义自己的Application
public class MyApplication extends Application {
    public static final String TAG = "蔡徐坤";

    @Override
    public void onCreate() {
        super.onCreate();
        Log.d(TAG, "onCreate: MyApplication");
    }

    @Override
    public void onTerminate() {
        super.onTerminate();
        Log.d(TAG, "onTerminate: MyApplication");
    }

    //配置改变,例如横竖屏切换
    @Override
    public void onConfigurationChanged(@NonNull Configuration newConfig) {
        super.onConfigurationChanged(newConfig);
        Log.d(TAG, "onConfigurationChanged: MyApplication");
    }
}
运行结果:

屏幕旋转:

onTerminate不会被调用
public class MyApplication extends Application {
    public HashMap<String, String> infoMap = new HashMap<>();
    //声明一个公共的静态的成员变量,作为全局变量使用
    private static MyApplication myApplication;
    public static MyApplication getInstance() {
        return myApplication;
    }
}
使用:
    @Override
    protected void onCreate(Bundle savedInstanceState) {
        super.onCreate(savedInstanceState);
        setContentView(R.layout.activity_share_write);

        MyApplication app = MyApplication.getInstance();
        app.infoMap.put("name", "张三");
        app.infoMap.put("age", "18");

        String name = app.infoMap.get("name");
        String age = app.infoMap.get("age");
    }
Room简化数据库操作
- 添加依赖:
    implementation 'androidx.room:room-runtime:2.2.5'
    annotationProcessor 'androidx.room:room-compiler:2.2.5'
- 编写实体类:
@Entity
public class Book {
    @PrimaryKey(autoGenerate = true)
    private int id;
    private String name;
    private String author;
    private double price;
}
- 编写持久化 类
@Dao
public interface BookDao {
    @Insert
    void insert(Book... book);
    @Delete
    void delete(Book... book);
    @Update
    int update(Book... book);
    @Query("select * from book")
    List<Book> queryAll();
    @Query("select * from book where name=:name order by id desc limit 1")
    Book queryByName(String name);
    @Query("select * from book ")
    void  deleteAll();
}
- 编写表对应的数据库类
@Database(entities = {Book.class}, version = 1, exportSchema = true)
public abstract class BookDataBase extends RoomDatabase {
    public abstract BookDao getBookDao();
}
- Activity中使用
    @Override
    protected void onCreate(Bundle savedInstanceState) {
        super.onCreate(savedInstanceState);
        setContentView(R.layout.activity_room_write);
        BookDataBase db = Room.databaseBuilder(getApplicationContext(), BookDataBase.class, "book.db")
                .allowMainThreadQueries()
                .build();
        BookDao bookDao = db.getBookDao();
        Book book = new Book();
        book.setName("Android开发艺术探索");
        book.setAuthor("任玉刚");
        book.setPrice(88.88);
        bookDao.insert(book);
        ToastUtil.show(this, "添加成功");
    }
Fragment
静态注册
- 创建Activity :FragmentStaticActivity
public class FragmentStaticActivity extends AppCompatActivity {
    @Override
    protected void onCreate(Bundle savedInstanceState) {
        super.onCreate(savedInstanceState);
        setContentView(R.layout.activity_fragment_static);
    }
}
布局文件,fragment的name属性为接下来要创建的fragment:
<?xml version="1.0" encoding="utf-8"?>
<LinearLayout
        xmlns:android="http://schemas.android.com/apk/res/android"
        xmlns:tools="http://schemas.android.com/tools"
        android:layout_width="match_parent"
        android:layout_height="match_parent"
        tools:context=".FragmentStaticActivity"
        android:orientation="vertical">
    <fragment
            android:id="@+id/fragment_static"
            android:layout_width="match_parent"
            android:name="com.cxk.chapter08.fragment.StaticFragment"
            android:layout_height="60dp"/>
    <Button
            android:layout_width="wrap_content"
            android:layout_height="wrap_content"
            android:text="button"/>
</LinearLayout>
- 创建Fragment:
public class StaticFragment extends Fragment {
    @Override
    public View onCreateView(LayoutInflater inflater, ViewGroup container,
                             Bundle savedInstanceState) {
        return inflater.inflate(R.layout.fragment_static, container, false);
    }
}
布局文件:
<?xml version="1.0" encoding="utf-8"?>
<FrameLayout xmlns:android="http://schemas.android.com/apk/res/android"
             xmlns:tools="http://schemas.android.com/tools"
             android:layout_width="match_parent"
             android:layout_height="match_parent"
             tools:context=".fragment.StaticFragment">
    <TextView
            android:layout_width="match_parent"
            android:layout_height="match_parent"
            android:text="@string/hello_blank_fragment"/>
</FrameLayout>
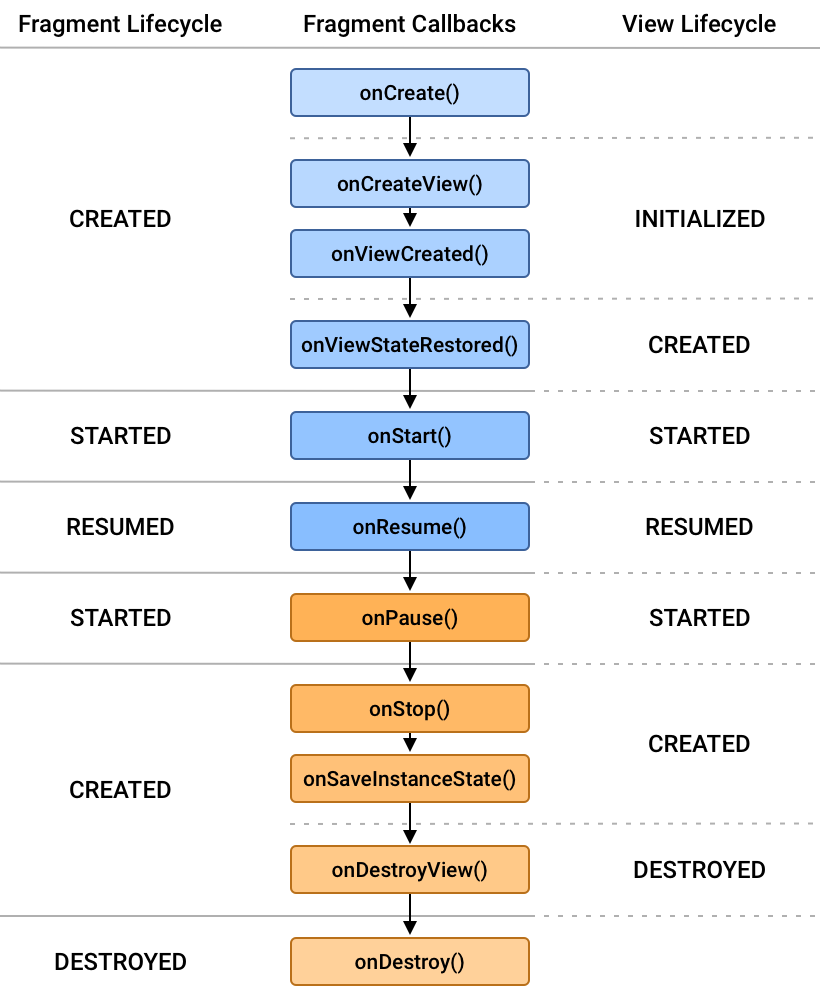
生命周期
动态注册
public class FragmentStaticActivity extends AppCompatActivity {
    @Override
    protected void onCreate(Bundle savedInstanceState) {
        super.onCreate(savedInstanceState);
        setContentView(R.layout.activity_fragment_static);
        if (savedInstanceState == null) {
            getSupportFragmentManager().beginTransaction()
                    .add(R.id.fragment_container, new StaticFragment())
                    .commit();
        }
    }
}
fragment_container位置:
<LinearLayout
        xmlns:android="http://schemas.android.com/apk/res/android"
        xmlns:tools="http://schemas.android.com/tools"
        android:layout_width="match_parent"
        android:layout_height="match_parent"
        tools:context=".FragmentStaticActivity"
        android:id="@+id/fragment_container"
        android:orientation="vertical">

    <Button
            android:layout_width="wrap_content"
            android:layout_height="wrap_content"
            android:text="button"/>
</LinearLayout>
public class StaticFragment extends Fragment {
    @Override
    public View onCreateView(LayoutInflater inflater, ViewGroup container,
                             Bundle savedInstanceState) {
        return inflater.inflate(R.layout.fragment_static, container, false);
    }
}
使用Fragment设计UI有哪些好处?
(1) 使用Fragment来设计用户界面(UI)具有多个好处,尤其在开发Android应用程序时。以下是一些使用Fragment的好处:
(2) 模块化和可重用性:Fragments允许你将UI拆分为多个小组件,每个组件都可以包含自己的布局和逻辑。这使得UI更容易维护和扩展,可以在不同的部分之间进行重用。
(3) 支持多屏幕和多设备布局:使用Fragment可以更容易地适应不同尺寸和方向的屏幕,从而提供一致的用户体验。你可以根据设备的屏幕尺寸和方向选择加载不同的Fragment。
(4) 分屏和多窗口支持:Fragment使得应用程序能够更好地支持分屏模式和多窗口模式,让用户同时执行多个任务。
(5) 管理后退堆栈:FragmentManager可以用于管理Fragment的后退堆栈,从而实现后退操作,使用户能够轻松导航和返回之前的界面状态。
(6) 灵活性:Fragments可以嵌套使用,你可以在一个Fragment中包含另一个Fragment,从而创建更复杂的UI层次结构。这种嵌套可以帮助你更好地组织代码和逻辑。
(7) 生命周期管理:每个Fragment都有自己的生命周期,这使得处理UI组件的生命周期事件更加容易,例如处理旋转屏幕时的数据保存和恢复。
(8) 可测试性:由于Fragments将UI和逻辑分离,你可以更轻松地编写单元测试,以确保你的UI组件和业务逻辑按预期工作。
动态加载:你可以在运行时动态加载和替换Fragments,以响应用户交互或其他条件,而无需重新启动整个Activity。
RecycleView
定义实体类:
public class Crime {
    private UUID id;
    private String title;
    private LocalDate date;
    private boolean solved;
}
xml中定义RecyclerView:
<FrameLayout
        xmlns:android="http://schemas.android.com/apk/res/android"
        android:layout_width="match_parent"
        android:layout_height="match_parent">
    <Button
            android:layout_width="wrap_content"
            android:layout_height="wrap_content"
            android:text="cxk"/>
    <androidx.recyclerview.widget.RecyclerView
            android:id="@+id/crime_recycler_view"
            android:layout_width="match_parent"
            android:layout_height="match_parent"
            android:layout_marginTop="100dp"
            >
    </androidx.recyclerview.widget.RecyclerView>
</FrameLayout>
定义RecyclerView中的每一项内容:
<?xml version="1.0" encoding="utf-8"?>
<FrameLayout xmlns:android="http://schemas.android.com/apk/res/android"
    android:layout_width="match_parent"
    android:layout_height="wrap_content"
    android:padding="12dp">
    <LinearLayout
        android:layout_width="match_parent"
        android:layout_height="wrap_content"
        android:orientation="vertical">
        <TextView
            android:id="@+id/crime_list_title"
            android:layout_width="match_parent"
            android:layout_height="wrap_content"
            android:text="Crime Title" />
        <TextView
            android:id="@+id/crime_list_date"
            android:layout_width="match_parent"
            android:layout_height="wrap_content"
            android:text="Crime Date" />
    </LinearLayout>
    <ImageView
        android:id="@+id/crime_list_solved"
        android:layout_gravity="right|center_vertical"
        android:src="@drawable/cxk"
        android:layout_width="32dp"
        android:layout_height="32dp"
        />
</FrameLayout>
使用Holder对数据进行绑定:
    private class CrimeHolder extends RecyclerView.ViewHolder {
        private Crime crime;
        private TextView titleTextView;
        private TextView dateTextView;
        private ImageView solvedImageView;

        public CrimeHolder(LayoutInflater inflater, ViewGroup parent) {
            super(inflater.inflate(R.layout.list_item_crime, parent, false));
            Log.d(TAG, "CrimeHolder: ");

            titleTextView = itemView.findViewById(R.id.crime_list_title);
            dateTextView = itemView.findViewById(R.id.crime_list_date);
            solvedImageView = itemView.findViewById(R.id.crime_list_solved);

            itemView.setOnClickListener(new View.OnClickListener() {
                @Override
                public void onClick(View v) {
                    adapterPosition = getAdapterPosition();
                    Intent intent = CrimePagerActivity.newIntent(getActivity(), crime.getId());
                    startActivityForResult(intent, REQUEST_CRIME);
                }
            });
        }

        public void bind(Crime crime) {
            this.crime = crime;
            titleTextView.setText(crime.getTitle());
            LocalDate date = crime.getDate();
            String week = date.getDayOfWeek().getDisplayName(TextStyle.SHORT, Locale.getDefault());
            String dateString = week + " " + date ;
            dateTextView.setText(dateString);
            solvedImageView.setVisibility(crime.isSolved() ? View.VISIBLE : View.GONE);
        }
    }
使用Adapter将真实的数据传入到 holder中进行绑定:
    private class CrimeAdapter extends RecyclerView.Adapter<CrimeHolder> {
        private List<Crime> crimes;

        public CrimeAdapter(List<Crime> crimes) {
            this.crimes = crimes;
        }

        @Override
        public CrimeHolder onCreateViewHolder(ViewGroup parent, int viewType) {
            Log.d(TAG, "onCreateViewHolder: ");
            return new CrimeHolder(LayoutInflater.from(getActivity()), parent);
        }

        @Override
        public void onBindViewHolder(CrimeHolder holder, int position) {
            Log.d(TAG, "onBindViewHolder: ");
            holder.bind(crimes.get(position));
        }

        @Override
        public int getItemCount() {
            Log.d(TAG, "getItemCount: ");
            return crimes.size();
        }
    }
声明的全局变量为:
    private static final String TAG = "CriminalIntent";
    private RecyclerView recyclerView;
    private CrimeAdapter crimeAdapter;
    private static final int REQUEST_CRIME = 1;
    private int adapterPosition;
在Fragment的onCreateView中为recyclerView设置布局方式
    @Override
    public View onCreateView(LayoutInflater inflater, ViewGroup container, Bundle savedInstanceState) {
        View view = inflater.inflate(R.layout.fragment_crime_list, container, false);
        recyclerView = view.findViewById(R.id.crime_recycler_view);
        recyclerView.setLayoutManager(new LinearLayoutManager(getActivity()));
        updateUI();
        return view;
    }
在updateUI中,将Adapter创建出来:
    private void updateUI() {
        CrimeLab crimeLab = CrimeLab.getInstance();
        List<Crime> crimes = crimeLab.getCrimes();

        if (crimeAdapter == null) {
            crimeAdapter = new CrimeAdapter(crimes);
            recyclerView.setAdapter(crimeAdapter);
        } else {
            crimeAdapter.notifyItemChanged(adapterPosition);
        }
    }
完整代码如下:
package com.cxk.criminalintent;
public class CrimeListFragment extends Fragment {
    private static final String TAG = "CriminalIntent";
    private RecyclerView recyclerView;
    private CrimeAdapter crimeAdapter;
    private static final int REQUEST_CRIME = 1;
    private int adapterPosition;
    @Override
    public View onCreateView(LayoutInflater inflater, ViewGroup container, Bundle savedInstanceState) {
        View view = inflater.inflate(R.layout.fragment_crime_list, container, false);
        recyclerView = view.findViewById(R.id.crime_recycler_view);
        recyclerView.setLayoutManager(new LinearLayoutManager(getActivity()));
        updateUI();
        return view;
    }

    @Override
    public void onResume() {
        super.onResume();
        updateUI();
    }

    private void updateUI() {
        CrimeLab crimeLab = CrimeLab.getInstance();
        List<Crime> crimes = crimeLab.getCrimes();

        if (crimeAdapter == null) {
            crimeAdapter = new CrimeAdapter(crimes);
            recyclerView.setAdapter(crimeAdapter);
        } else {
            crimeAdapter.notifyItemChanged(adapterPosition);
        }
    }

    private class CrimeHolder extends RecyclerView.ViewHolder {
        private Crime crime;
        private TextView titleTextView;
        private TextView dateTextView;
        private ImageView solvedImageView;

        public CrimeHolder(LayoutInflater inflater, ViewGroup parent) {
            super(inflater.inflate(R.layout.list_item_crime, parent, false));
            Log.d(TAG, "CrimeHolder: ");

            titleTextView = itemView.findViewById(R.id.crime_list_title);
            dateTextView = itemView.findViewById(R.id.crime_list_date);
            solvedImageView = itemView.findViewById(R.id.crime_list_solved);

            itemView.setOnClickListener(new View.OnClickListener() {
                @Override
                public void onClick(View v) {
                    adapterPosition = getAdapterPosition();
                    Intent intent = CrimePagerActivity.newIntent(getActivity(), crime.getId());
                    startActivityForResult(intent, REQUEST_CRIME);
                }
            });
        }

        public void bind(Crime crime) {
            this.crime = crime;
            titleTextView.setText(crime.getTitle());
            LocalDate date = crime.getDate();
            String week = date.getDayOfWeek().getDisplayName(TextStyle.SHORT, Locale.getDefault());
            String dateString = week + " " + date ;
            dateTextView.setText(dateString);
            solvedImageView.setVisibility(crime.isSolved() ? View.VISIBLE : View.GONE);
        }
    }

    private class CrimeAdapter extends RecyclerView.Adapter<CrimeHolder> {
        private List<Crime> crimes;

        public CrimeAdapter(List<Crime> crimes) {
            this.crimes = crimes;
        }

        @Override
        public CrimeHolder onCreateViewHolder(ViewGroup parent, int viewType) {
            Log.d(TAG, "onCreateViewHolder: ");
            return new CrimeHolder(LayoutInflater.from(getActivity()), parent);
        }

        @Override
        public void onBindViewHolder(CrimeHolder holder, int position) {
            Log.d(TAG, "onBindViewHolder: ");
            holder.bind(crimes.get(position));
        }

        @Override
        public int getItemCount() {
            Log.d(TAG, "getItemCount: ");
            return crimes.size();
        }
    }
}
在CrimeLab 存储Crime的文件中使用单例模式:
public class CrimeLab {
    private static CrimeLab crimeLab;
    public static CrimeLab getInstance() {
        if (crimeLab == null) {
            crimeLab = new CrimeLab();
        }
        return crimeLab;
    }
}
后台任务
异步线程
https://developer.android.google.cn/guide/background/asynchronous/java-threads?hl=zh-cn
Android UI线程(主线程)有以下几个特点:
- 单线程模型: Android应用的UI框架采用单线程模型,也称为主线程。所有与用户界面相关的操作都在主线程上执行。这确保了对UI的访问是同步的,避免了多线程并发操作UI可能引发的问题。
- 响应用户输入: 主线程负责监听和响应用户的输入事件,例如触摸屏幕、按键等。用户的交互行为会触发相应的UI事件,这些事件在主线程上被处理。
- 更新UI组件: 所有对UI组件(如TextView、Button等)的操作必须在主线程上进行。这包括修改组件的可见性、文本内容、颜色等属性。如果在非主线程上更新UI,可能导致应用崩溃或出现不可预测的行为。
- ANR(Application Not Responding): 主线程负责处理应用的事件循环,如果在主线程上执行耗时的操作(如网络请求、复杂计算等),可能导致UI无法响应用户操作,引发ANR错误。因此,长时间运行的任务应该放在异步线程中执行,以保持UI的响应性。
- 主线程阻塞问题: 主线程被阻塞时,整个应用的响应性会受到影响。因此,耗时的任务应该在子线程或异步任务中执行,以避免阻塞主线程。
在Android中,异步线程通常使用AsyncTask类来实现。AsyncTask允许在后台执行耗时操作,并在UI线程上更新UI组件。以下是使用异步线程的一般步骤:
- 创建一个继承自
AsyncTask的子类: 需要创建一个新的类,继承自AsyncTask,并实现其抽象方法。 - 实现
doInBackground方法: 在doInBackground方法中执行后台任务,例如网络请求、文件操作、或其他耗时操作。在这个方法中,不要直接更新UI组件。 - 实现其他回调方法(可选):
AsyncTask提供了其他一些回调方法,如onPreExecute(在doInBackground执行前调用)、onPostExecute(在doInBackground执行后调用)、onProgressUpdate(用于更新进度,通常与publishProgress一起使用)、onCancelled(任务被取消时调用)。 - 在UI线程上启动异步任务: 在UI线程上创建异步任务的实例并调用
execute方法启动任务。通常,这是在用户触发某个事件(如点击按钮)时执行的。
源码:
public abstract class AsyncTask<Params, Progress, Result>
- Params: 传递给异步任务执行时的参数的类型。
- Progress: 异步任务在执行的时候将执行的进度返回给UI线程的参数的类型。
- Result: 异步任务执行完后返回给UI线程的结果的类型。
AsyncTask 的几个主要方法中,doInBackground 方法运行在子线程,execute、onPreExecute、onProgressUpdate、onPostExecute 这几个方法都是在 UI 线程运行的。
注意事项 :
- AsyncTask 的实例必须在 UI Thread 中创建。
- 只能在 UI 线程中调用 AsyncTask 的 execute 方法。
- AsyncTask 被重写的四个方法是系统自动调用的,不应手动调用。
- 每个 AsyncTask 只能被执行一次,多次执行会引发异常。
- AsyncTask 的四个方法,只有 doInBackground 方法是运行在其他线程中,其他三个方法都运行在 UI 线程中,也就说其他三个方法都可以进行 UI 的更新操作。
- AsyncTask 默认是串行执行,如果需要并行执行,使用接口 executeOnExecutor 方法。
package com.cxk.testasyntask;

import androidx.appcompat.app.AppCompatActivity;

import android.os.AsyncTask;
import android.os.Bundle;
import android.util.Log;
import android.view.View;
import android.widget.ProgressBar;
import android.widget.Toast;

public class MainActivity extends AppCompatActivity {

    private ProgressBar bar = null;
    private String filename;
    private DownloadTask downloadtask = null;

    @Override
    protected void onCreate(Bundle savedInstanceState) {
        super.onCreate(savedInstanceState);
        // 设置布局文件
        setContentView(R.layout.activity_main);
        // 初始化进度条
        bar = (ProgressBar) findViewById(R.id.progressBar);
    }

    // 点击下载按钮触发的方法
    public void onDownload(View v) {
        // 设置要下载的文件名
        filename = "test.bmp";
        // 创建并执行下载任务
        downloadtask = new DownloadTask();
        downloadtask.execute(filename);
    }

    // 点击取消按钮触发的方法
    public void onCancel(View v) {
        // 取消当前下载任务
        downloadtask.cancel(false);
    }

    // 自定义的异步任务类,继承自AsyncTask
    class DownloadTask extends AsyncTask<String, Integer, Boolean> {
        // 后台线程执行文件下载操作
        @Override
        protected Boolean doInBackground(String... params) {
            // 输出日志,表示开始下载文件
            Log.i("MyTest", "开始下载文件:" + params[0]);
            // 模拟文件下载过程,循环执行100次
            for (int i = 1; i <= 100; i++) {
                // 检查任务是否被取消
                if (isCancelled()) {
                    return false;
                }
                // 输出日志,表示下载进度
                Log.i("MyTest", "下载进度:" + i);
                try {
                    // 模拟文件下载过程中的延迟
                    Thread.sleep(20);
                } catch (InterruptedException e) {
                    // 异常处理
                    e.printStackTrace();
                }
                // 以当前的i模拟已经下载的文件大小,通知UI更新下载进度
                publishProgress(i);
            }
            // 下载完成,返回true
            return true;
        }

        // 执行任务前的准备工作
        @Override
        protected void onPreExecute() {
            super.onPreExecute();
        }

        // 任务执行完成后的处理
        @Override
        protected void onPostExecute(Boolean result) {
            // 根据下载结果显示相应的提示信息
            if (result) {
                Toast.makeText(getApplicationContext(), "文件下载成功", Toast.LENGTH_LONG).show();
            } else {
                Toast.makeText(getApplicationContext(), "文件下载失败", Toast.LENGTH_LONG).show();
            }
            super.onPostExecute(result);
        }

        // 更新下载进度时调用,用于更新UI上的ProgressBar
        @Override
        protected void onProgressUpdate(Integer... values) {
            bar.setProgress(values[0]);
            super.onProgressUpdate(values);
        }

        // 任务被取消时的处理
        @Override
        protected void onCancelled(Boolean result) {
            // 显示取消下载的提示信息
            Toast.makeText(getApplicationContext(), "文件下载取消", Toast.LENGTH_SHORT).show();
            // 将ProgressBar重置为0
            bar.setProgress(0);
            super.onCancelled(result);
        }
    }
}
Service
https://developer.android.google.cn/guide/components/services?hl=zh-cn
Service 是一种可在后台执行长时间运行操作而不提供界面的应用组件。服务可由其他应用组件启动,而且即使用户切换到其他应用,服务仍将在后台继续运行。此外,组件可通过绑定到服务与之进行交互,甚至是执行进程间通信 (IPC)。例如,服务可在后台处理网络事务、播放音乐,执行文件 I/O 或与内容提供程序进行交互。
WebView
https://developer.android.google.cn/develop/ui/views/layout/webapps/webview?hl=zh-cn

