谷粒商城分布式基础篇
谷粒商城分布式基础篇
环境搭建
Docker安装mysql
拉取镜像image
docker pull mysql
创建实例container并启动
docker run -p 3307:3306 --name mysql \
-v ~/tools/docker-volumes/mysql/log:/var/log/mysql \
-v ~/tools/docker-volumes/mysql/data:/var/lib/mysql \
-v ~/tools/docker-volumes/mysql/conf:/etc/mysql/conf.d \
-e MYSQL_ROOT_PASSWORD=12345678 \
-d mysql:latest
参数说明
-p 3307:3306: 将容器内部的3306端口映射到主机的3307端口,即将容器中的 MySQL 服务映射到主机上的3307端口。--name mysql: 为容器指定一个名称,这里为 "mysql"。-v ~/tools/docker-volumes/mysql/log:/var/log/mysql: 将主机上的~/tools/docker-volumes/mysql/log目录挂载到容器内的/var/log/mysql目录,用于存储 MySQL 的日志文件。-v ~/tools/docker-volumes/mysql/data:/var/lib/mysql: 将主机上的~/tools/docker-volumes/mysql/data目录挂载到容器内的/var/lib/mysql目录,用于存储 MySQL 的数据文件。-v ~/tools/docker-volumes/mysql/conf:/etc/mysql: 将主机上的~/tools/docker-volumes/mysql/conf目录挂载到容器内的/etc/mysql目录,用于存储 MySQL 的配置文件。-e MYSQL_ROOT_PASSWORD=12345678: 设置 MySQL 的 root 用户密码为 "12345678"。-d mysql:latest: 以后台模式运行最新版本的 MySQL 容器。
进入容器:
docker exec -it mysql /bin/bash
我的配置文件挂载到了~/tools/docker-volumes/mysql/conf文件夹下面,因此需要在这个文件夹下面创建一个my.cnf的配置文件
vim my.cnf
输入以下配置内容:
[client]
default-character-set=utf8
[mysql]
default-character-set=utf8
[mysqld]
init_connect='SET collation_connection = utf8_unicode_ci'
init_connect='SET NAMES utf8'
character-set-server=utf8
collation-server=utf8_unicode_ci
skip-character-set-client-handshake
skip-name-resolve
接着重启mysql:
docker restart mysql
Docker 安装redis
拉取镜像image
docker pull redis
先提前创建一个redis.conf配置文件在~/tools/docker-volumes/redis/conf目录下面
运行redis容器:
docker run -p 6379:6379 --name redis -v ~/tools/docker-volumes/redis/data:/data \
-v ~/tools/docker-volumes/redis/conf/redis.conf:/etc/redis/redis.conf \
-d redis redis-server /etc/redis/redis.conf
使用redis-cli
docker exec -it redis redis-cli
新版本已经默认可以数据持久化了
设置开机自启:
docker update redis --restart=always
创建项目
父级maven用于聚合
    <groupId>com.cxk</groupId>
    <artifactId>gulimall</artifactId>
    <version>0.0.1</version>
    <name>gulimall</name>
    <description>聚合服务</description>

    <modules>
        <module>gulimall-coupon</module>
        <module>gulimall-member</module>
        <module>gulimall-order</module>
        <module>gulimall-product</module>
        <module>gulimall-ware</module>
    </modules>
项目结构如下:
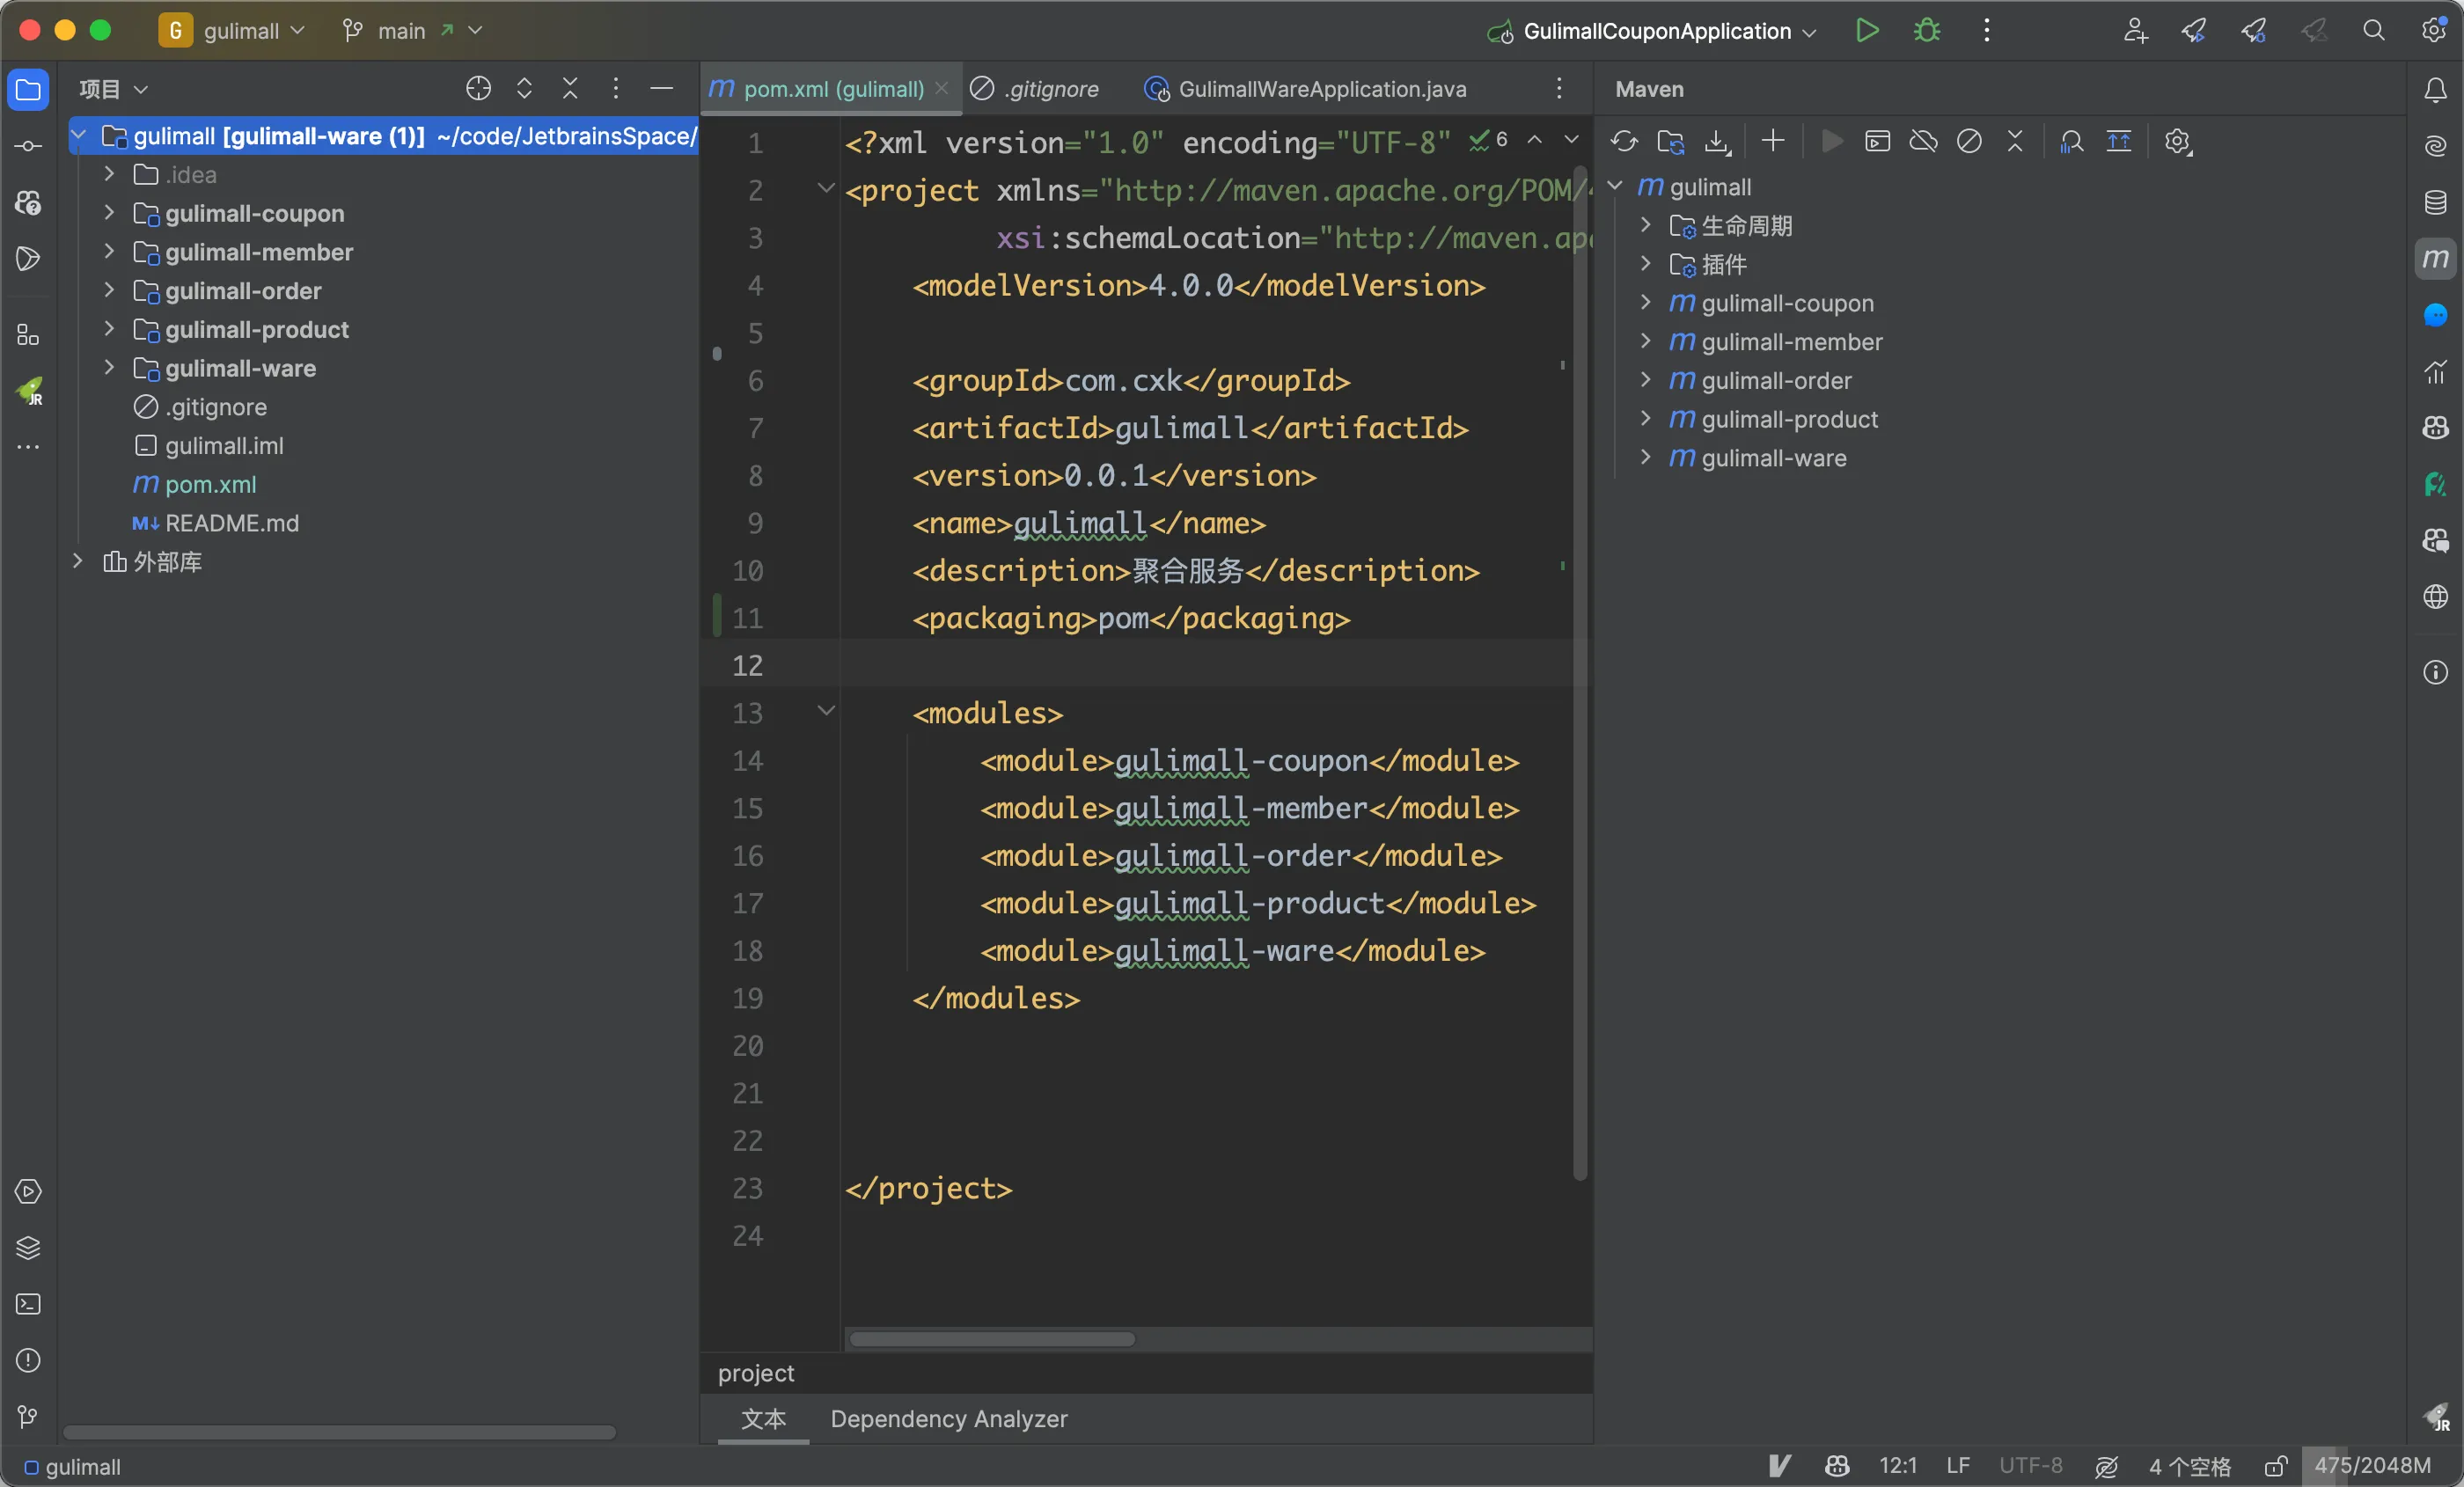
报错:

解决办法:将父级pom文件里面设置:
<packaging>pom</packaging>
数据库导入
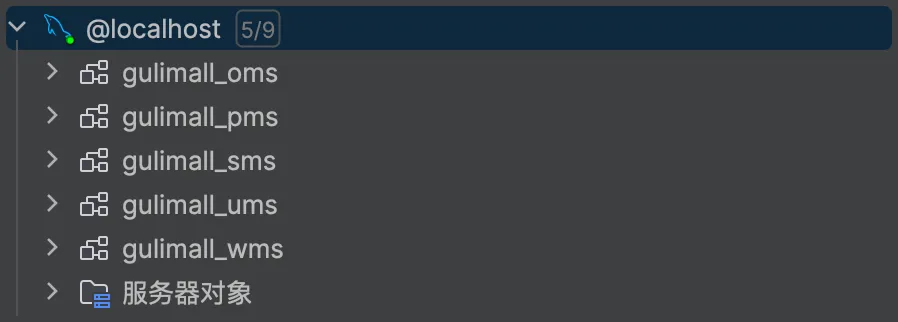
创建五个数据库,再导入sql文件
开源项目导入
导入开源项目renren-fast-vue:https://gitee.com/renrenio/renren-fast-vue
导入开源项目renren-fast:https://gitee.com/renrenio/renren-fast
父级maven加入renrnefast依赖:
    <modules>
        <module>gulimall-coupon</module>
        <module>gulimall-member</module>
        <module>gulimall-order</module>
        <module>gulimall-product</module>
        <module>gulimall-ware</module>
        <module>renren-fast</module>
    </modules>
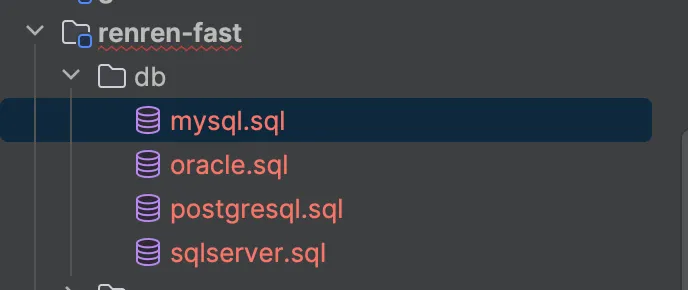
创建数据库gulimall_admin并导入sql
前端安装依赖的时候会有很多报错,解决办法如下(M1 Pro芯片):要加sudo
使用nvm, node版本选择v12.22.12
1.先安装node-sass: sudo npm install node-sass@npm:sass --ignore-scripts
2.安装chromedriver的时候会报错
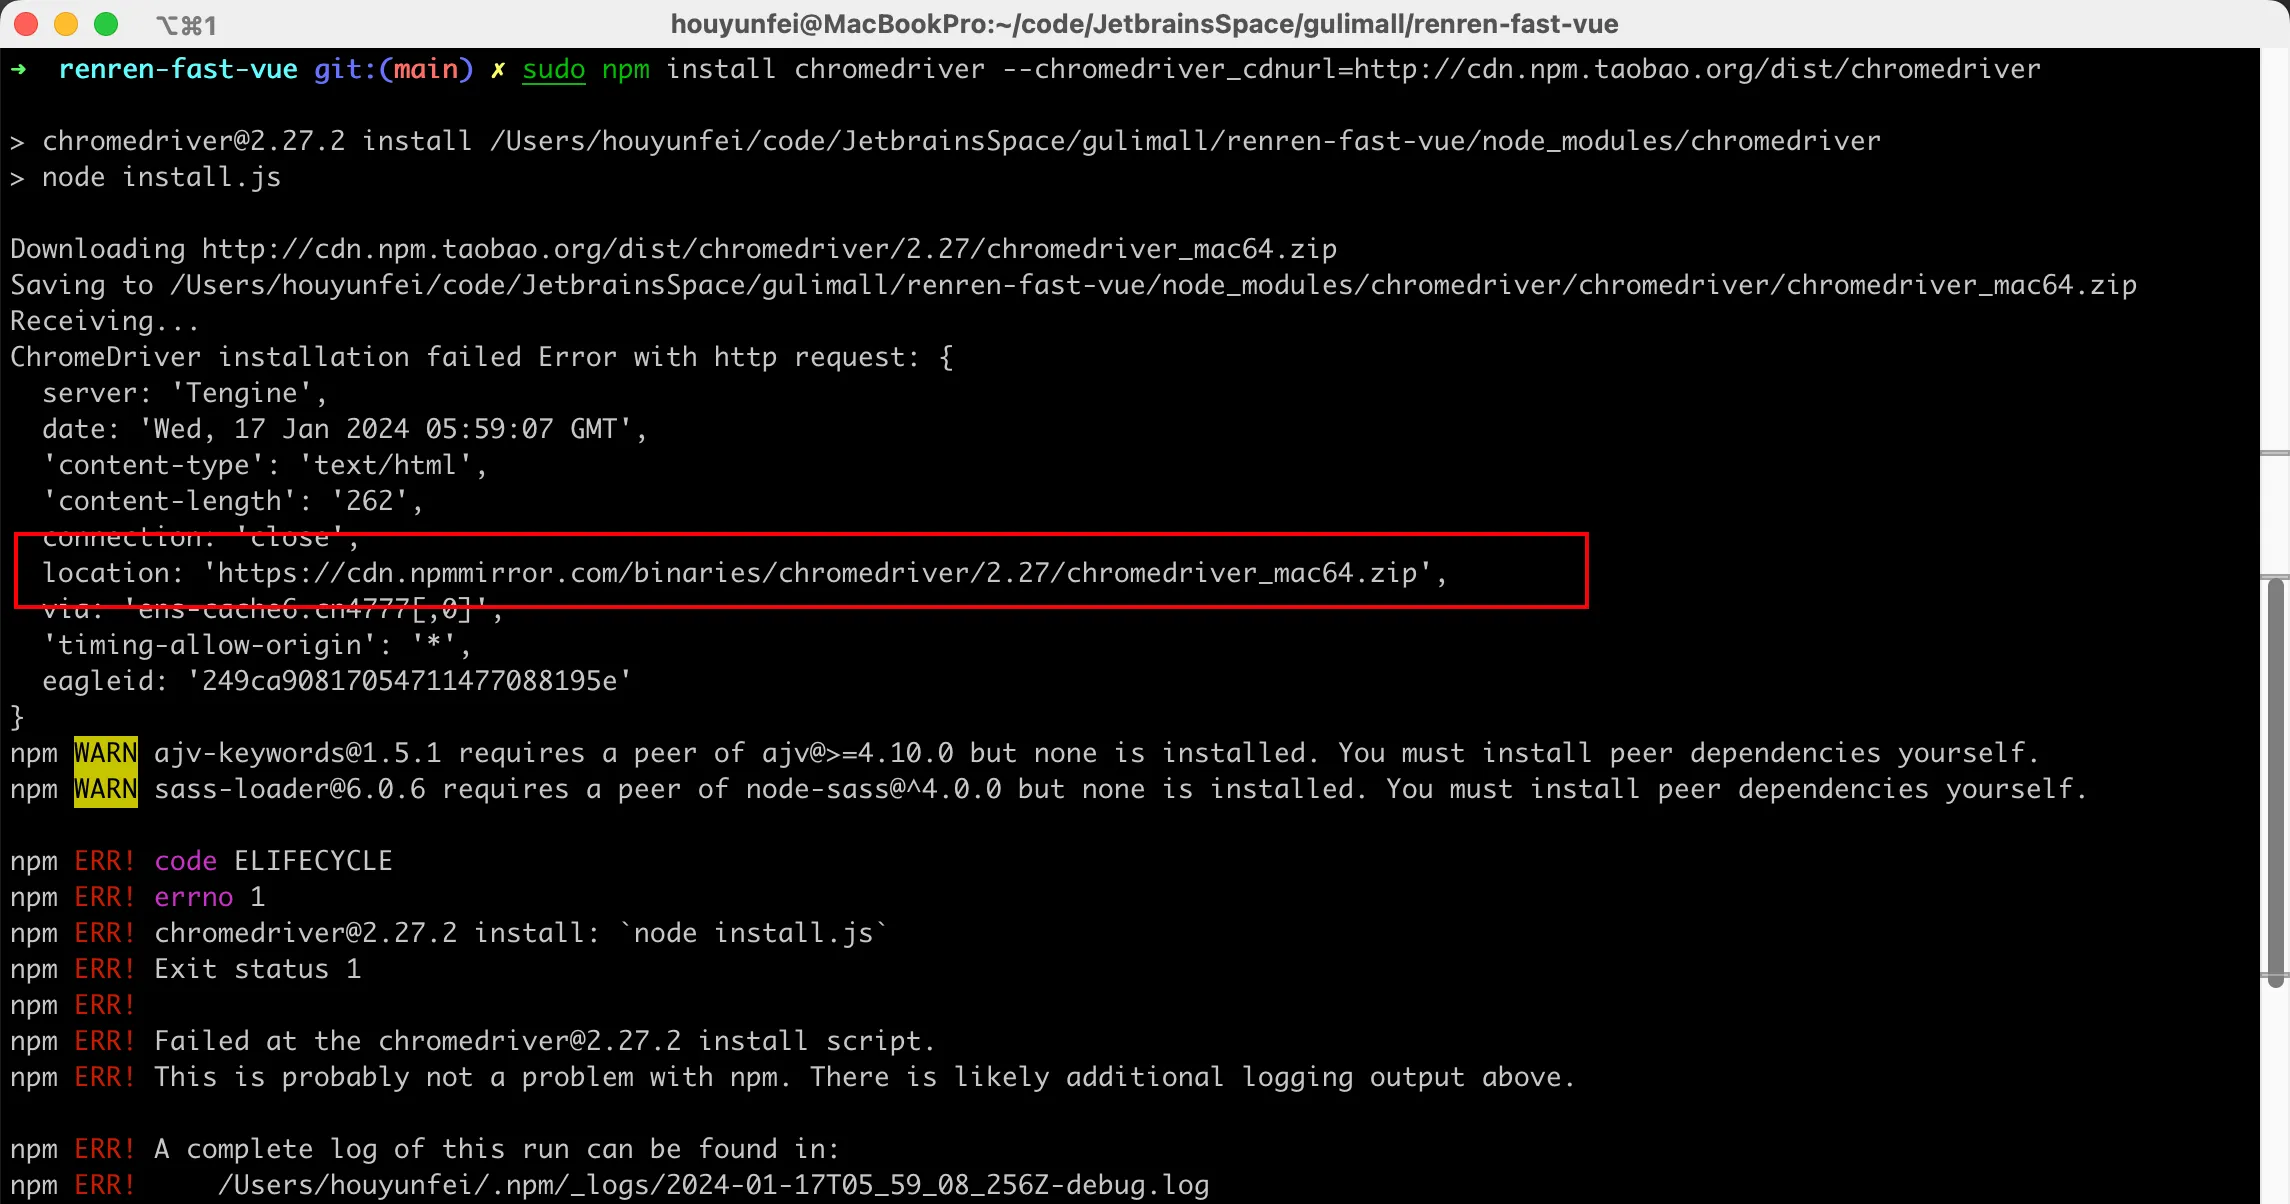
这时候先去下载链接中的这个chromedriver,
然后再安装,使用命令:后面的位置要改为自己的下载路径
sudo npm install chromedriver --chromedriver_filepath=/Users/houyunfei/Downloads/chromedriver_mac64.zip
最后再安装其他依赖:sudo npm install
成功登录:
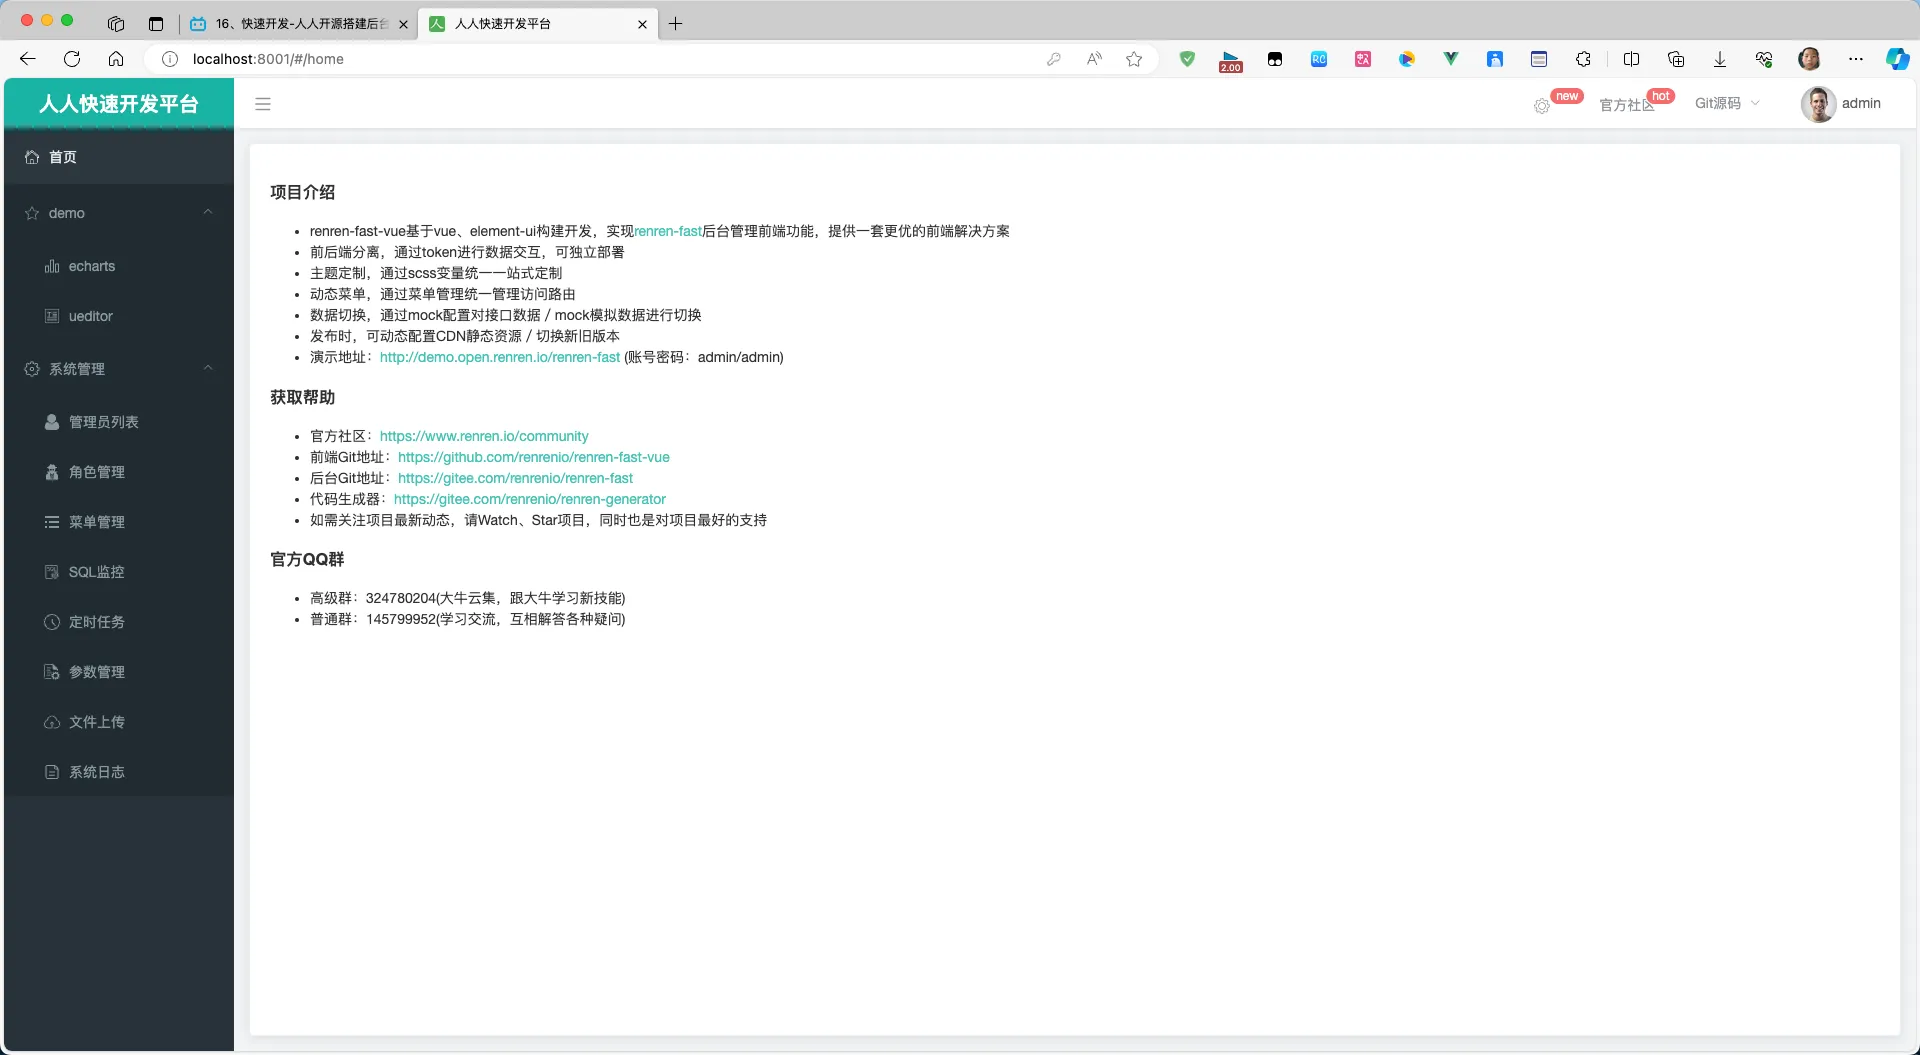
导入开源项目renren-generator:https://gitee.com/renrenio/renren-generator
加入父级maven
    <modules>
        <module>gulimall-coupon</module>
        <module>gulimall-member</module>
        <module>gulimall-order</module>
        <module>gulimall-product</module>
        <module>gulimall-ware</module>
        <module>renren-fast</module>
        <module>renren-generator</module>
    </modules>
修改代码生成器数据库信息为自己要生成的数据库:
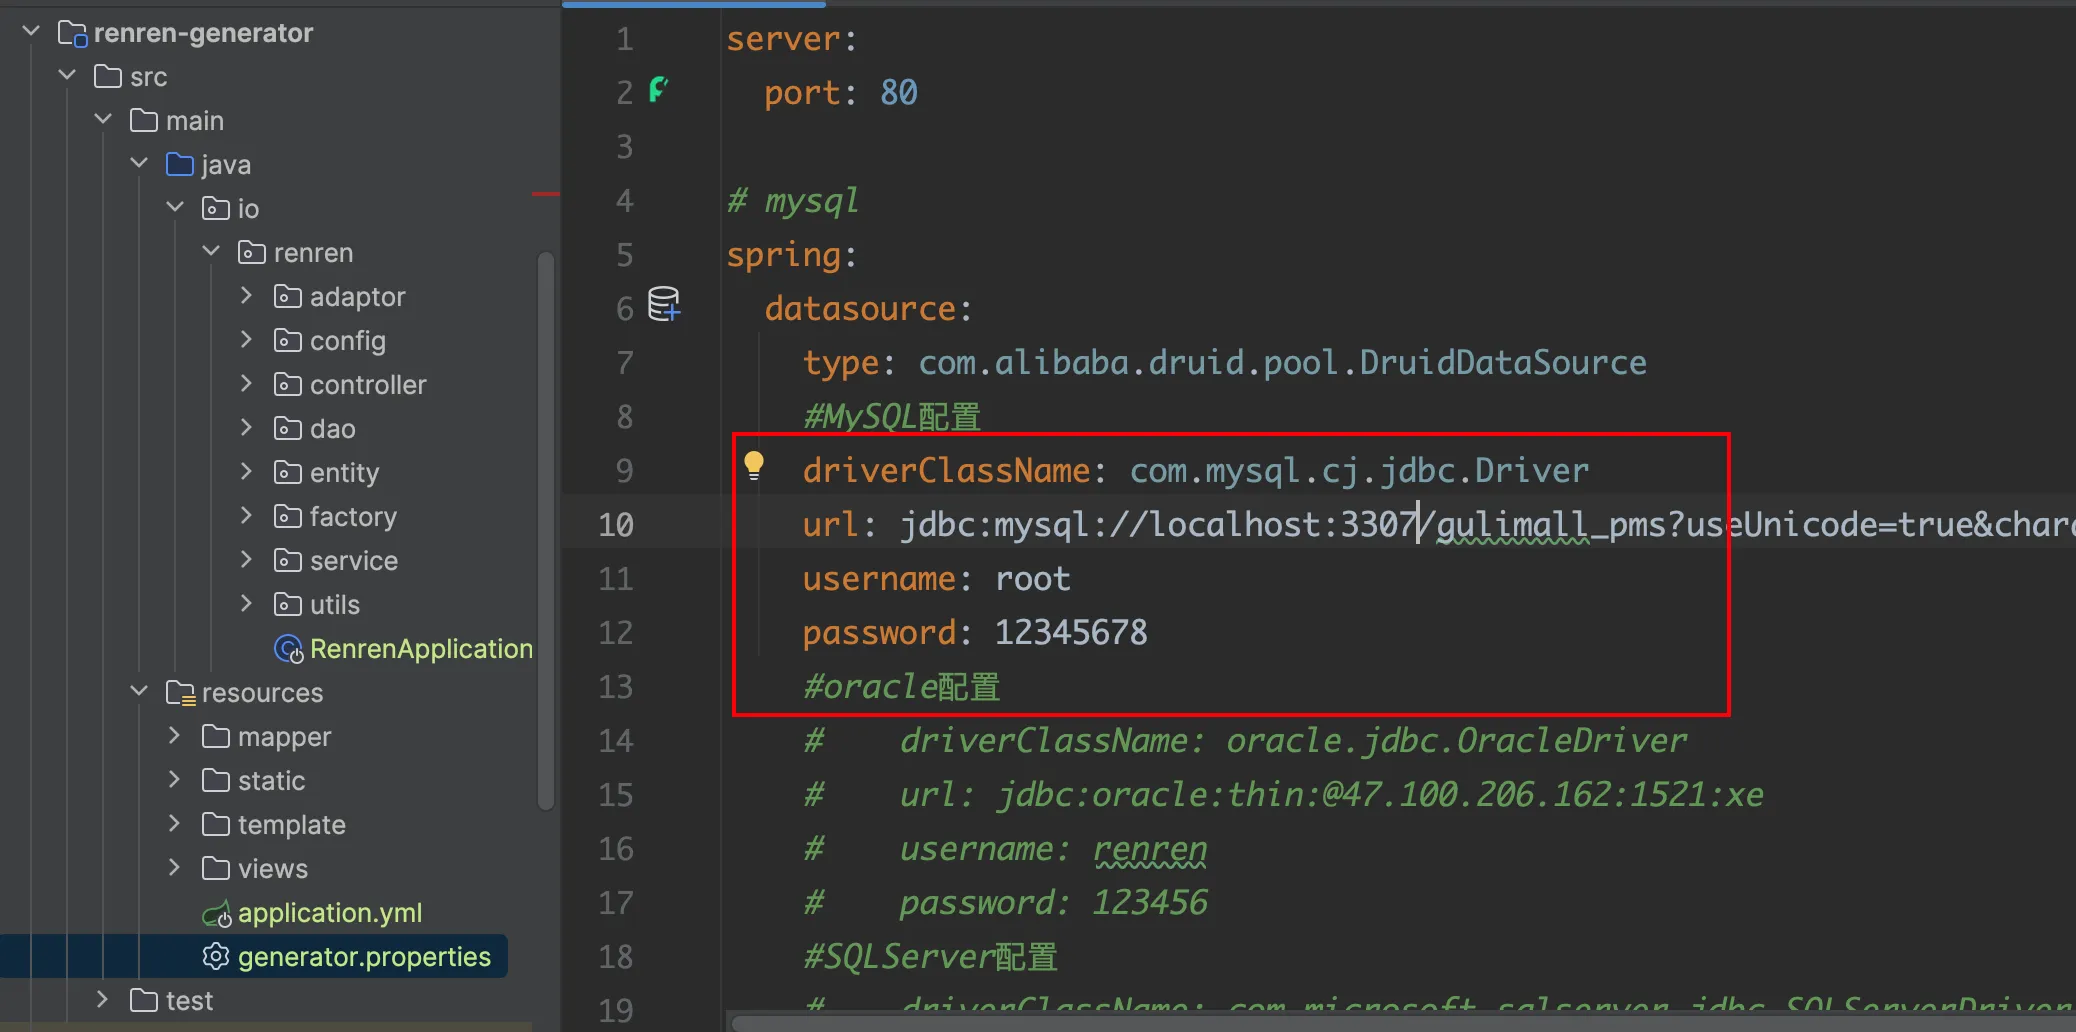
修改下面几项信息:

访问localhost:
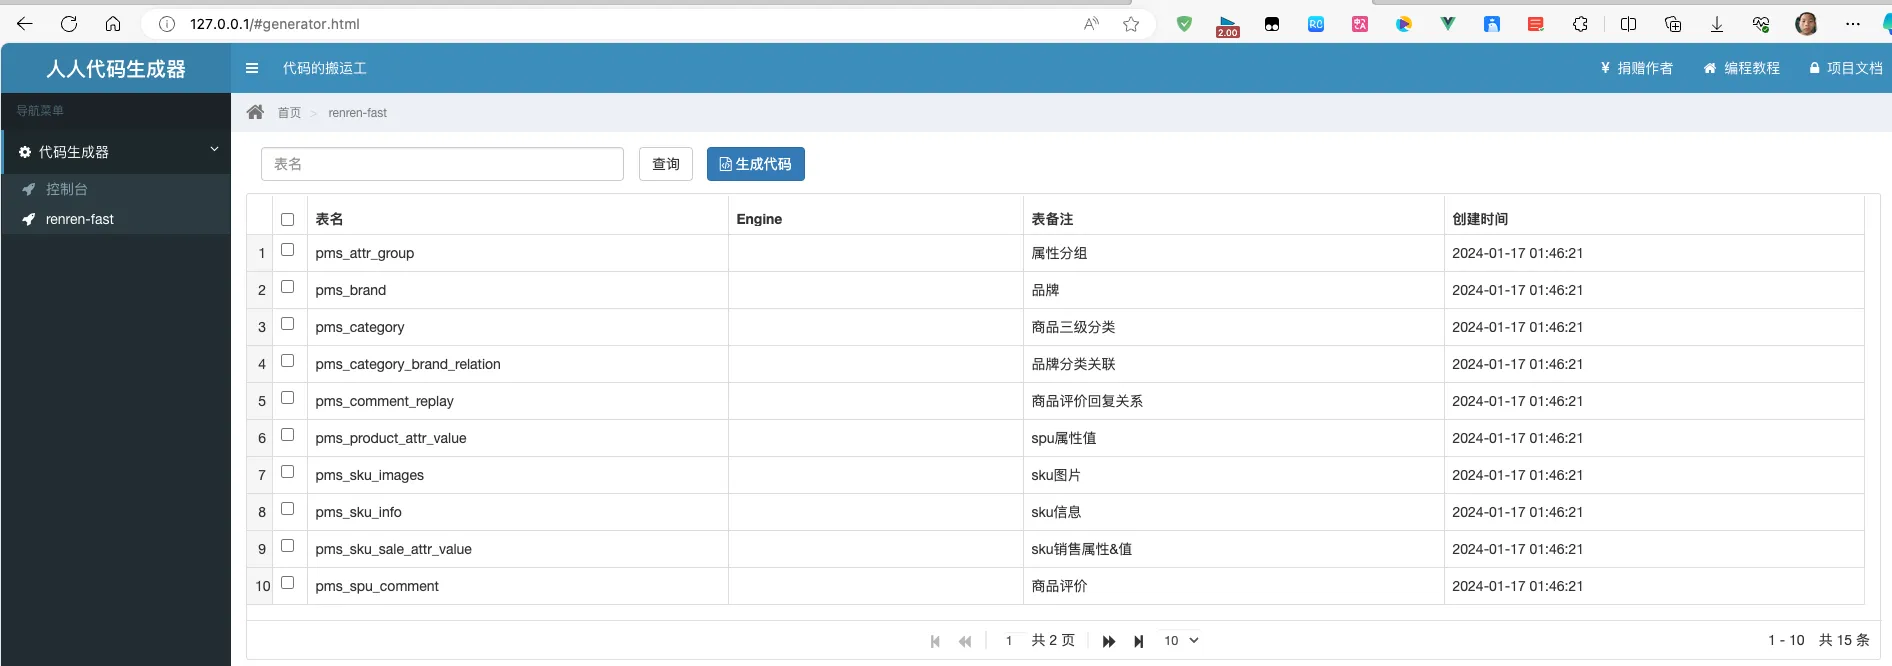
勾选所有表,然后生成代码,将生成的main文件夹复制到项目中,因为代码中有报错,缺少代码,所以还要进行下面的操作
创建gulimall-common模块,再让其他模块添加这个依赖
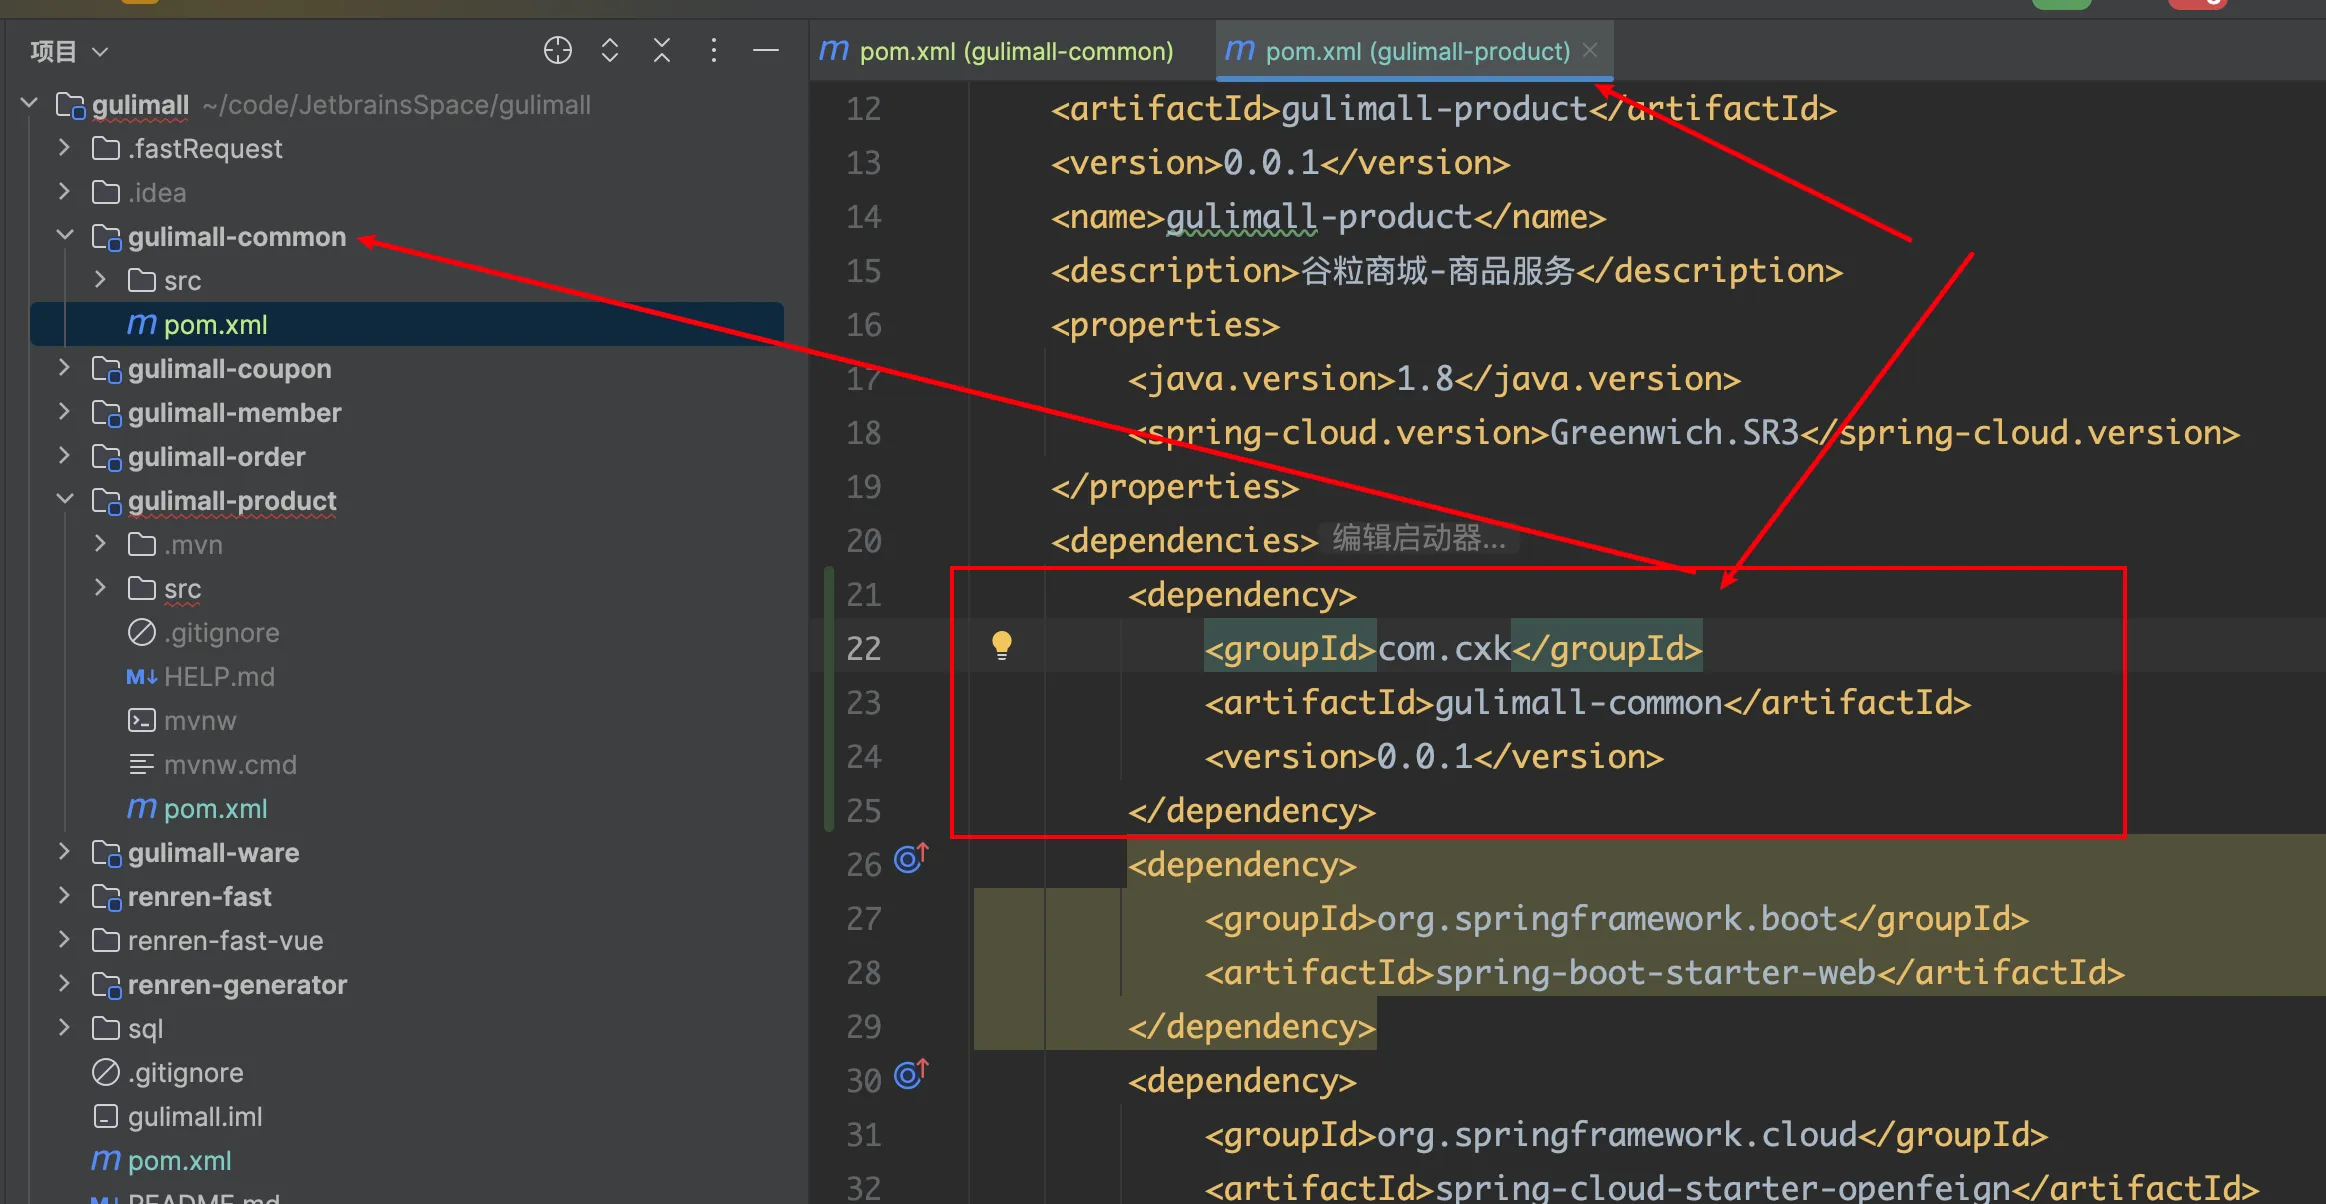
common模块导入mybatisplus等依赖
        <!-- https://mvnrepository.com/artifact/javax.servlet/javax.servlet-api -->
        <dependency>
            <groupId>javax.servlet</groupId>
            <artifactId>javax.servlet-api</artifactId>
            <version>3.1.0</version>
            <scope>provided</scope>
        </dependency>


        <dependency>
            <groupId>com.baomidou</groupId>
            <artifactId>mybatis-plus-boot-starter</artifactId>
            <version>3.2.0</version>
        </dependency>

        <dependency>
            <groupId>com.mysql</groupId>
            <artifactId>mysql-connector-j</artifactId>
            <version>8.0.33</version>
        </dependency>

        <!-- https://mvnrepository.com/artifact/org.apache.httpcomponents/httpcore -->
        <dependency>
            <groupId>org.apache.httpcomponents</groupId>
            <artifactId>httpcore</artifactId>
            <version>4.4.12</version>
        </dependency>

        <dependency>
            <groupId>commons-lang</groupId>
            <artifactId>commons-lang</artifactId>
            <version>${commons.lang.version}</version>
        </dependency>
        <dependency>
            <groupId>org.projectlombok</groupId>
            <artifactId>lombok</artifactId>
            <version>1.18.8</version>
        </dependency>
暂时用不到RequiresPermissions,可以先将逆向工程里的这个注释掉,然后重新生成代码

其他地方报错的,可以将renrenfast里面的代码复制过来,大概有如下几个:
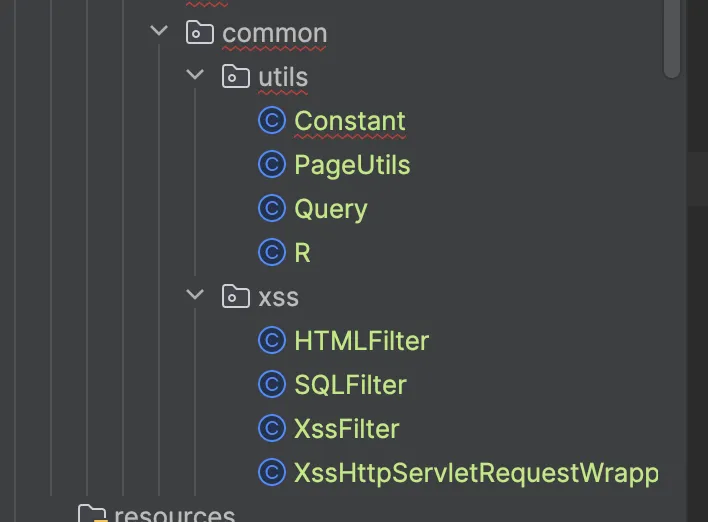
导入mybatis plus配置:
启动类加MapperScan
@SpringBootApplication
@MapperScan("com.cxk.gulimall.product.dao")
public class GulimallProductApplication {

	public static void main(String[] args) {
		SpringApplication.run(GulimallProductApplication.class, args);
	}

}
配置文件:
spring:
  datasource:
    username: root
    password: 12345678
    url: jdbc:mysql://localhost:3307/gulimall_pms?useUnicode=true&characterEncoding=UTF-8&serverTimezone=Asia/Shanghai
    driver-class-name: com.mysql.cj.jdbc.Driver

mybatis-plus:
  mapper-locations: "classpath*:/mapper/**/*.xml" # mapper文件位置
  global-config:
    db-config:
      id-type: auto # 自增
maven多模块聚合compile 时报错:
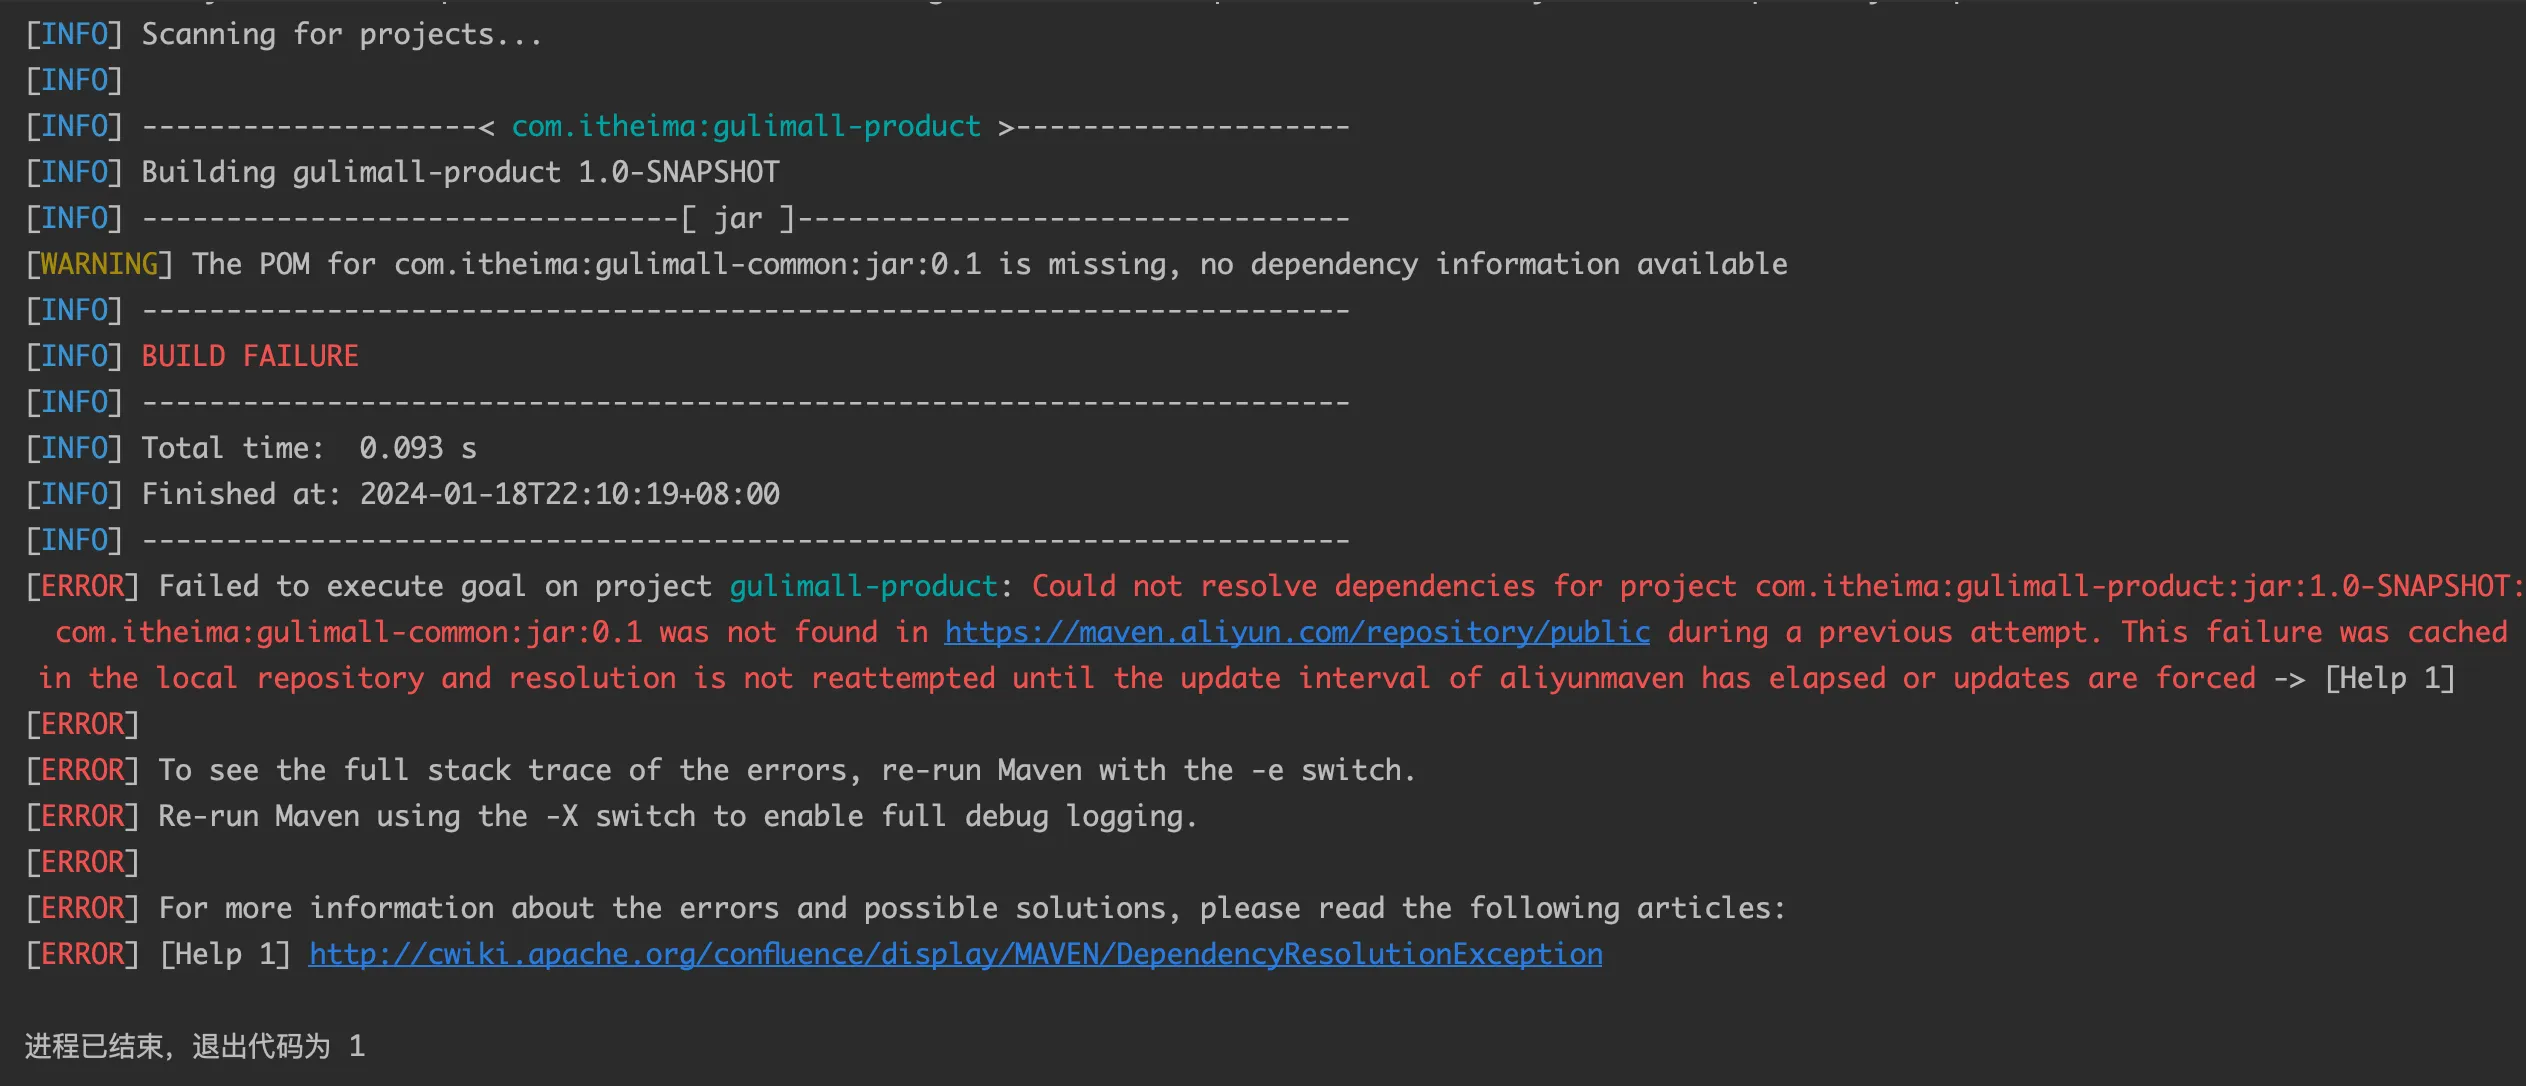
执行命令:
mvn clean install -U
清理本地仓库并重新构建
写个测试类测试:
package com.cxk.product;

import com.baomidou.mybatisplus.core.conditions.query.LambdaQueryWrapper;
import com.cxk.gulimall.product.GulimallProductApplication;
import com.cxk.gulimall.product.entity.BrandEntity;
import com.cxk.gulimall.product.service.BrandService;
import org.junit.Test;
import org.junit.runner.RunWith;
import org.springframework.beans.factory.annotation.Autowired;
import org.springframework.boot.test.context.SpringBootTest;
import org.springframework.test.context.junit4.SpringRunner;

import java.util.List;

@SpringBootTest(classes=GulimallProductApplication.class)
@RunWith(SpringRunner.class)
public class GulimallProductApplicationTests {

	@Autowired
	private BrandService brandService;

	@Test
    public void contextLoads() {
		BrandEntity brandEntity = new BrandEntity();
		brandEntity.setName("华为");
		boolean save = brandService.save(brandEntity);
		System.out.println("保存成功:" + save);

		LambdaQueryWrapper<BrandEntity> wrapper = new LambdaQueryWrapper<>();
		wrapper.eq(BrandEntity::getBrandId, 6L);
		List<BrandEntity> list = brandService.list(wrapper);
		list.forEach(System.out::println);

	}

	@Test
	public void test(){

	}
}
接下来为其他服务也逆向生成代码:
优惠券系统coupon
修改配置generator.properties
mainPath=com.cxk
#\u5305\u540D
package=com.cxk.gulimall
moduleName=coupon
#\u4F5C\u8005
author=yunfei
#Email
email=hyf1844025705@gmail.com
#\u8868\u524D\u7F00(\u7C7B\u540D\u4E0D\u4F1A\u5305\u542B\u8868\u524D\u7F00)
tablePrefix=sms_
以及mysql:
# mysql
spring:
  datasource:
    type: com.alibaba.druid.pool.DruidDataSource
    #MySQL配置
    driverClassName: com.mysql.cj.jdbc.Driver
    url: jdbc:mysql://localhost:3307/gulimall_sms?useUnicode=true&characterEncoding=UTF-8&useSSL=false&serverTimezone=Asia/Shanghai
    username: root
    password: 12345678
加入common模块依赖:
		<dependency>
			<groupId>com.cxk</groupId>
			<artifactId>gulimall-common</artifactId>
			<version>0.0.1-SNAPSHOT</version>
		</dependency>
分布式组件
SpringCloud Alibaba
eureka停止维护,这里使用spring cloud Alibaba
根据spring cloud Alibaba 技术搭配方案:https://github.com/alibaba/spring-cloud-alibaba/blob/2022.x/README-zh.md
- SpringCloud Alibaba - Nacos:注册中心(服务发现/注册)
- SpringCloud Alibaba - Nacos:配置中心(动态配置管理)(相当于替换eureka)
- SpringCloud - Ribbon:负载均衡
- SpringCloud - Feign:声明式 HTTP 客户端(调用远程服务)
- SpringCloud Alibaba - Sentinel:服务容错(限流、降级、熔断)
- SpringCloud - Gateway:API 网关(webflux 编程模式)
- SpringCloud - Sleuth:调用链监控
- SpringCloud Alibaba - Seata:原 Fescar,即分布式事务解决方案
导入依赖到common模块:
    <dependencyManagement>
        <dependencies>
            <dependency>
                <groupId>org.springframework.cloud</groupId>
                <artifactId>spring-cloud-dependencies</artifactId>
                <version>${spring-cloud.version}</version>
                <type>pom</type>
                <scope>import</scope>
            </dependency>
            <dependency>
                <groupId>com.alibaba.cloud</groupId>
                <artifactId>spring-cloud-alibaba-dependencies</artifactId>
                <version>2.1.0.RELEASE</version>
                <type>pom</type>
                <scope>import</scope>
            </dependency>
        </dependencies>
    </dependencyManagement>
Nacos注册中心
Mac启动nacos
sh startup.sh -m standalone
导入到common模块:
        <!--        服务注册/发现-->
        <dependency>
            <groupId>com.alibaba.cloud</groupId>
            <artifactId>spring-cloud-starter-alibaba-nacos-discovery</artifactId>
        </dependency>
在其他模块如coupon中:
spring:
  cloud:
    nacos:
      discovery:
        server-addr: localhost:8848 # nacos服务注册中心地址
  application:
    name: gulimall-coupon # 应用名称
在启动类上面加注解EnableDiscoveryClient:
@SpringBootApplication
@EnableDiscoveryClient
public class GulimallCouponApplication {
	public static void main(String[] args) {
		SpringApplication.run(GulimallCouponApplication.class, args);
	}
}
启动后:

OpenFeign远程调用
导入依赖到每个模块
		<dependency>
			<groupId>org.springframework.cloud</groupId>
			<artifactId>spring-cloud-starter-openfeign</artifactId>
		</dependency>
写一个接口:
@RestController
@RequestMapping("coupon/coupon")
public class CouponController {
    @Autowired
    private CouponService couponService;

    @RequestMapping("/member/list")
    public R membercoupons(){
        CouponEntity couponEntity = new CouponEntity();
        couponEntity.setCouponName("满100减10");
        return R.ok().put("coupons", Arrays.asList(couponEntity));
    }
}
在member模块进行远程调用:
package com.cxk.gulimall.member.feign;

import com.cxk.common.utils.R;
import org.springframework.cloud.openfeign.FeignClient;
import org.springframework.web.bind.annotation.RequestMapping;

@FeignClient("gulimall-coupon")
public interface CouponFeignService {
    @RequestMapping("/coupon/coupon/member/list")
    public R membercoupons();
}
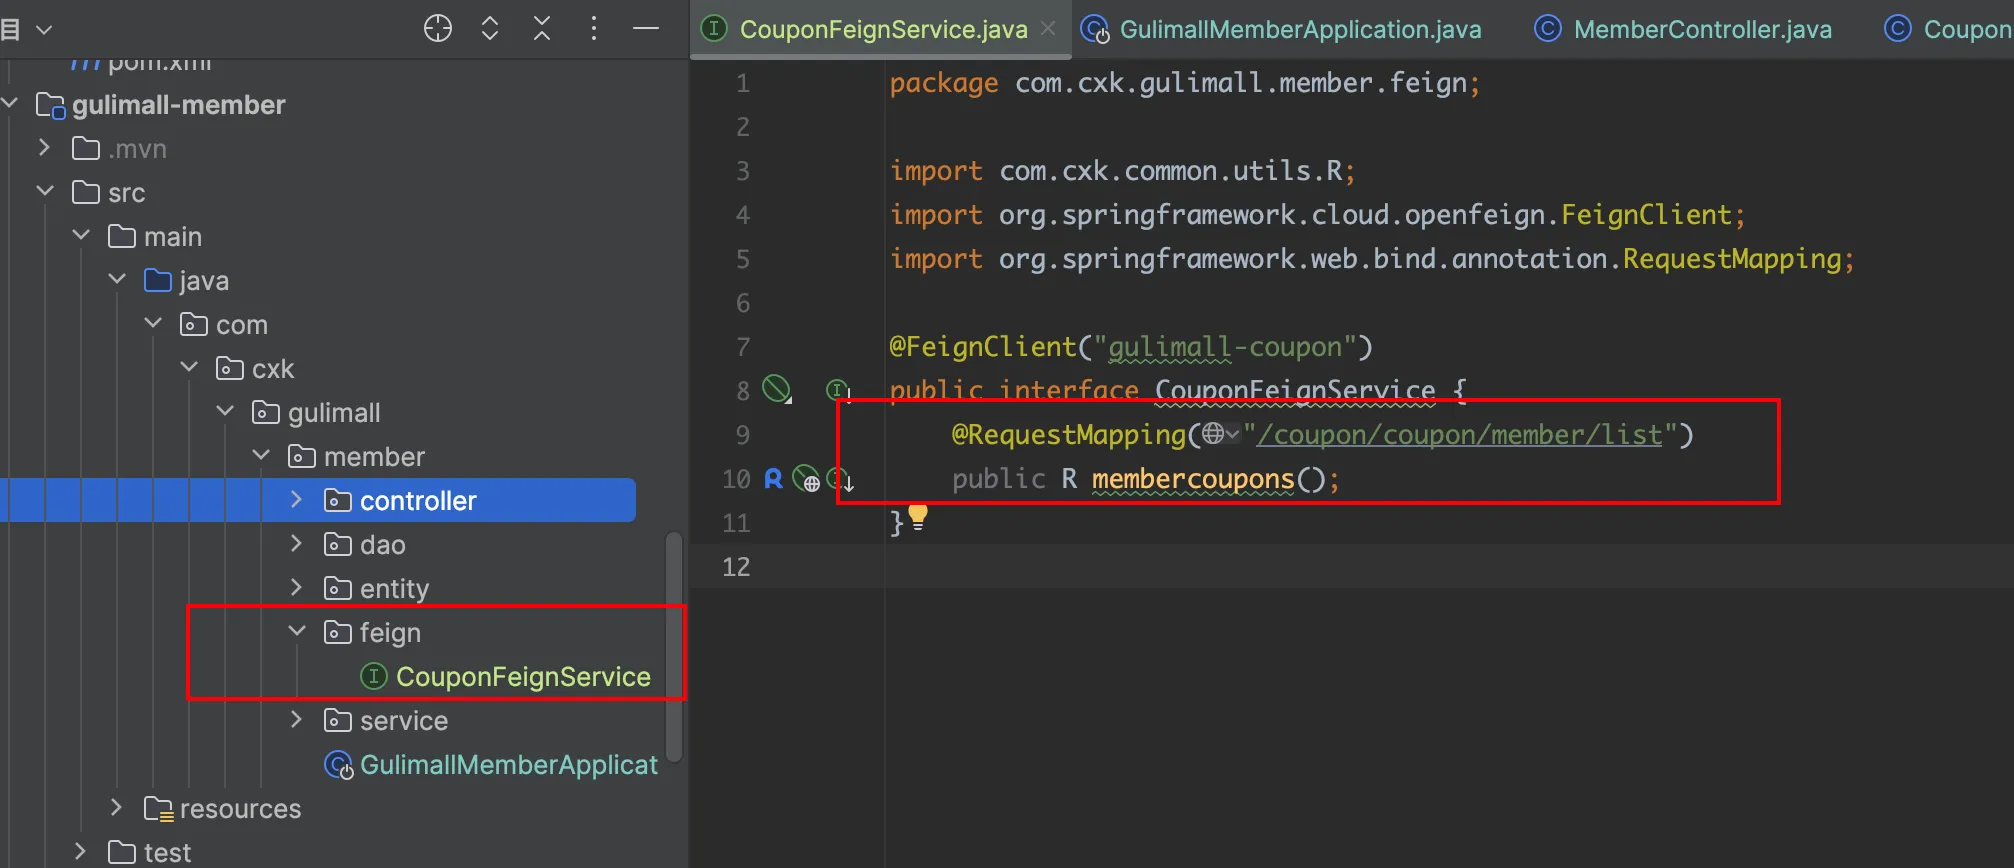
启动类添加EnableFeignClients注解
@EnableFeignClients(basePackages="com.cxk.gulimall.member.feign")
@SpringBootApplication
@EnableDiscoveryClient // 开启服务注册发现功能
public class GulimallMemberApplication {

    public static void main(String[] args) {
        SpringApplication.run(GulimallMemberApplication.class, args);
    }

}
在MemberController中进行远程调用
@RestController
@RequestMapping("member/member")
public class MemberController {
    @Autowired
    private MemberService memberService;

    @Autowired
    private CouponFeignService couponFeignService;

    @RequestMapping("/coupons")
    public R test(){
        MemberEntity memberEntity = new MemberEntity();
        memberEntity.setNickname("张三");
        R membercoupons = couponFeignService.membercoupons();
        Object coupons = membercoupons.get("coupons");
        return R.ok()
                .put("member", memberEntity)
                .put("coupons", coupons);
    }
}
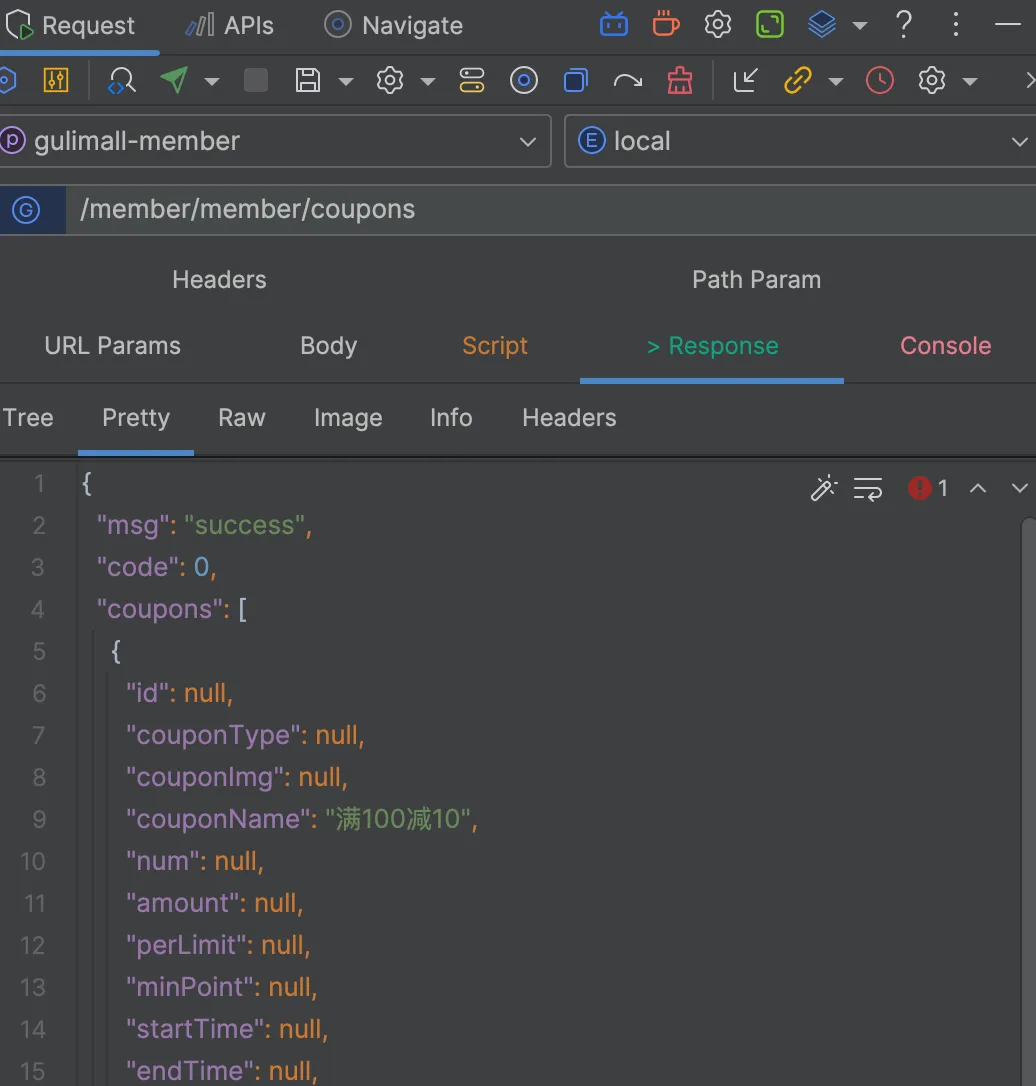
此时调用接口即可
Nacos配置中心
导入依赖到common模块:
        <!--        配置中心来做配置管理-->
        <dependency>
            <groupId>com.alibaba.cloud</groupId>
            <artifactId>spring-cloud-starter-alibaba-nacos-config</artifactId>
        </dependency>
在coupon模块下面创建一个bootstrap.yml文件,bootstrap文件会优先于application文件:
spring:
  application:
    name: gulimall-coupon

  cloud:
    nacos:
      config:
        server-addr: localhost:8848
测试配置coupon模块:
在application.properties创建一个配置文件:
coupon.user.name="cxk"
coupon.user.age=18
写一个测试接口用来获取:
@RestController
@RequestMapping("coupon/coupon")
public class CouponController {
    @Value("${coupon.user.name}")
    private String name;
    @Value("${coupon.user.age}")
    private Integer age;
    @RequestMapping("/test")
    public R test() {
        return R.ok().put("name", name).put("age", age);
    }
}
此时发送请求可以获取到值。
现在有新的需求,希望修改值之后可以实时看到结果,步骤如下:
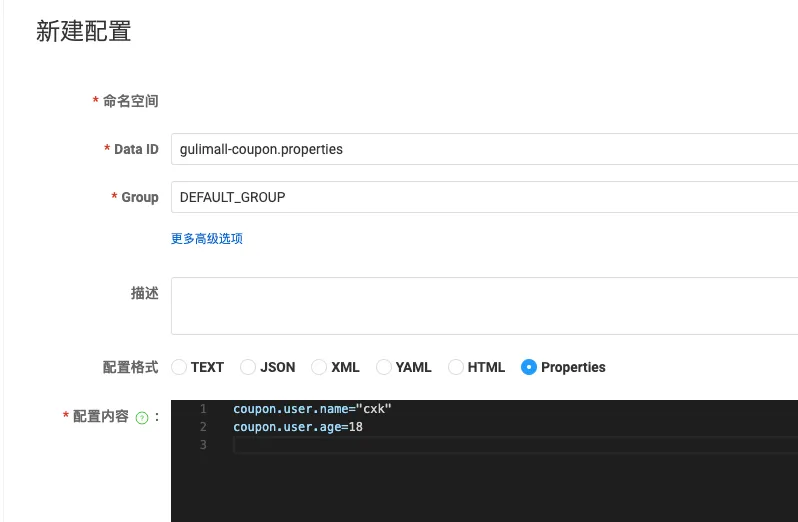
在配置列表中创建配置:

写入以下内容:
在控制器上面加注解RefreshScope:
@RestController
@RequestMapping("coupon/coupon")
@RefreshScope
public class CouponController {
此时nacos中的配置重新发布即可。如果配置中心和配置文件配置相同的项,优先使用配置中心的配置。
使用细节:
- 命名空间:
默认为public,用来做配置隔离,可以自己创建命名空间,如dev,test等

image-20240119171023665 此时需要在bootstrap文件中配置namespace 命名空间id:
spring: application: name: gulimall-coupon cloud: nacos: config: server-addr: localhost:8848 namespace: 12e5ed93-2be2-44c0-93d4-4cdc0a65426e- 配置集:所有配置文件的集合
- 配置集ID:类似文件名
Data ID:类似文件名 - 配置分组:
默认DEFAULT_GROUP
Gateway网关
官方文档:https://docs.spring.io/spring-cloud-gateway/docs/3.0.8/reference/html/#gateway-starter
创建一个网关模块:
添加common模块依赖,以及gateway依赖:
		<dependency>
			<groupId>com.cxk</groupId>
			<artifactId>gulimall-common</artifactId>
			<version>0.0.1-SNAPSHOT</version>
		</dependency>
		<dependency>
			<groupId>org.springframework.cloud</groupId>
			<artifactId>spring-cloud-starter-gateway</artifactId>
		</dependency>
开启nacos注册发现:
@SpringBootApplication(exclude = {DataSourceAutoConfiguration.class})
@EnableDiscoveryClient
public class GulimallGatewayApplication {

	public static void main(String[] args) {
		SpringApplication.run(GulimallGatewayApplication.class, args);
	}
}
测试配置路由规则:
spring:
  cloud:
    gateway:
      routes:
        - id: test_route
          uri: https://www.baidu.com
          predicates:
            - Query=url, baidu

        - id: qq_route
          uri: https://www.qq.com
          predicates:
            - Query=url, qq
此时可以访问:http://localhost:88?url=qq. -> qq.com
商品服务
三级分类
导入数据pms_catelog.sql
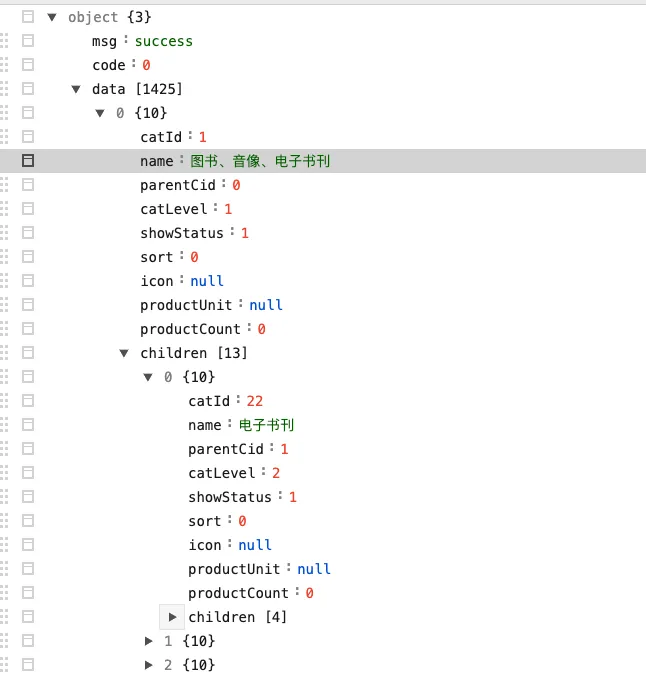
功能:查出所有分类以及子分类,以树形结构组装起来
控制器:
/**
 * 查出所有分类以及子分类,以树形结构组装起来
 */
@RequestMapping("/list/tree")
public R listWithTree(){
    List<CategoryEntity> entities= categoryService.listWithTree();
    return R.ok().put("data", entities);
}
逻辑:
@Override
public List<CategoryEntity> listWithTree() {
    //1. 查出所有分类
    List<CategoryEntity> entities = baseMapper.selectList(null);
    //2, 组装成父子的树形结构 先找到所有的一级分类
    List<CategoryEntity> level1Menu = entities.stream().filter(categoryEntity -> {
        return categoryEntity.getParentCid().equals(0L);
    }).map(menu -> {
        menu.setChildren(getChildrens(menu, entities));
        return menu;
    }).sorted((menu1, menu2) -> {
        return (menu1.getSort() == null ? 0 : menu1.getSort()) - (menu2.getSort() == null ? 0 : menu2.getSort());
    }).collect(Collectors.toList());
    return entities;
}

private List<CategoryEntity> getChildrens(CategoryEntity root, List<CategoryEntity> all) {
    List<CategoryEntity> children = all.stream().filter(categoryEntity -> {
        //找到所有的二级分类
        return categoryEntity.getParentCid().equals(root.getCatId());
    }).map(categoryEntity -> {
        categoryEntity.setChildren(getChildrens(categoryEntity, all));
        return categoryEntity;
    }).sorted((menu1, menu2) -> {
        return (menu1.getSort() == null ? 0 : menu1.getSort()) - (menu2.getSort() == null ? 0 : menu2.getSort());
    }).collect(Collectors.toList());
    return children;
}
运行结果:
前端开发:
添加一个菜单:
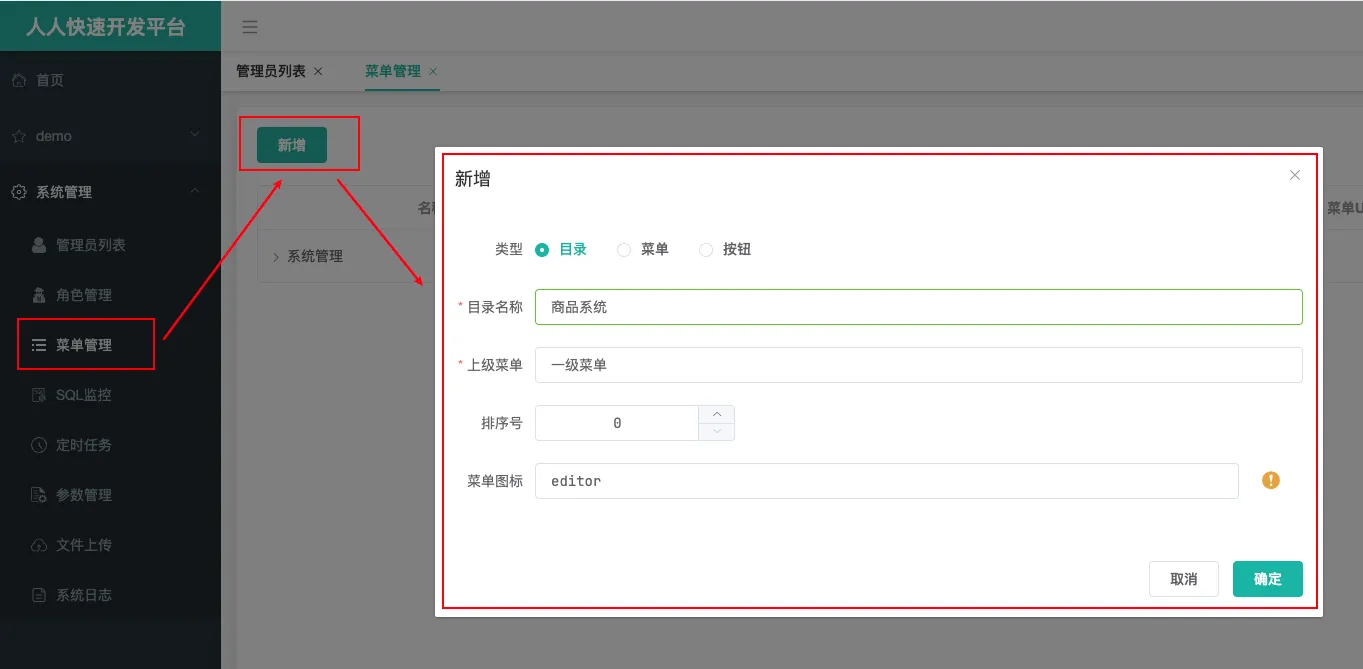
再添加一个分类维护菜单:
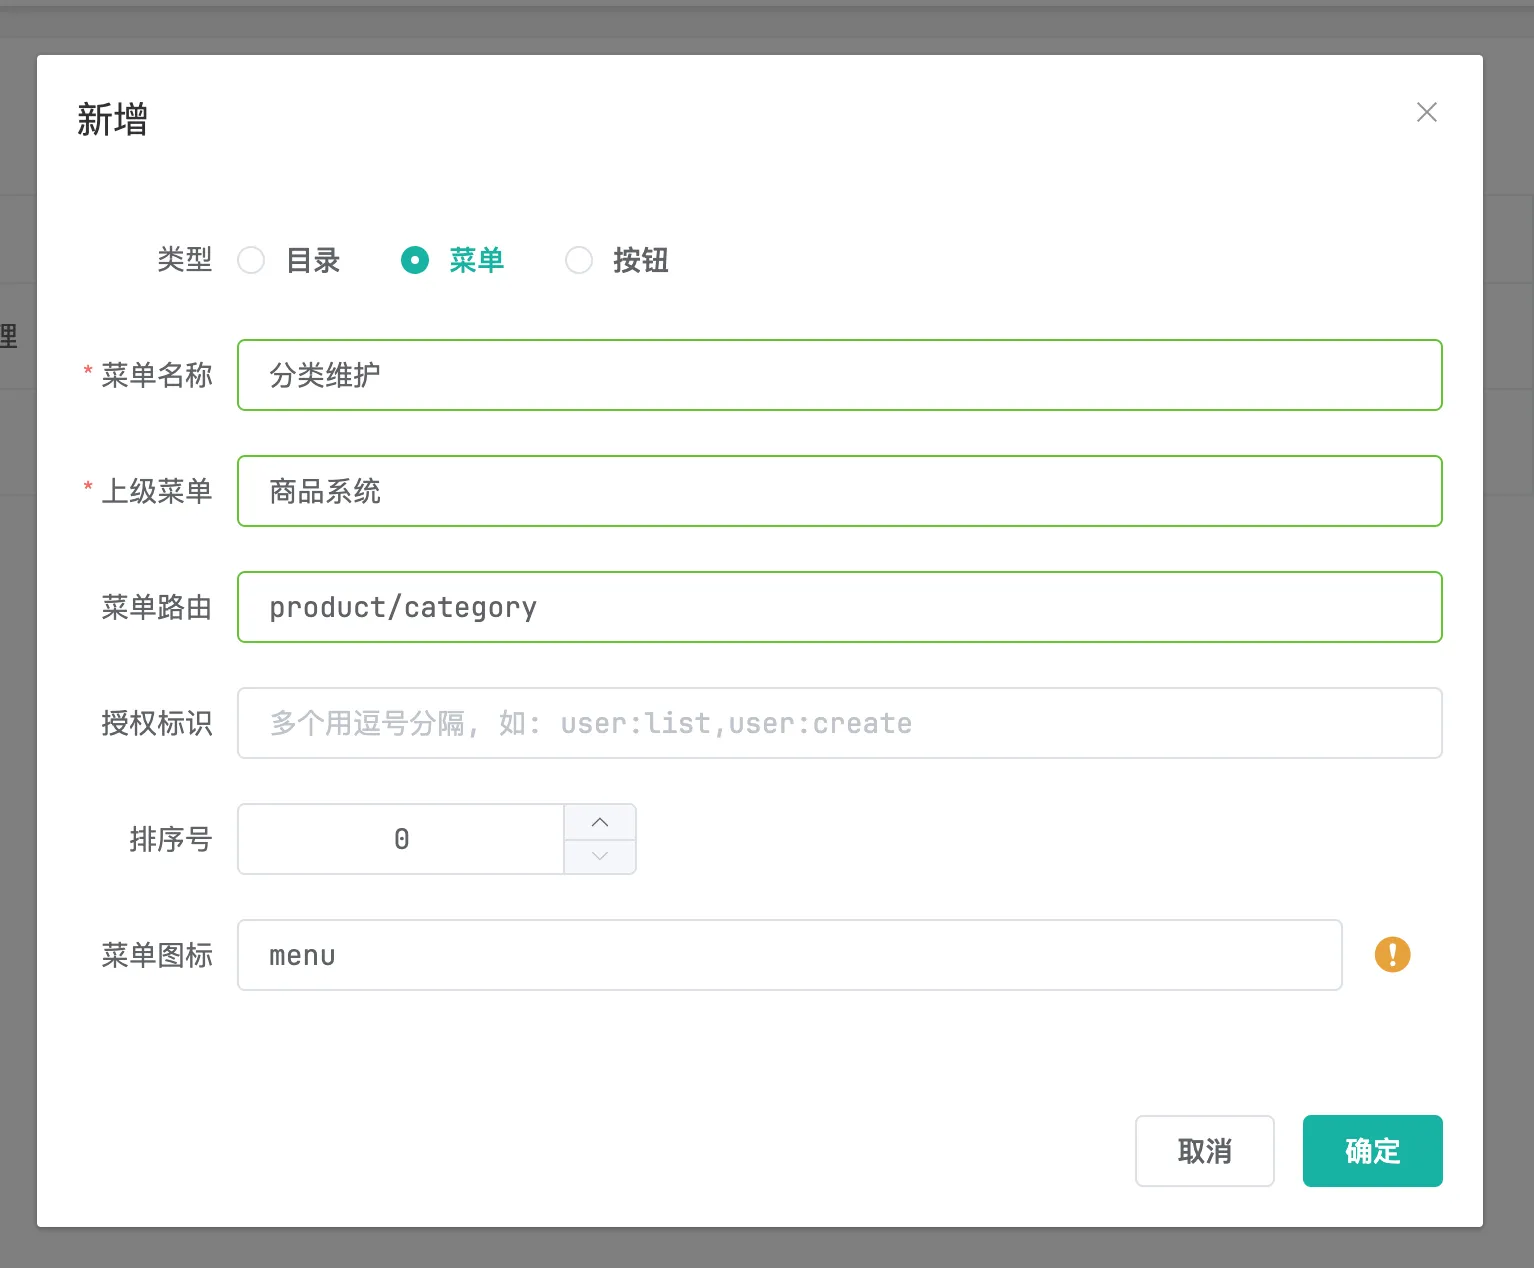
创建vue文件,路径需要和菜单路径匹配
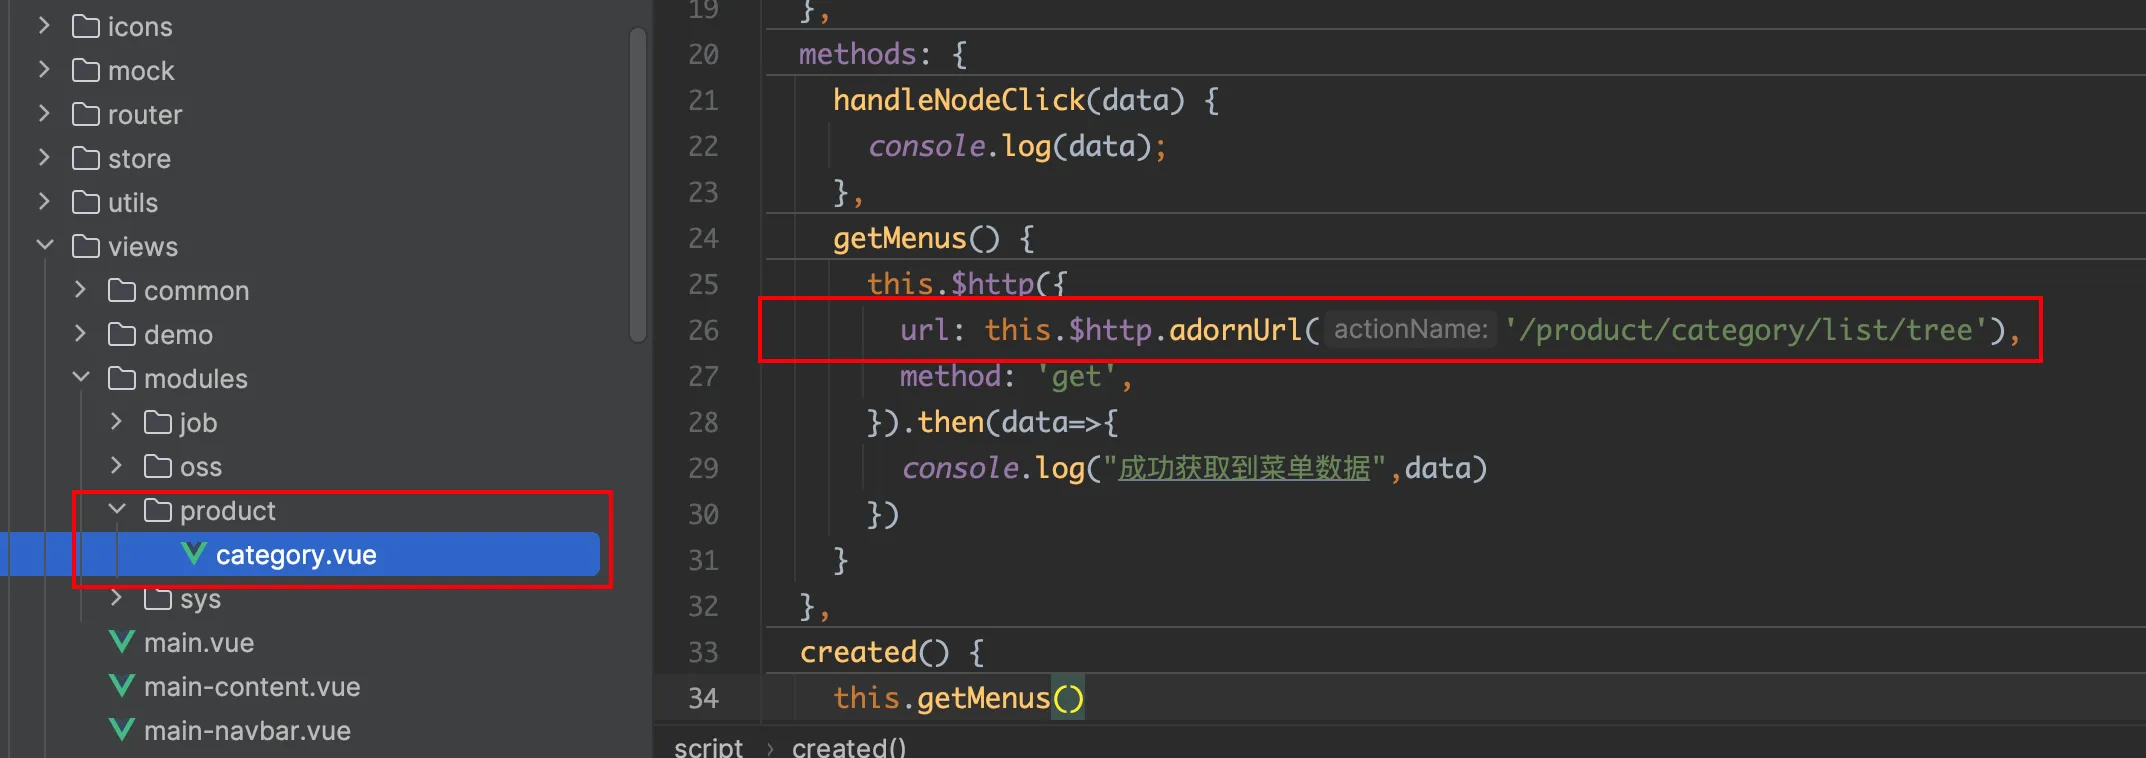
这里发送请求会直接发送到8080端口,因此需要使用网关进行处理
修改renrenfast的xml文件
修改lombok版本
<lombok.version>1.18.20</lombok.version>

修改springboot版本
	<parent>
		<groupId>org.springframework.boot</groupId>
		<artifactId>spring-boot-starter-parent</artifactId>
		<version>2.1.8.RELEASE</version>
		<relativePath></relativePath>
	</parent>

导入common模块
		<dependency>
			<groupId>com.cxk</groupId>
			<artifactId>gulimall-common</artifactId>
			<version>0.0.1-SNAPSHOT</version>
		</dependency>
修改配置:
@Configuration
public class CorsConfig implements WebMvcConfigurer {

    @Override
    public void addCorsMappings(CorsRegistry registry) {
        registry.addMapping("/**")
            .allowedOriginPatterns("*")
            .allowCredentials(true)
            .allowedMethods("GET", "POST", "PUT", "DELETE", "OPTIONS")
            .maxAge(3600);
    }
}
修改为:
.allowedOrigins("*")
配置文件中加nacos注册:
  application:
    name: renren-fast
  cloud:
    nacos:
      discovery:
        server-addr: localhost:8848
修改前端的配置向后端网关88端口发送请求:

在网关配置文件中配置路由规则:
        - id: admin_route
          uri: lb://renren-fast
          predicates:
            - Path=/api/**
          filters:
            - RewritePath=/api/(?<segment>.*), /renren-fast/$\{segment}
此时 http://localhost:88/api/xx 会被路由到http://localhost:8080/renren-fast/xx
此时点登录会出现跨域问题:

解决办法:
- nginx服务器 反向代理
- 后端处理前端发送的预检请求
网关添加配置允许跨域:
@Configuration
public class GulimallCorsConfiguration {

    @Bean
    public CorsWebFilter corsWebFilter(){
        UrlBasedCorsConfigurationSource source=new UrlBasedCorsConfigurationSource();
        CorsConfiguration corsConfiguration = new CorsConfiguration();

        //配置跨域
        corsConfiguration.addAllowedHeader("*");
        corsConfiguration.addAllowedMethod("*");
        corsConfiguration.addAllowedOrigin("*");
        corsConfiguration.setAllowCredentials(true);
        source.registerCorsConfiguration("/**",corsConfiguration);
        return  new CorsWebFilter(source);
    }

}
此时重新登录,预检请求通过:
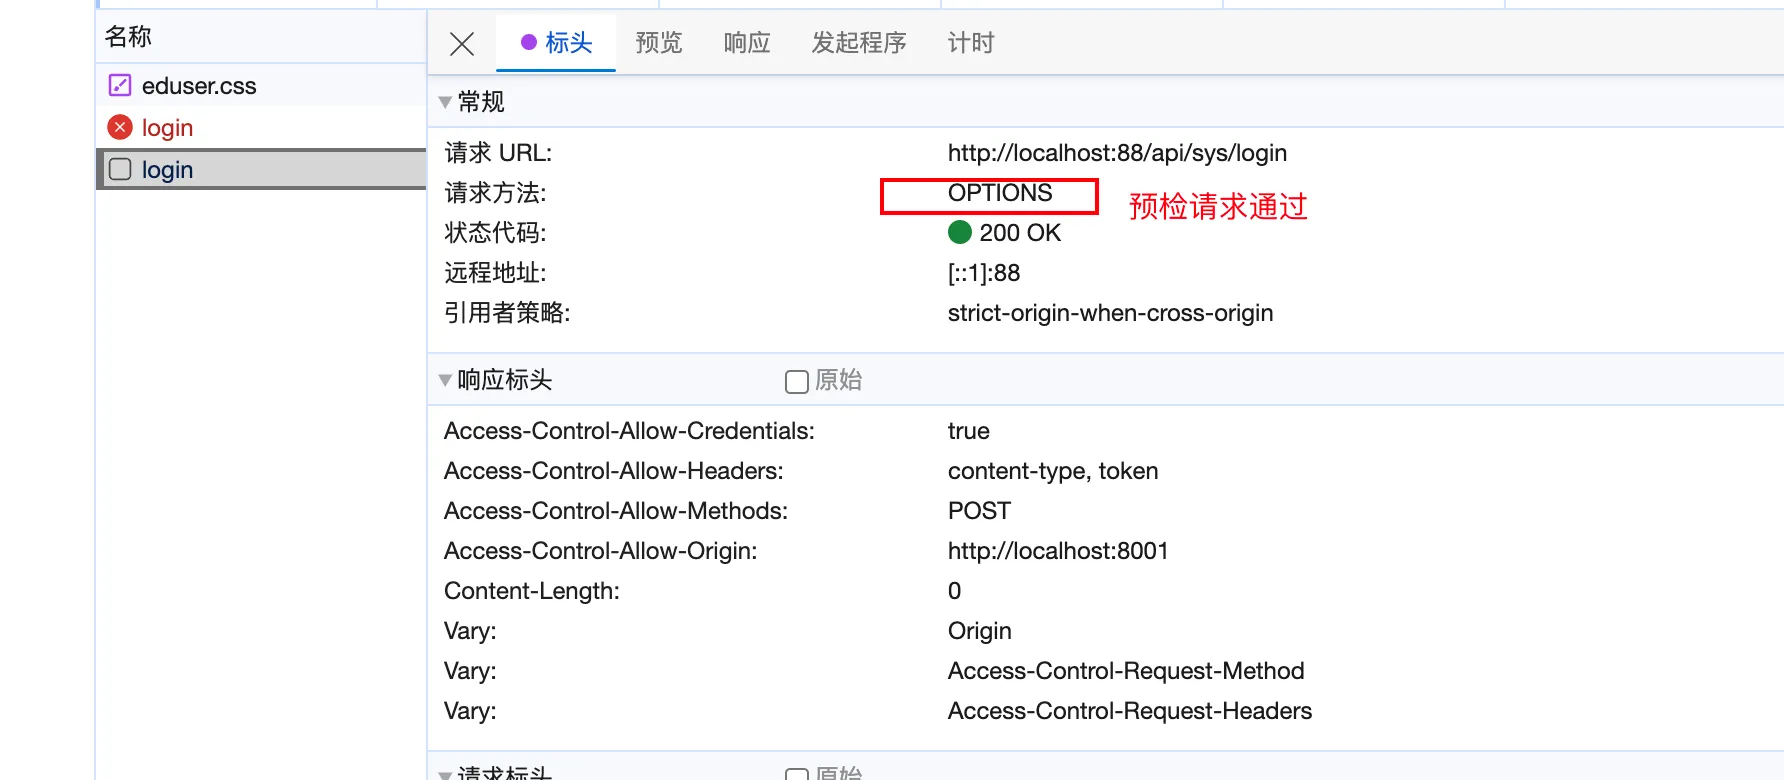
但是真实请求出现问题:
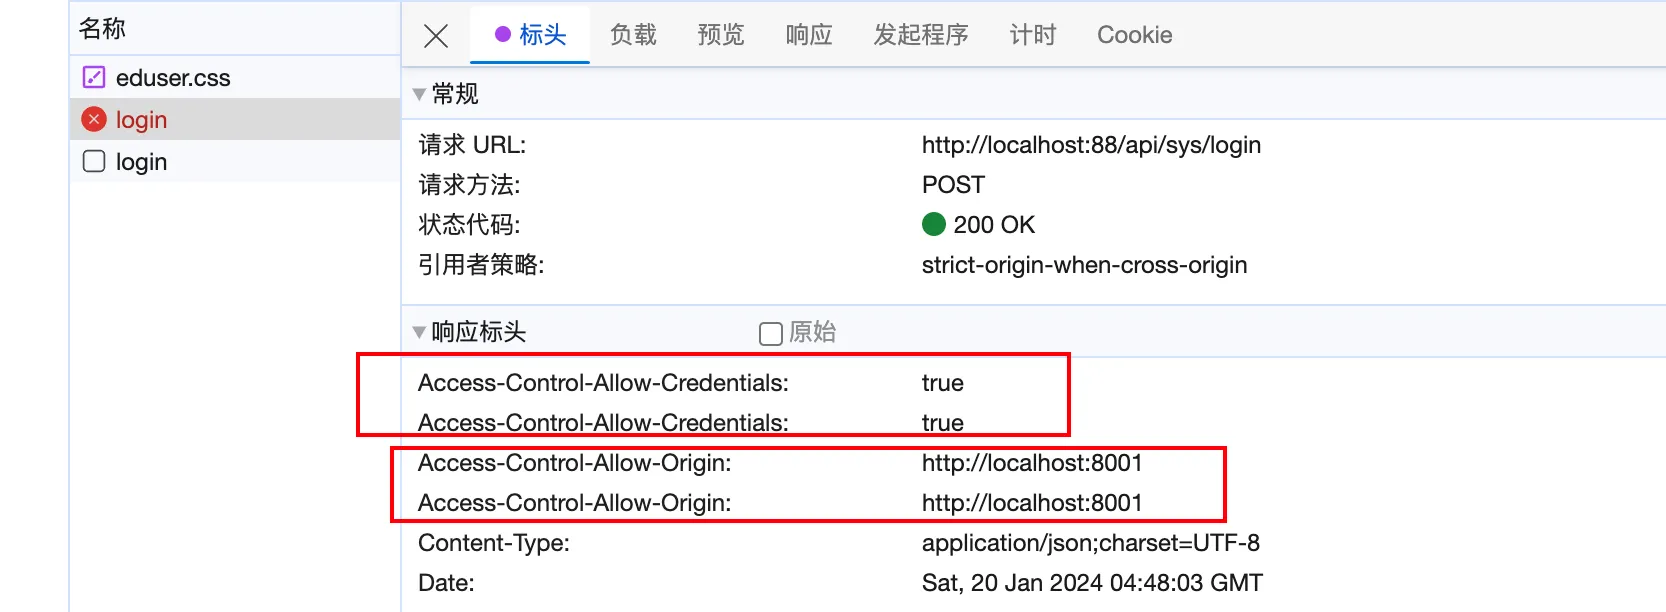

出现了多个值,需要解决,这是因为ren ren fast 项目中也配置了跨域请求,将renrenfast中的跨域配置注释掉,可以成功解决问题
接着编写分类管理:
先编写product模块的路由规则,注意要放在renrenfast上面,否则会先匹配到renrenfast模块
spring:
  cloud:
    gateway:
      routes:
#        - id: test_route
#          uri: https://www.baidu.com
#          predicates:
#            - Query=url, baidu
#
#        - id: qq_route
#          uri: https://www.qq.com
#          predicates:
#            - Query=url, qq
        - id: product_route # product模块
          uri: lb://gulimall-product
          predicates:
            - Path=/api/product/**
          filters:
            - RewritePath=/api/(?<segment>.*), /$\{segment}

        - id: admin_route # admin模块
          uri: lb://renren-fast
          predicates:
            - Path=/api/**
          filters:
            - RewritePath=/api/(?<segment>.*), /renren-fast/$\{segment}
前端代码:
<template>
  <div>
    <h2>商品分类</h2>
    <el-tree :data="menus" :props="defaultProps" @node-click="handleNodeClick"></el-tree>
  </div>
</template>

<script>
export default {
  name: "category",
  data() {
    return {
      menus: [],
      defaultProps: {
        children: 'children',
        label: 'name'
      }
    };
  },
  methods: {
    handleNodeClick(data) {
      console.log(data);
    },
    getMenus() {
      this.$http({
        url: this.$http.adornUrl('/product/category/list/tree'),
        method: 'get',
      }).then(res => {
        const {data} = res //解构赋值  data 中 code data msg
        this.menus = data.data
      })
    }
  },
  created() {
    this.getMenus()
  }
};
</script>

<style scoped lang="scss">

</style>
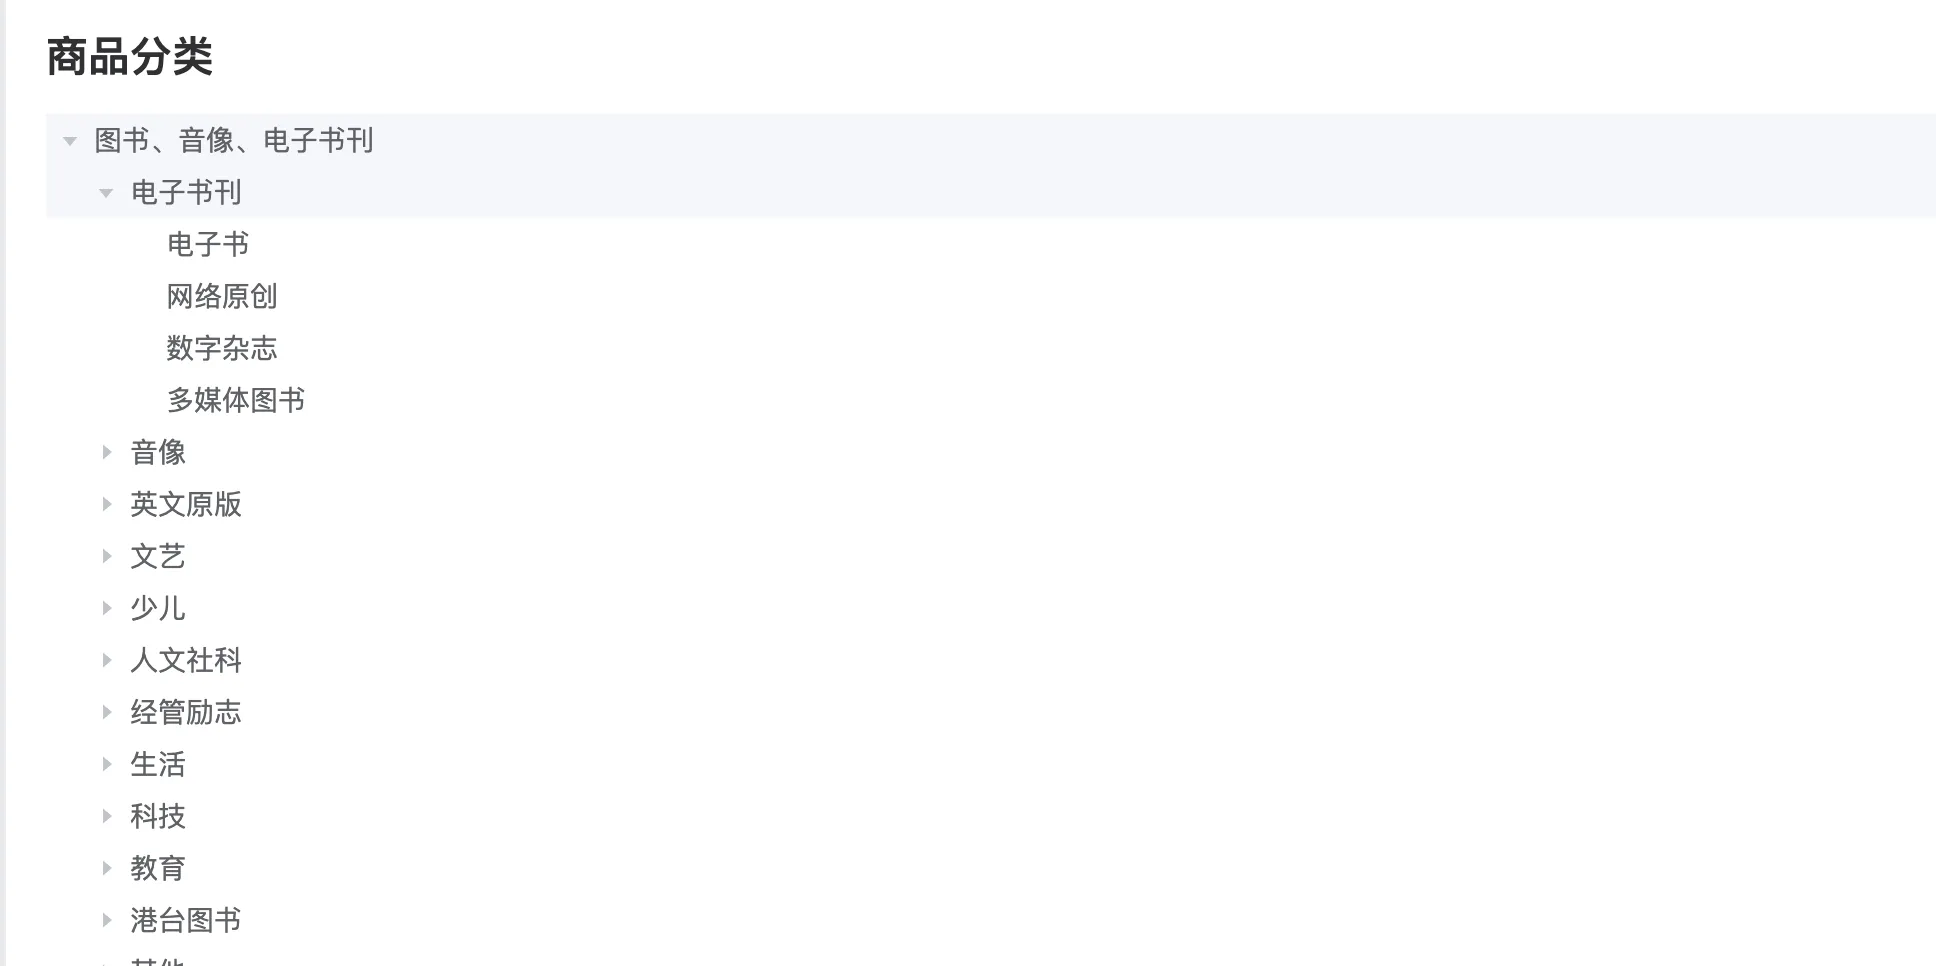
效果:
删除分类:
使用逻辑删除,需要配置mybatis-plus
mybatis-plus:
  global-config:
    db-config:
      logic-delete-value: 1
      logic-not-delete-value: 0
给categoryEntity类加上TableLogic字段:
上面配置的是全局,这里和上面刚好相反,可以主动配置value和delval
	/**
	 * 是否显示[0-不显示,1显示]
	 */
	@TableLogic(value = "1", delval = "0")
	private Integer showStatus;
拖拽节点,批量修改:
    /**
     * 批量修改
     */
    @RequestMapping("/update/sort")
    //@RequiresPermissions("product:category:update")
    public R updateSort(@RequestBody CategoryEntity[] category){
        categoryService.updateBatchById(Arrays.asList(category));
        return R.ok();
    }
品牌管理
新增品牌管理菜单:
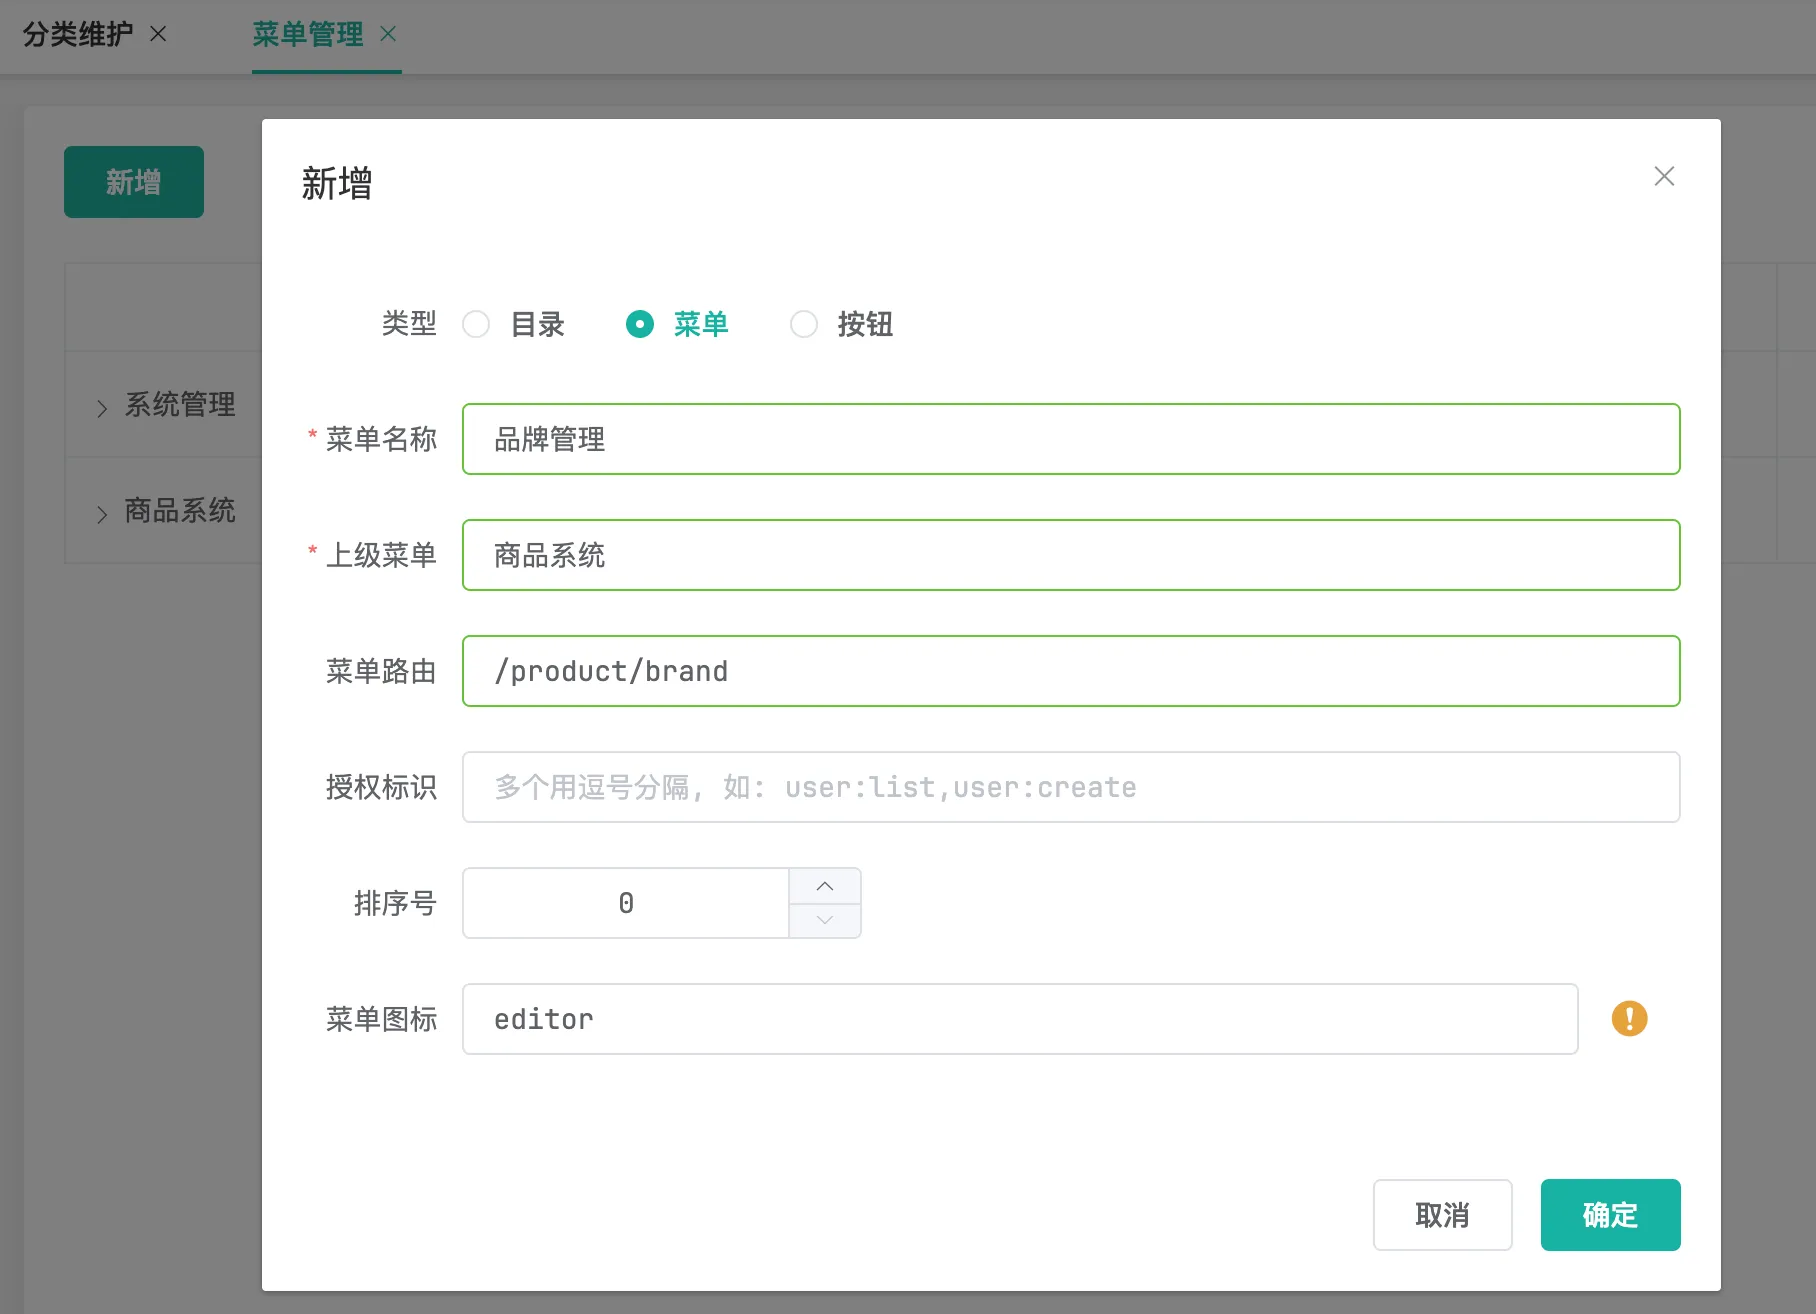
之前逆向工程生成代码的时候已经生成了页面,可以直接复制过来:
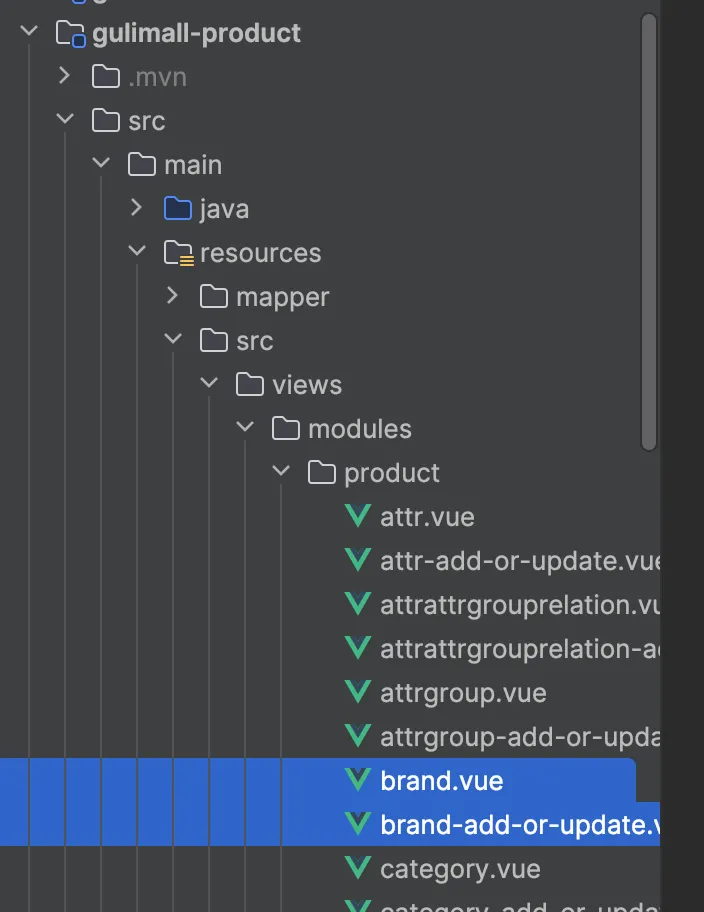
此时页面已经存在增删改查功能:

发现没有增加功能,这是因为没有权限,先始终拥有权限即可
/**
 * 是否有权限
 * @param {*} key
 */
export function isAuth(key) {
  // return JSON.parse(sessionStorage.getItem('permissions') || '[]').indexOf(key) !== -1 || false
  return true;
}
OSS对象存储
https://oss.console.aliyun.com/bucket
新建bucket
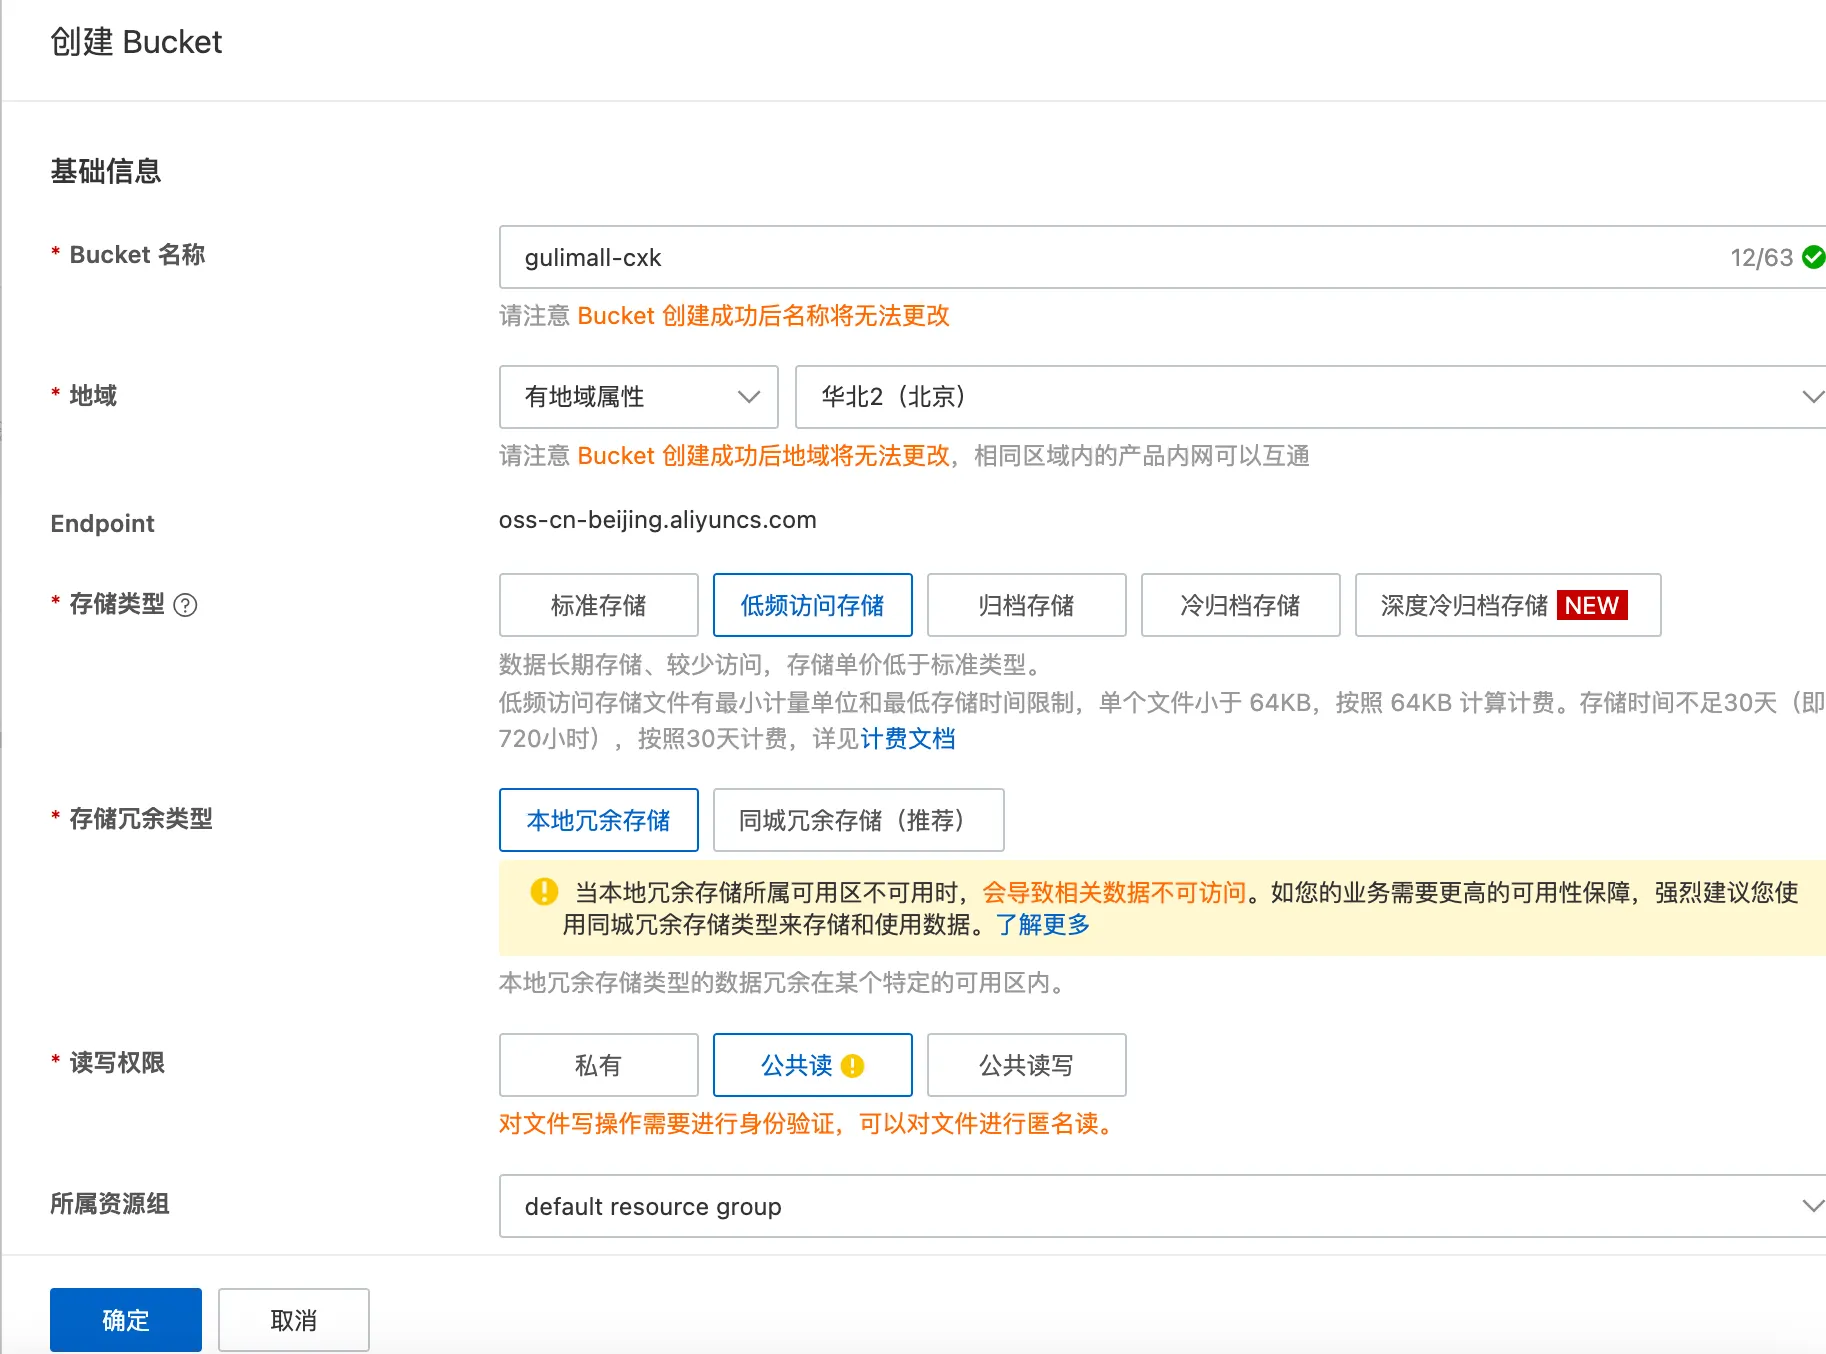
上传方式:
- 用自己图片先上传自己服务器 ,然后再上传阿里云
- 前端js直接上传阿里云
这里选择第二种方式:
导入依赖:
<dependency>
    <groupId>com.aliyun.oss</groupId>
    <artifactId>aliyun-sdk-oss</artifactId>
    <version>3.15.1</version>
</dependency>
	@Test
	public void testUpload() throws  Exception{
		// Endpoint以华东1(杭州)为例,其它Region请按实际情况填写。
		String endpoint = "https://oss-cn-beijing.aliyuncs.com";
		// 从环境变量中获取访问凭证。运行本代码示例之前,请确保已设置环境变量OSS_ACCESS_KEY_ID和OSS_ACCESS_KEY_SECRET。
		String OSS_ACCESS_KEY_ID = "x";
		String OSS_ACCESS_KEY_SECRET ="x";
		// 填写Bucket名称,例如examplebucket。
		String bucketName = "x";
		// 填写Object完整路径,完整路径中不能包含Bucket名称,例如exampledir/exampleobject.txt。
		String objectName = "vue.jpg";
		// 填写本地文件的完整路径,例如D:\\localpath\\examplefile.txt。
		// 如果未指定本地路径,则默认从示例程序所属项目对应本地路径中上传文件流。
		String filePath= "/Users/houyunfei/Pictures/CSDN/Vue.jpg";

		// 创建OSSClient实例。
		OSS ossClient = new OSSClientBuilder().build(endpoint, OSS_ACCESS_KEY_ID, OSS_ACCESS_KEY_SECRET);

		try {
			InputStream inputStream = new FileInputStream(filePath);
			// 创建PutObjectRequest对象。
			PutObjectRequest putObjectRequest = new PutObjectRequest(bucketName, objectName, inputStream);
			// 创建PutObject请求。
			PutObjectResult result = ossClient.putObject(putObjectRequest);
			// 打印ETag
			System.out.println(result.getETag());
			System.out.println("上传成功");
		} catch (OSSException oe) {
			System.out.println("Caught an OSSException, which means your request made it to OSS, "
					+ "but was rejected with an error response for some reason.");
			System.out.println("Error Message:" + oe.getErrorMessage());
			System.out.println("Error Code:" + oe.getErrorCode());
			System.out.println("Request ID:" + oe.getRequestId());
			System.out.println("Host ID:" + oe.getHostId());
		} catch (ClientException ce) {
			System.out.println("Caught an ClientException, which means the client encountered "
					+ "a serious internal problem while trying to communicate with OSS, "
					+ "such as not being able to access the network.");
			System.out.println("Error Message:" + ce.getMessage());
		} finally {
			if (ossClient != null) {
				ossClient.shutdown();
			}
		}
	}
可以成功上传
第二种方式,使用Spring Boot OSS
        <dependency>
            <groupId>com.alibaba.cloud</groupId>
            <artifactId>spring-cloud-starter-alicloud-oss</artifactId>
            <version>2.2.0.RELEASE</version>
        </dependency>
配置:
spring:
    alicloud:
      access-key: x
      secret-key: x
      oss:
        endpoint: oss-cn-beijing.aliyuncs.com
测试:
	@Autowired
	private OSSClient ossClient;


		@Test
	public void testUpload() throws  Exception{

		String filePath= "/Users/houyunfei/Pictures/CSDN/Vue.jpg";
		try {
			InputStream inputStream = new FileInputStream(filePath);
			// 创建PutObjectRequest对象。
			// 创建PutObject请求。
			PutObjectResult result = ossClient.putObject("gulimall-cxk", "vue2.jpg", inputStream);
			// 打印ETag
			System.out.println(result.getETag());
			System.out.println("上传成功");
		} catch (OSSException oe) {
			System.out.println("Caught an OSSException, which means your request made it to OSS, "
					+ "but was rejected with an error response for some reason.");
			System.out.println("Error Message:" + oe.getErrorMessage());
			System.out.println("Error Code:" + oe.getErrorCode());
			System.out.println("Request ID:" + oe.getRequestId());
			System.out.println("Host ID:" + oe.getHostId());
		} catch (ClientException ce) {
			System.out.println("Caught an ClientException, which means the client encountered "
					+ "a serious internal problem while trying to communicate with OSS, "
					+ "such as not being able to access the network.");
			System.out.println("Error Message:" + ce.getMessage());
		} finally {
			if (ossClient != null) {
				ossClient.shutdown();
			}
		}
	}

Java:https://help.aliyun.com/zh/oss/use-cases/java-1?spm=a2c4g.11186623.0.i4#concept-ahk-rfz-2fb
新建一个第三方模块,按之前的步骤配置注册中心,网关:
        - id: third_party_route # 第三方
          uri: lb://gulimall-third-party
          predicates:
            - Path=/api/thirdparty/**
          filters:
            - RewritePath=/api/thirdparty/(?<segment>.*), /$\{segment}
获取签名:
@RestController("/thirdparty")
public class OssController {

    @Resource
    private OSSClient ossClient;
    @Value("${spring.cloud.alicloud.access-key}")
    private String accessKeyId;
    @Value("${spring.cloud.alicloud.oss.endpoint}")
    private String endpoint;
    @Value("${spring.cloud.alicloud.oss.bucket}")
    private String bucket;

    @RequestMapping("/oss/policy")
    public R policy() {
        // 填写Host名称,格式为https://bucketname.endpoint。
        String host = "https://" + bucket + "." + endpoint;
        // 设置上传到OSS文件的前缀,可置空此项。置空后,文件将上传至Bucket的根目录下。
        String date = new SimpleDateFormat("yyyy-MM-dd").format(new Date());
        String dir = date + "/";

        Map<String, String> respMap = null;
        // 创建OSSClient实例。
        try {
            long expireTime = 30;
            long expireEndTime = System.currentTimeMillis() + expireTime * 1000;
            Date expiration = new Date(expireEndTime);
            // PostObject请求最大可支持的文件大小为5 GB,即CONTENT_LENGTH_RANGE为5*1024*1024*1024。
            PolicyConditions policyConds = new PolicyConditions();
            policyConds.addConditionItem(PolicyConditions.COND_CONTENT_LENGTH_RANGE, 0, 1048576000);
            policyConds.addConditionItem(MatchMode.StartWith, PolicyConditions.COND_KEY, dir);

            String postPolicy = ossClient.generatePostPolicy(expiration, policyConds);
            byte[] binaryData = postPolicy.getBytes("utf-8");
            String encodedPolicy = BinaryUtil.toBase64String(binaryData);
            String postSignature = ossClient.calculatePostSignature(postPolicy);

            respMap = new LinkedHashMap<String, String>();
            respMap.put("accessid", accessKeyId);
            respMap.put("policy", encodedPolicy);
            respMap.put("signature", postSignature);
            respMap.put("dir", dir);
            respMap.put("host", host);
            respMap.put("expire", String.valueOf(expireEndTime / 1000));
            // respMap.put("expire", formatISO8601Date(expiration));

        } catch (Exception e) {
            System.out.println(e.getMessage());
        } finally {
            ossClient.shutdown();
        }
        return R.ok().put("data", respMap);
    }
}
导入上传文件的三个文件:
数据发送给阿里云时存在跨域问题:

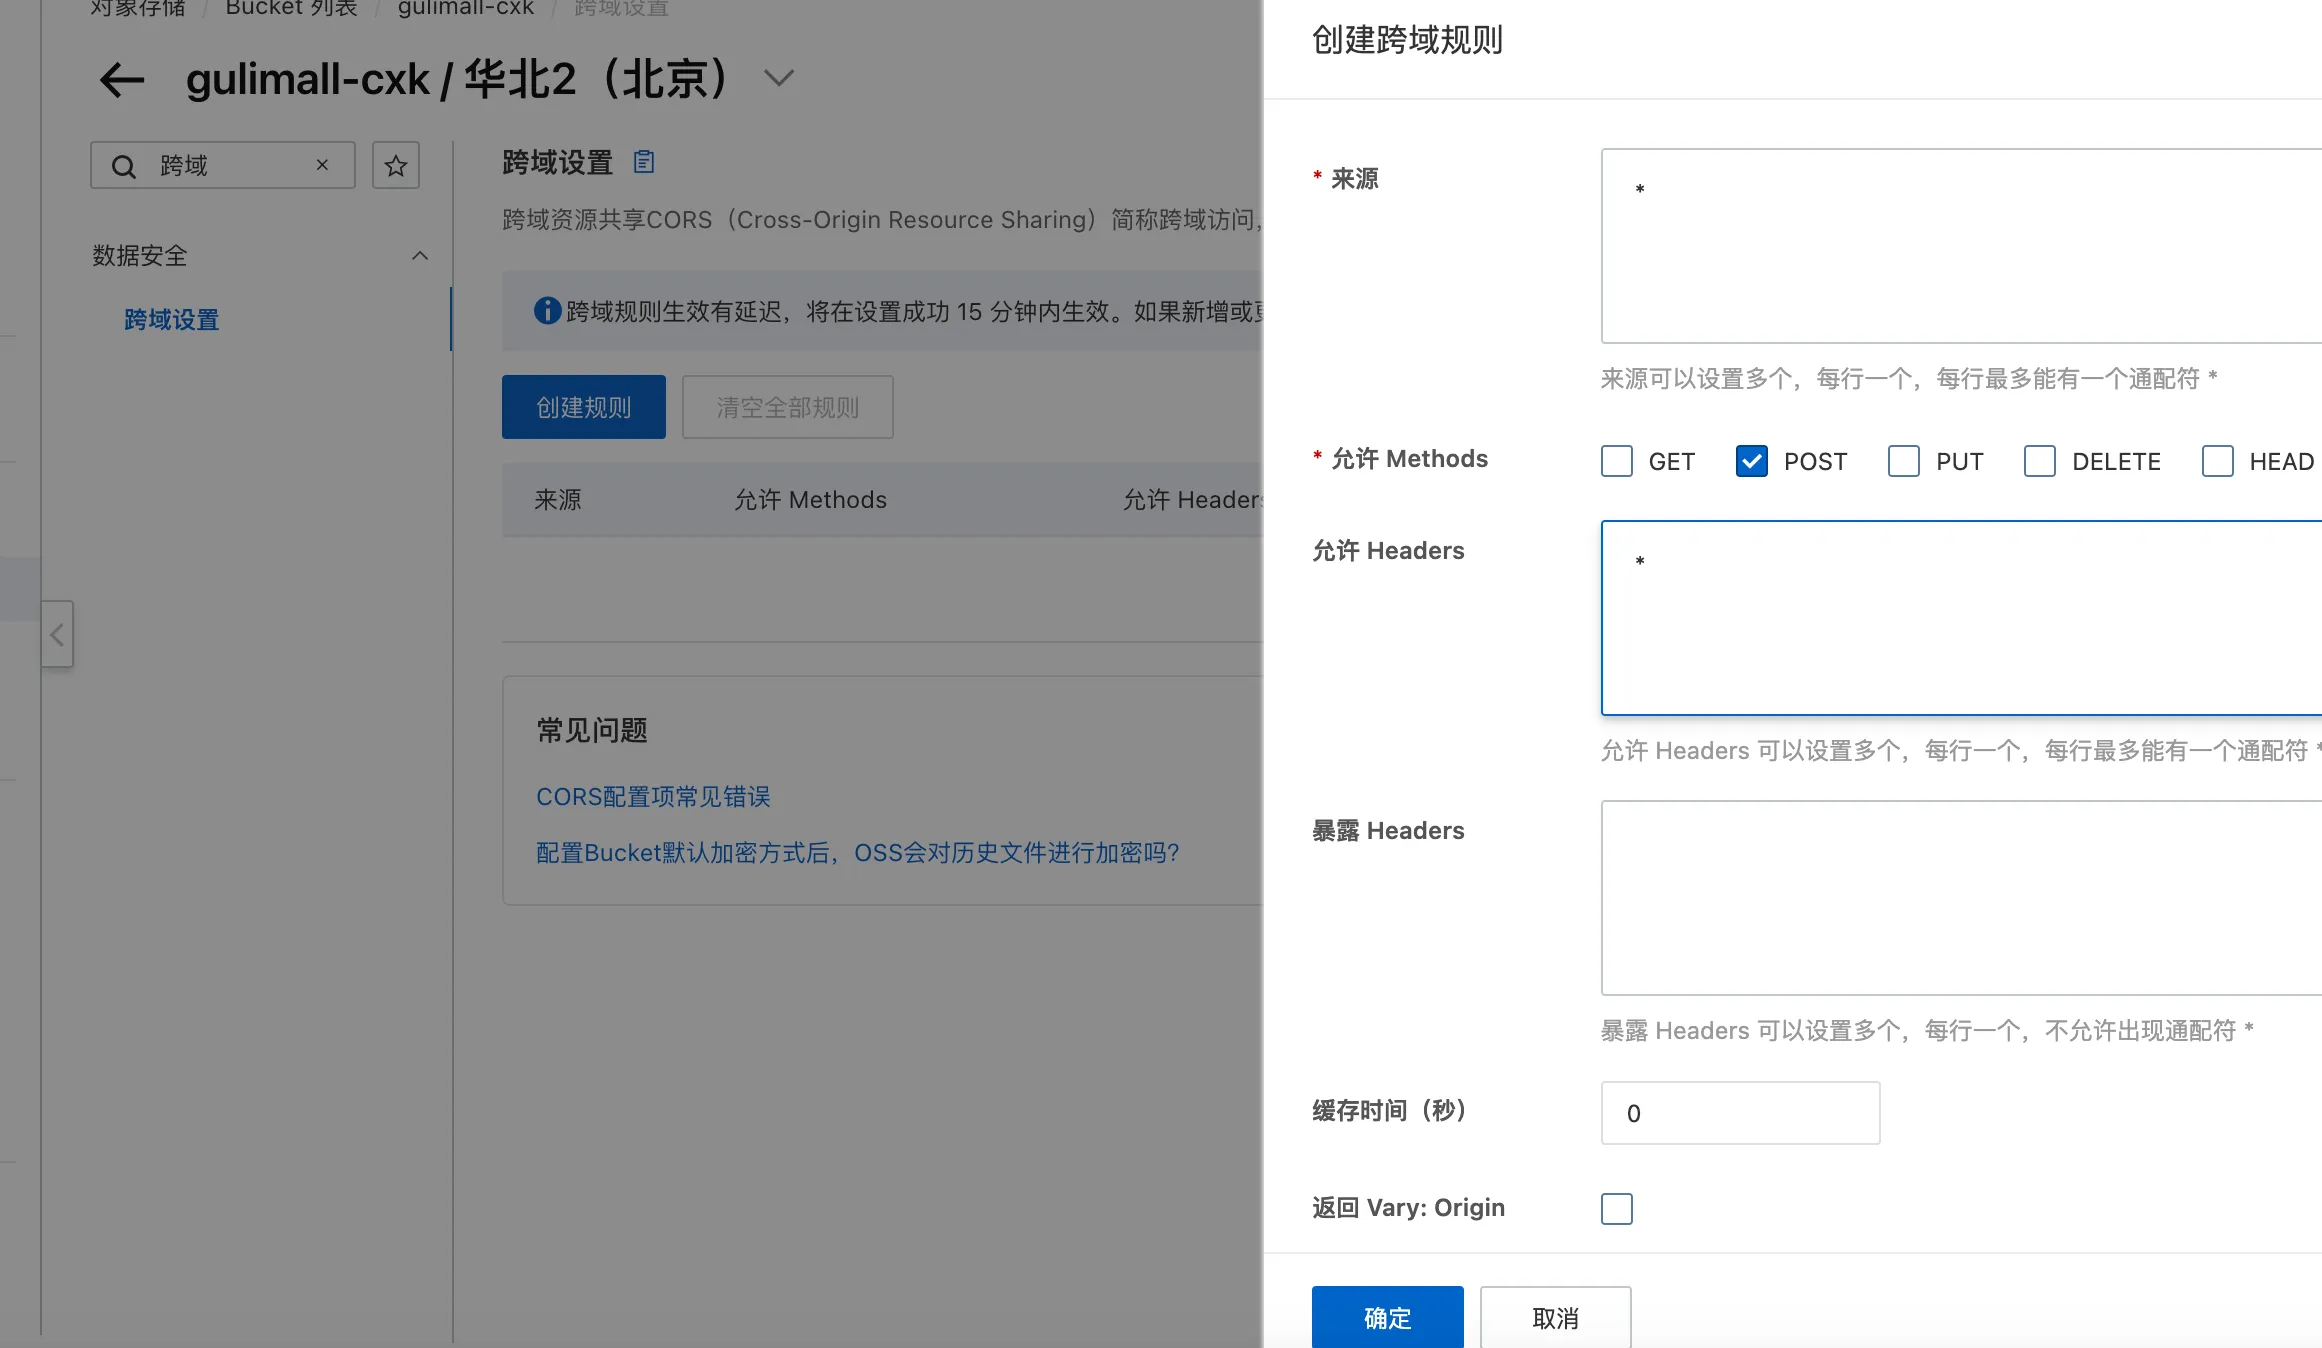
数据成功上传:

新增品牌后端校验
使用JSR303进行校验:
在实体类上面加注解:
@Data
@TableName("pms_brand")
public class BrandEntity implements Serializable {
	private static final long serialVersionUID = 1L;

	/**
	 * 品牌id
	 */
	@TableId
	private Long brandId;
	/**
	 * 品牌名
	 */
	@NotBlank(message = "品牌名不能为空")
	private String name;
	/**
	 * 品牌logo地址
	 */
	@NotEmpty
	@URL(message = "logo必须是一个合法的url地址")
	private String logo;
	/**
	 * 介绍
	 */
	private String descript;
	/**
	 * 显示状态[0-不显示;1-显示]
	 */
	private Integer showStatus;
	/**
	 * 检索首字母
	 */
	@NotEmpty
	@Pattern(regexp = "/^[a-zA-Z]$/",message = "检索首字母必须是一个字母")
	private String firstLetter;
	/**
	 * 排序
	 */
	@NotNull
	@Min(value = 0,message = "排序必须大于等于0")
	private Integer sort;
}
控制器中加注解:
/**
 * 保存
 */
@RequestMapping("/save")
//@RequiresPermissions("product:brand:save")
public R save(@Valid @RequestBody BrandEntity brand, BindingResult result) {

    if (result.hasErrors()) {
        Map<String, String> map = new HashMap<>();
        result.getFieldErrors().forEach((item) -> {
            //获取到错误提示
            String message = item.getDefaultMessage();
            //获取错误的属性的名字
            String field = item.getField();
            map.put(field, message);
        });
        return R.error(400, "submit data not valid").put("data", map);
    }
    brandService.save(brand);
    return R.ok();
}
BindingResult要紧跟在校验的后面
测试结果:
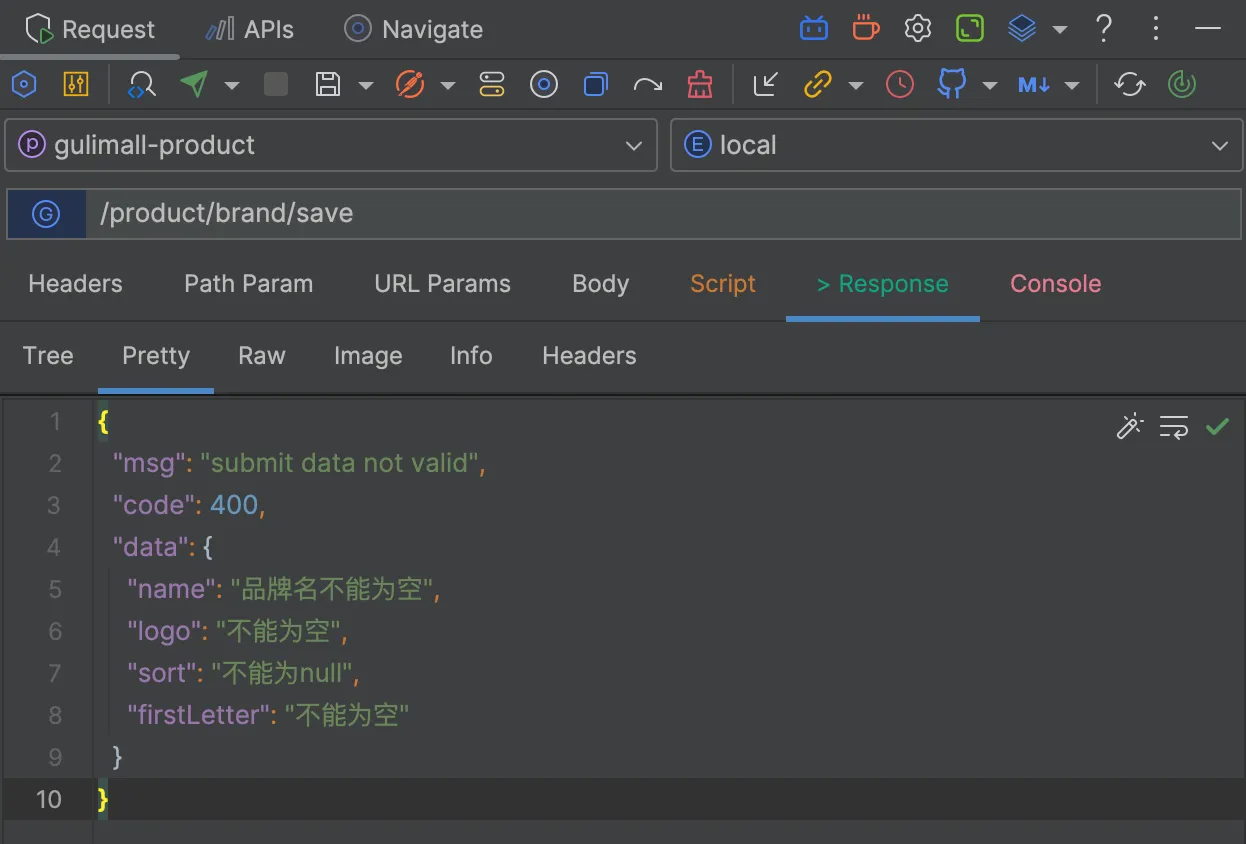
统一异常校验:
@RestControllerAdvice(basePackages = "com.cxk.gulimall.product.controller")
@Slf4j
public class GulimallExceptionControllerAdvice {

    @ExceptionHandler(value = {MethodArgumentNotValidException.class})
    public R handleVaildException(MethodArgumentNotValidException e) {
        log.error("数据校验出现异常,异常类型:{}", MethodArgumentNotValidException.class);
        BindingResult bindingResult = e.getBindingResult();
        Map<String, String> map = new HashMap<>();
        bindingResult.getFieldErrors().forEach((item) -> {
            map.put(item.getField(), item.getDefaultMessage());
        });
        return R.error(BizCodeEnum.VALID_EXCEPTION.getCode(), BizCodeEnum.VALID_EXCEPTION.getMsg())
                .put("data", map);
    }

    @ExceptionHandler(value = Exception.class)
    public R handleException(Exception e) {
        return R.error(BizCodeEnum.UNKNOW_EXCEPTION.getCode(), BizCodeEnum.UNKNOW_EXCEPTION.getMsg());
    }
}
状态码枚举:
public enum BizCodeEnum {
    UNKNOW_EXCEPTION(10000, "系统未知异常"),

    VALID_EXCEPTION(10001, "参数格式校验失败");

    private Integer code;
    private String msg;

    BizCodeEnum(Integer code, String msg) {
        this.code = code;
        this.msg = msg;
    }

    public Integer getCode() {
        return code;
    }

    public String getMsg() {
        return msg;
    }
}
JSR303分组校验
创建两个类,增加和修改分组:
public interface AddGroup {
}
public interface UpdateGroup {
}
给实体类增加组:
@Data
@TableName("pms_brand")
public class BrandEntity implements Serializable {
    private static final long serialVersionUID = 1L;

    /**
     * 品牌id
     */
    @TableId
    @NotNull(message = "品牌id必须提交",groups = {UpdateGroup.class})
    @Null(message = "新增不能指定id",groups = {AddGroup.class})
    private Long brandId;
    /**
     * 品牌名
     */
    @NotBlank(message = "品牌名不能为空",groups = {UpdateGroup.class,AddGroup.class})
    private String name;
    /**
     * 品牌logo地址
     */
    @NotBlank(message = "logo不能为空",groups = {AddGroup.class})
    @URL(message = "logo必须是一个合法的url地址",groups = {UpdateGroup.class,AddGroup.class})
    private String logo;
    /**
     * 介绍
     */
    private String descript;
    /**
     * 显示状态[0-不显示;1-显示]
     */
    private Integer showStatus;
    /**
     * 检索首字母
     */
    @NotEmpty(groups = {AddGroup.class})
    @Pattern(regexp = "/^[a-zA-Z]$/",message = "检索首字母必须是一个字母",groups = {UpdateGroup.class,AddGroup.class})
    private String firstLetter;
    /**
     * 排序
     */
    @NotNull(message = "排序不能为空",groups = {AddGroup.class})
    @Min(value = 0,message = "排序必须大于等于0",groups = {UpdateGroup.class,AddGroup.class})
    private Integer sort;

}
控制器上面添加组:
/**
 * 保存
 */
@RequestMapping("/save")
//@RequiresPermissions("product:brand:save")
public R save(@Validated(AddGroup.class) @RequestBody BrandEntity brand) {
    brandService.save(brand);
    return R.ok();
}

/**
 * 修改
 */
@RequestMapping("/update")
//@RequiresPermissions("product:brand:update")
public R update(@Validated(UpdateGroup.class) @RequestBody BrandEntity brand) {
    brandService.updateById(brand);

    return R.ok();
}
自定义校验规则
创建一个ListValue注解:
@Documented
@Constraint(validatedBy = {ListValueConstraintValidator.class})
@Target({METHOD, FIELD, ANNOTATION_TYPE, CONSTRUCTOR, PARAMETER, TYPE_USE})
@Retention(RUNTIME)
public @interface ListValue {

    String message() default "{com.cxk.common.validator.ListValue.message}";

    Class<?>[] groups() default {};

    Class<? extends Payload>[] payload() default {};

    int[] vals() default {};
}
在Resources目录下面创建ValidationMessages.properties
com.cxk.common.validator.ListValue.message = 必须提交给定的值
创建一个ListValueConstraintValidator类,只允许制定的整数
public class ListValueConstraintValidator implements ConstraintValidator<ListValue, Integer> {

    private Set<Integer> set = new HashSet<>();

    @Override
    public void initialize(ListValue constraintAnnotation) {
        int[] vals = constraintAnnotation.vals();
        for (int val : vals) {
            set.add(val);
        }
    }

    @Override
    public boolean isValid(Integer value, ConstraintValidatorContext context) {
        return set.contains(value);
    }
}
在实体类上面加注解:
/**
 * 显示状态[0-不显示;1-显示]
 */
@NotNull(groups = {AddGroup.class, UpdateStatusGroup.class})
@ListValue(vals = {0,1},groups = {AddGroup.class, UpdateStatusGroup.class})
private Integer showStatus;
商品属性
基本概念:
- SPU:Standard Product Unit(标准化产品单元)(如iPhone)
- SKU:Stock Keeping Unit(库存量单位)(如iPhone 64G,详细)
数据库设计
商品属性表:
create table pms_attr
(
    attr_id      bigint auto_increment comment '属性id' primary key,
    attr_name    char(30)     null comment '属性名',
    search_type  tinyint      null comment '是否需要检索[0-不需要,1-需要]',
    value_type   tinyint      null comment '值类型[0-为单个值,1-可以选择多个值]',
    icon         varchar(255) null comment '属性图标',
    value_select char(255)    null comment '可选值列表[用逗号分隔]',
    attr_type    tinyint      null comment '属性类型[0-销售属性,1-基本属性,2-既是销售属性又是基本属性]',
    enable       bigint       null comment '启用状态[0 - 禁用,1 - 启用]',
    catelog_id   bigint       null comment '所属分类',
    show_desc    tinyint      null comment '快速展示【是否展示在介绍上;0-否 1-是】,在sku中仍然可以调整'
)comment '商品属性';
属性分组表:
create table pms_attr_group
(
    attr_group_id   bigint auto_increment comment '分组id'       primary key,
    attr_group_name char(20)     null comment '组名',
    sort            int          null comment '排序',
    descript        varchar(255) null comment '描述',
    icon            varchar(255) null comment '组图标',
    catelog_id      bigint       null comment '所属分类id'
)comment '属性分组';
将上面两个表关联起来:
属性-分组-关联表:
create table pms_attr_attrgroup_relation
(
    id            bigint auto_increment comment 'id'  primary key,
    attr_id       bigint null comment '属性id',
    attr_group_id bigint null comment '属性分组id',
    attr_sort     int    null comment '属性组内排序'
) comment '属性&属性分组关联';
image-20240122100838174 如 这里的
基本信息就是分组表里的attr_group_name分组名字
机身颜色就是attr_name属性名字
商品属性值表,如上面的魅海蓝,其实也是一张关联表:
create table pms_product_attr_value
(
    id         bigint auto_increment comment 'id'     primary key,
    spu_id     bigint       null comment '商品id',
    attr_id    bigint       null comment '属性id',
    attr_name  varchar(200) null comment '属性名',
    attr_value varchar(200) null comment '属性值',
    attr_sort  int          null comment '顺序',
    quick_show tinyint      null comment '快速展示【是否展示在介绍上;0-否 1-是】'
)    comment 'spu属性值';
商品真正的信息,商品信息表:
create table pms_spu_info
(
    id              bigint auto_increment comment '商品id'  primary key,
    spu_name        varchar(200)   null comment '商品名称',
    spu_description varchar(1000)  null comment '商品描述',
    catalog_id      bigint         null comment '所属分类id',
    brand_id        bigint         null comment '品牌id',
    weight          decimal(18, 4) null,
    publish_status  tinyint        null comment '上架状态[0 - 下架,1 - 上架]',
    create_time     datetime       null,
    update_time     datetime       null
) comment 'spu信息';
sku信息表:
create table pms_sku_info
(
    sku_id          bigint auto_increment comment 'skuId'  primary key,
    spu_id          bigint         null comment 'spuId',
    sku_name        varchar(255)   null comment 'sku名称',
    sku_desc        varchar(2000)  null comment 'sku介绍描述',
    catalog_id      bigint         null comment '所属分类id',
    brand_id        bigint         null comment '品牌id',
    sku_default_img varchar(255)   null comment '默认图片',
    sku_title       varchar(255)   null comment '标题',
    sku_subtitle    varchar(2000)  null comment '副标题',
    price           decimal(18, 4) null comment '价格',
    sale_count      bigint         null comment '销量'
) comment 'sku信息';
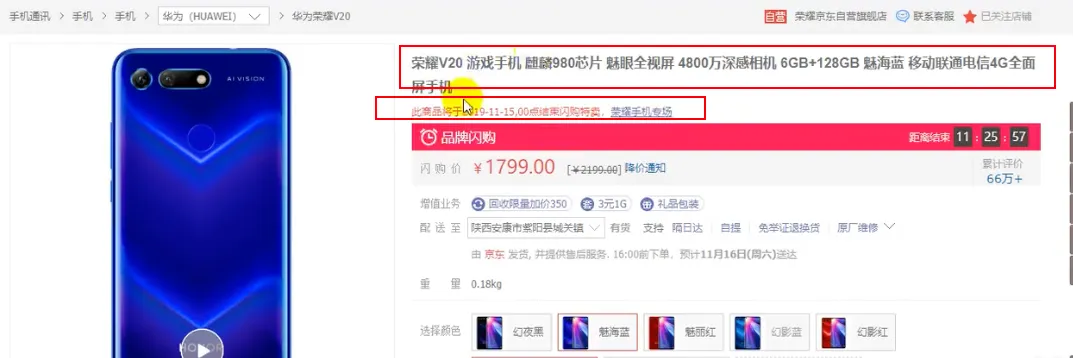
如下图的标题,副标题等信息
image-20240122102114729
sku图片表:
存不同种如手机等图片
create table pms_sku_images
(
    id          bigint auto_increment comment 'id'     primary key,
    sku_id      bigint       null comment 'sku_id',
    img_url     varchar(255) null comment '图片地址',
    img_sort    int          null comment '排序',
    default_img int          null comment '默认图[0 - 不是默认图,1 - 是默认图]'
)    comment 'sku图片';
颜色,128G,这些信息
存在sku销售属性表里面
create table pms_sku_sale_attr_value
(
    id         bigint auto_increment comment 'id' primary key,
    sku_id     bigint       null comment 'sku_id',
    attr_id    bigint       null comment 'attr_id',
    attr_name  varchar(200) null comment '销售属性名',
    attr_value varchar(200) null comment '销售属性值',
    attr_sort  int          null comment '顺序'
)    comment 'sku销售属性&值';
整个关系如下:
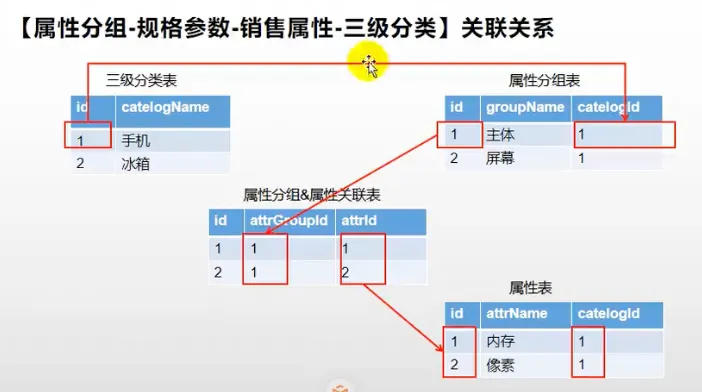
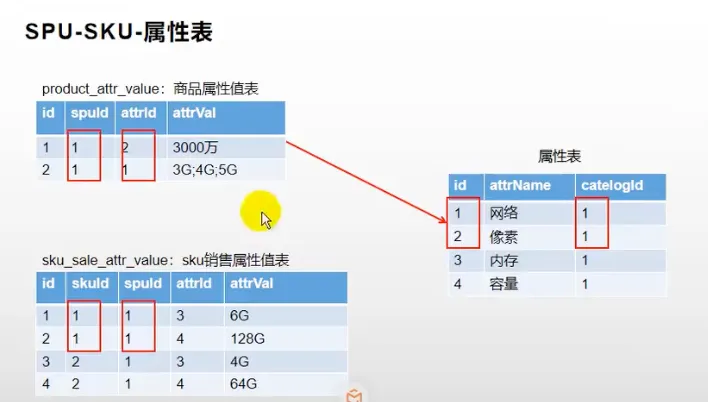
前端页面,我们希望点击左侧的分类,在右侧能查出对应的内容,但是左边是一个子组件,因此我们需要用子组件给父组件传递数据
使用事件机制,类似于冒泡

子组件:
  <el-tree :data="menus"
           :props="defaultProps"
           node-key="catId"
           @node-click="modeClick"
           ref="tree">
  </el-tree>
    modeClick(data,node,component){
      console.log("子组件被点击",data,node,component)
      //向父附件发送事件
      this.$emit('tree-node-click',data,node,component)
    },
使用
this.$emit来传递事件
在父组件中:
      <category @tree-node-click="treeNodeClick"></category>
    treeNodeClick(data, node, component) {
      console.log("父组件感知", data, node, component)
      console.log("被点击的菜单id", data.catId)
    },
绑定这个事件
运行结果:

根据categoryId查询组
后端接口:
/**
 * 列表
 */
@GetMapping("/list/{categoryId}")
//@RequiresPermissions("product:attrgroup:list")
public R listCategoryById(@RequestParam Map<String, Object> params,
                          @PathVariable("categoryId") Long categoryId) {
    PageUtils page = attrGroupService.queryPage(params, categoryId);
    return R.ok().put("page", page);
}
实现类:
@Override
public PageUtils queryPage(Map<String, Object> params, Long categoryId) {
    //如果categoryId为0,则查询所有
    if (categoryId == 0) {
        IPage<AttrGroupEntity> page = this.page(
                new Query<AttrGroupEntity>().getPage(params),
                new QueryWrapper<AttrGroupEntity>()
        );
        return new PageUtils(page);
    }
    // select * from pms_attr_group where catelog_id = ? and (attr_group_id = ? or attr_group_name like %?%)
    String key = (String) params.get("key");
    LambdaQueryWrapper<AttrGroupEntity> wrapper = new LambdaQueryWrapper<AttrGroupEntity>();
    wrapper.eq(AttrGroupEntity::getCatelogId, categoryId);
    if (StringUtils.isNotEmpty(key)) {
        wrapper.and((obj) -> {
            obj.eq(AttrGroupEntity::getAttrGroupId, key)
                    .or()
                    .like(AttrGroupEntity::getAttrGroupName, key);
        });
    }
    IPage<AttrGroupEntity> page = this.page(new Query<AttrGroupEntity>().getPage(params), wrapper);
    return new PageUtils(page);
}
选择三级分类时:
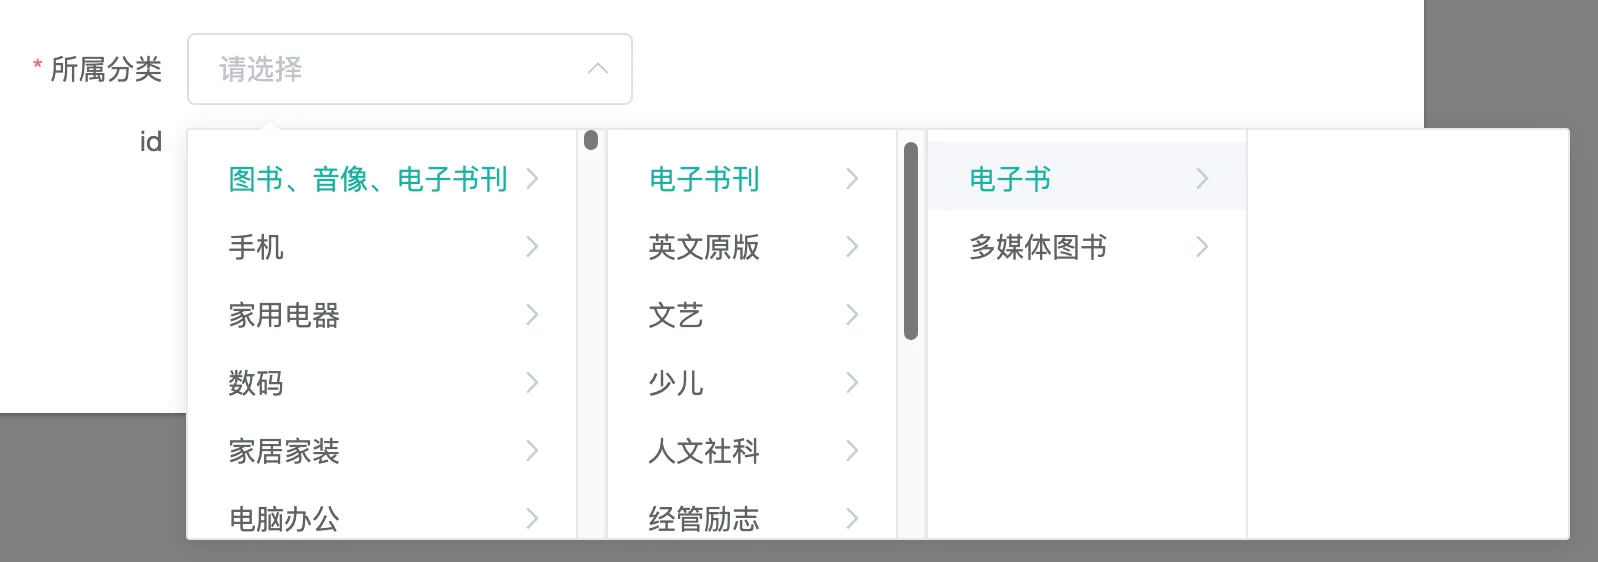
原因在于三级之后的children为空:
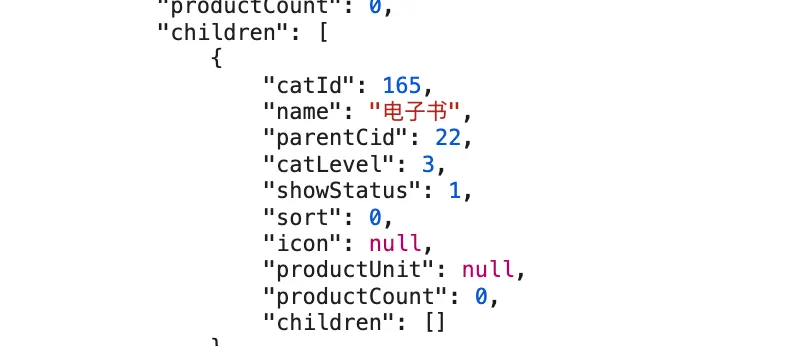
因此我们要做到让这个字段为空的时候不展示给前端,给这个字段设置@JsonInclude(JsonInclude.Include.NON_EMPTY):
@TableField(exist = false)
@JsonInclude(JsonInclude.Include.NON_EMPTY)
private List <CategoryEntity> children;
修改回显,由于后端返回数据的时候只有一个categoryId,而前端的三级分类是一个数组,因此需要修改后端:
/**
 * 信息
 */
@RequestMapping("/info/{attrGroupId}")
//@RequiresPermissions("product:attrgroup:info")
public R info(@PathVariable("attrGroupId") Long attrGroupId) {
    AttrGroupEntity attrGroup = attrGroupService.getById(attrGroupId);
    Long catelogId = attrGroup.getCatelogId();
    //查询完整路径
    Long[] path = categoryService.findCatelogPath(catelogId);
    attrGroup.setCatelogPath(path);
    return R.ok().put("attrGroup", attrGroup);
}
业务逻辑:
@Override
public Long[] findCatelogPath(Long catelogId) {
    List<Long> paths = new ArrayList<>();
    List<Long> parentPath = findParentPath(catelogId, paths);
    Collections.reverse(parentPath);
    return parentPath.toArray(new Long[parentPath.size()]);
}

private List<Long> findParentPath(Long catelogId, List<Long> paths) {
    paths.add(catelogId);
    CategoryEntity categoryEntity = this.getById(catelogId);
    if (categoryEntity.getParentCid() != 0) {
        findParentPath(categoryEntity.getParentCid(), paths);
    }
    return paths;
}
MybatisPlus分页插件配置
package com.cxk.gulimall.product.config;

import com.baomidou.mybatisplus.annotation.DbType;
import com.baomidou.mybatisplus.extension.plugins.PaginationInterceptor;
import org.mybatis.spring.annotation.MapperScan;
import org.springframework.context.annotation.Bean;
import org.springframework.context.annotation.Configuration;
import org.springframework.transaction.annotation.EnableTransactionManagement;

@Configuration
@EnableTransactionManagement
@MapperScan("com.cxk.gulimall.product.dao")
public class MybatisConfig {

    /**
     * 添加分页插件
     */
    @Bean
    public PaginationInterceptor mybatisPlusInterceptor() {
        PaginationInterceptor paginationInterceptor = new PaginationInterceptor();
        paginationInterceptor.setOverflow(true);
        paginationInterceptor.setLimit(1000);
        // 设置数据库类型为mysql
        return paginationInterceptor;
    }
}
品牌分类关联
品牌和分类是多对多的问题:
- 一个品牌可能属于多个分类
- 一个分类下面有多个品牌
create table pms_category_brand_relation
(
    id           bigint auto_increment  primary key,
    brand_id     bigint       null comment '品牌id',
    catelog_id   bigint       null comment '分类id',
    brand_name   varchar(255) null,
    catelog_name varchar(255) null
)  comment '品牌分类关联';
多对多关系一般都有一张中间表,记录他们的关系,这里还设置了两个冗余字段,提高效率。
根据品牌id查询所有关联关系
/**
 * 列表
 */
@GetMapping("/catelog/list")
//@RequiresPermissions("product:categorybrandrelation:list")
public R cateloglist(@RequestParam("brandId") Long brandId) {
    LambdaQueryWrapper<CategoryBrandRelationEntity> wrapper = new LambdaQueryWrapper<>();
    wrapper.eq(CategoryBrandRelationEntity::getBrandId, brandId);
    List<CategoryBrandRelationEntity> data = categoryBrandRelationService.list(wrapper);
    return R.ok().put("data", data);
}
保存品牌和分类的关联关系:
@Override
public void saveDetail(CategoryBrandRelationEntity categoryBrandRelation) {
    Long brandId = categoryBrandRelation.getBrandId();
    Long catelogId = categoryBrandRelation.getCatelogId();
    //查询详细名字
    BrandEntity brandEntity = brandDao.selectById(brandId);
    CategoryEntity categoryEntity = categoryDao.selectById(catelogId);
    categoryBrandRelation.setBrandName(brandEntity.getName());
    categoryBrandRelation.setCatelogName(categoryEntity.getName());
    this.save(categoryBrandRelation);
}
但是这个冗余字段存在问题,就是当品牌名字或者分类名字变化的时候,这里的冗余字段也需要进行更改,因此还需要去修改代码
BrandServiceImpl中:
    @Override
    @Transactional
    public void updateDetail(BrandEntity brand) {
        //保证冗余字段的数据一致
        this.updateById(brand);
        if (StringUtils.isNotEmpty(brand.getName())) {
            categoryBrandRelationService.updateBrand(brand.getBrandId(), brand.getName());
            //TODO 更新其他关联
        }
    }
CategoryBrandRelationServiceImpl中
public void updateBrand(Long brandId, String name) {
    CategoryBrandRelationEntity relationEntity = new CategoryBrandRelationEntity();
    relationEntity.setBrandId(brandId);
    relationEntity.setBrandName(name);
    LambdaUpdateWrapper<CategoryBrandRelationEntity> wrapper = new LambdaUpdateWrapper<>();
    wrapper.eq(CategoryBrandRelationEntity::getBrandId, brandId);
    this.update(relationEntity, wrapper);
}
同理分类修改时,注意开启事物:
    @Override
    @Transactional
    public void updateCascade(CategoryEntity category) {
        this.updateById(category);
        if (StringUtils.isNotEmpty(category.getName())) {
            categoryBrandRelationService.updateCategory(category.getCatId(), category.getName());
            //TODO 同步更新其他关联表的数据
        }
    }
这里使用mapper做,学习不同的方式:
@Override
public void updateCategory(Long catId, String name) {
    this.baseMapper.updateCategory(catId, name);
}
void updateCategory(@Param("catId") Long catId, @Param("name") String name);
<update id="updateCategory">
    update pms_category_brand_relation
    set catelog_name = #{name}
    where catelog_id = #{catId}
</update>
商品属性
保存:
  /**
   * 保存
   */
  @RequestMapping("/save")
  //@RequiresPermissions("product:attr:save")
  public R save(@RequestBody AttrVo attr){
attrService.saveAttr(attr);
      return R.ok();
  }
@Override
@Transactional
public void saveAttr(AttrVo attr) {
    AttrEntity attrEntity = new AttrEntity();
    BeanUtils.copyProperties(attr, attrEntity);
    // 保存基本数据
    this.save(attrEntity);
    // 保存关联关系
    AttrAttrgroupRelationEntity entity = new AttrAttrgroupRelationEntity();
    entity.setAttrGroupId(attr.getAttrGroupId());
    entity.setAttrId(attrEntity.getAttrId());
    relationDao.insert(entity);
}
关联查询属性分类和分组名称
定义响应类,
@Data
public class AttrRespVo extends AttrVo {
    /**
     * 所属分类名字
     */
    private String catelogName;
    /**
     * 所属分组名字
     */
    private String groupName;
}
查询代码:
@Override
public PageUtils queryBaseAttrPage(Map<String, Object> params, Long catelogId) {
    LambdaQueryWrapper<AttrEntity> wrapper = new LambdaQueryWrapper<>();
    if (catelogId != 0) {
        wrapper.eq(AttrEntity::getCatelogId, catelogId);
    }
    String key = (String) params.get("key");
    if (StringUtils.isNotEmpty(key)) {
        wrapper.and((obj) -> {
            obj.eq(AttrEntity::getAttrId, key).or().like(AttrEntity::getAttrName, key);
        });
    }
    IPage<AttrEntity> page = this.page(
            new Query<AttrEntity>().getPage(params),
            wrapper
    );
    PageUtils pageUtils = new PageUtils(page);
    List<AttrEntity> list = page.getRecords();
    List<AttrRespVo> collect = list.stream().map(attrEntity -> {
        AttrRespVo attrRespVo = new AttrRespVo();
        BeanUtils.copyProperties(attrEntity, attrRespVo);
        //设置分类和分组名字

        //查询分类
        CategoryEntity categoryEntity = categoryDao.selectById(attrEntity.getCatelogId());
        if (categoryEntity != null) {
            attrRespVo.setCatelogName(categoryEntity.getName());
        }

        //查询分组
        AttrAttrgroupRelationEntity attrAttrgroupRelationEntity =
                relationDao.selectOne(new LambdaQueryWrapper<AttrAttrgroupRelationEntity>()
                        .eq(AttrAttrgroupRelationEntity::getAttrId, attrEntity.getAttrId()));
        if (attrAttrgroupRelationEntity != null) {
            Long groupId = attrAttrgroupRelationEntity.getAttrGroupId();
            AttrGroupEntity attrGroupEntity = attrGroupDao.selectById(groupId);
            attrRespVo.setGroupName(attrGroupEntity.getAttrGroupName());
        }
        return attrRespVo;
    }).collect(Collectors.toList());
    pageUtils.setList(collect);
    return pageUtils;
}
修改规格参数:
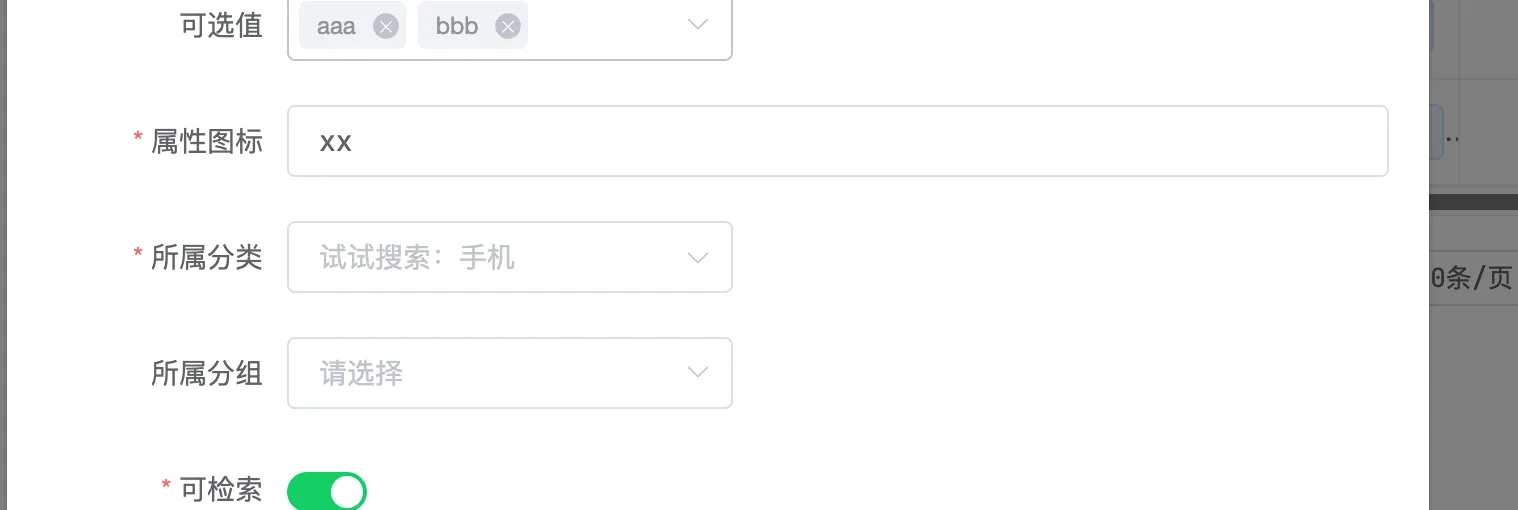
发现所属分类和分组无法回显
AttrRespVo类中添加catelogPath
@Data
public class AttrRespVo extends AttrVo {
    /**
     * 所属分类名字
     */
    private String catelogName;
    /**
     * 所属分组名字
     */
    private String groupName;

    /**
     * 分类完整路径
     */
    private Long[] catelogPath;
}
    @Override
    public AttrRespVo getAttrInfo(Long attrId) {
        AttrEntity attrEntity = this.getById(attrId);
        AttrRespVo attrRespVo = new AttrRespVo();
        BeanUtils.copyProperties(attrEntity, attrRespVo);

        //还需要设置分组id和分类路径
//        attrRespVo.setCatelogPath();
//        attrRespVo.setAttrGroupId();
//        attrRespVo.setCatelogName();

        //1、设置分组信息
        AttrAttrgroupRelationEntity relationEntity = relationDao.selectOne(
                new LambdaQueryWrapper<AttrAttrgroupRelationEntity>()
                        .eq(AttrAttrgroupRelationEntity::getAttrId, attrId));
        if (relationEntity != null) {
            attrRespVo.setAttrGroupId(relationEntity.getAttrGroupId());
            AttrGroupEntity attrGroupEntity = attrGroupDao.selectById(relationEntity.getAttrGroupId());
            if (attrGroupEntity != null) {
                attrRespVo.setGroupName(attrGroupEntity.getAttrGroupName());
            }
        }

        //2、设置分类信息
        Long catelogId = attrEntity.getCatelogId();
        Long[] catelogPath = categoryService.findCatelogPath(catelogId);
        attrRespVo.setCatelogPath(catelogPath);
        CategoryEntity categoryEntity = categoryDao.selectById(catelogId);
        if (categoryEntity != null) {
            attrRespVo.setCatelogName(categoryEntity.getName());
        }
        return attrRespVo;
    }
修改操作:
需要先判断是否存在
@Override
@Transactional
public void updateAttr(AttrVo attr) {
    AttrEntity attrEntity = new AttrEntity();
    BeanUtils.copyProperties(attr, attrEntity);
    //修改基本数据
    this.updateById(attrEntity);
    AttrAttrgroupRelationEntity relationEntity = new AttrAttrgroupRelationEntity();
    relationEntity.setAttrGroupId(attr.getAttrGroupId());
    relationEntity.setAttrId(attrEntity.getAttrId());
    //统计是否存在
    Integer count = relationDao.selectCount(new LambdaQueryWrapper<AttrAttrgroupRelationEntity>()
            .eq(AttrAttrgroupRelationEntity::getAttrId, attrEntity.getAttrId()));
    if (count > 0) {
        //修改关联关系
        relationDao.update(relationEntity, new LambdaUpdateWrapper<AttrAttrgroupRelationEntity>()
                .eq(AttrAttrgroupRelationEntity::getAttrId, attrEntity.getAttrId()));
    } else {
        //新增关联关系
        relationDao.insert(relationEntity);
    }
}
分组关联关系
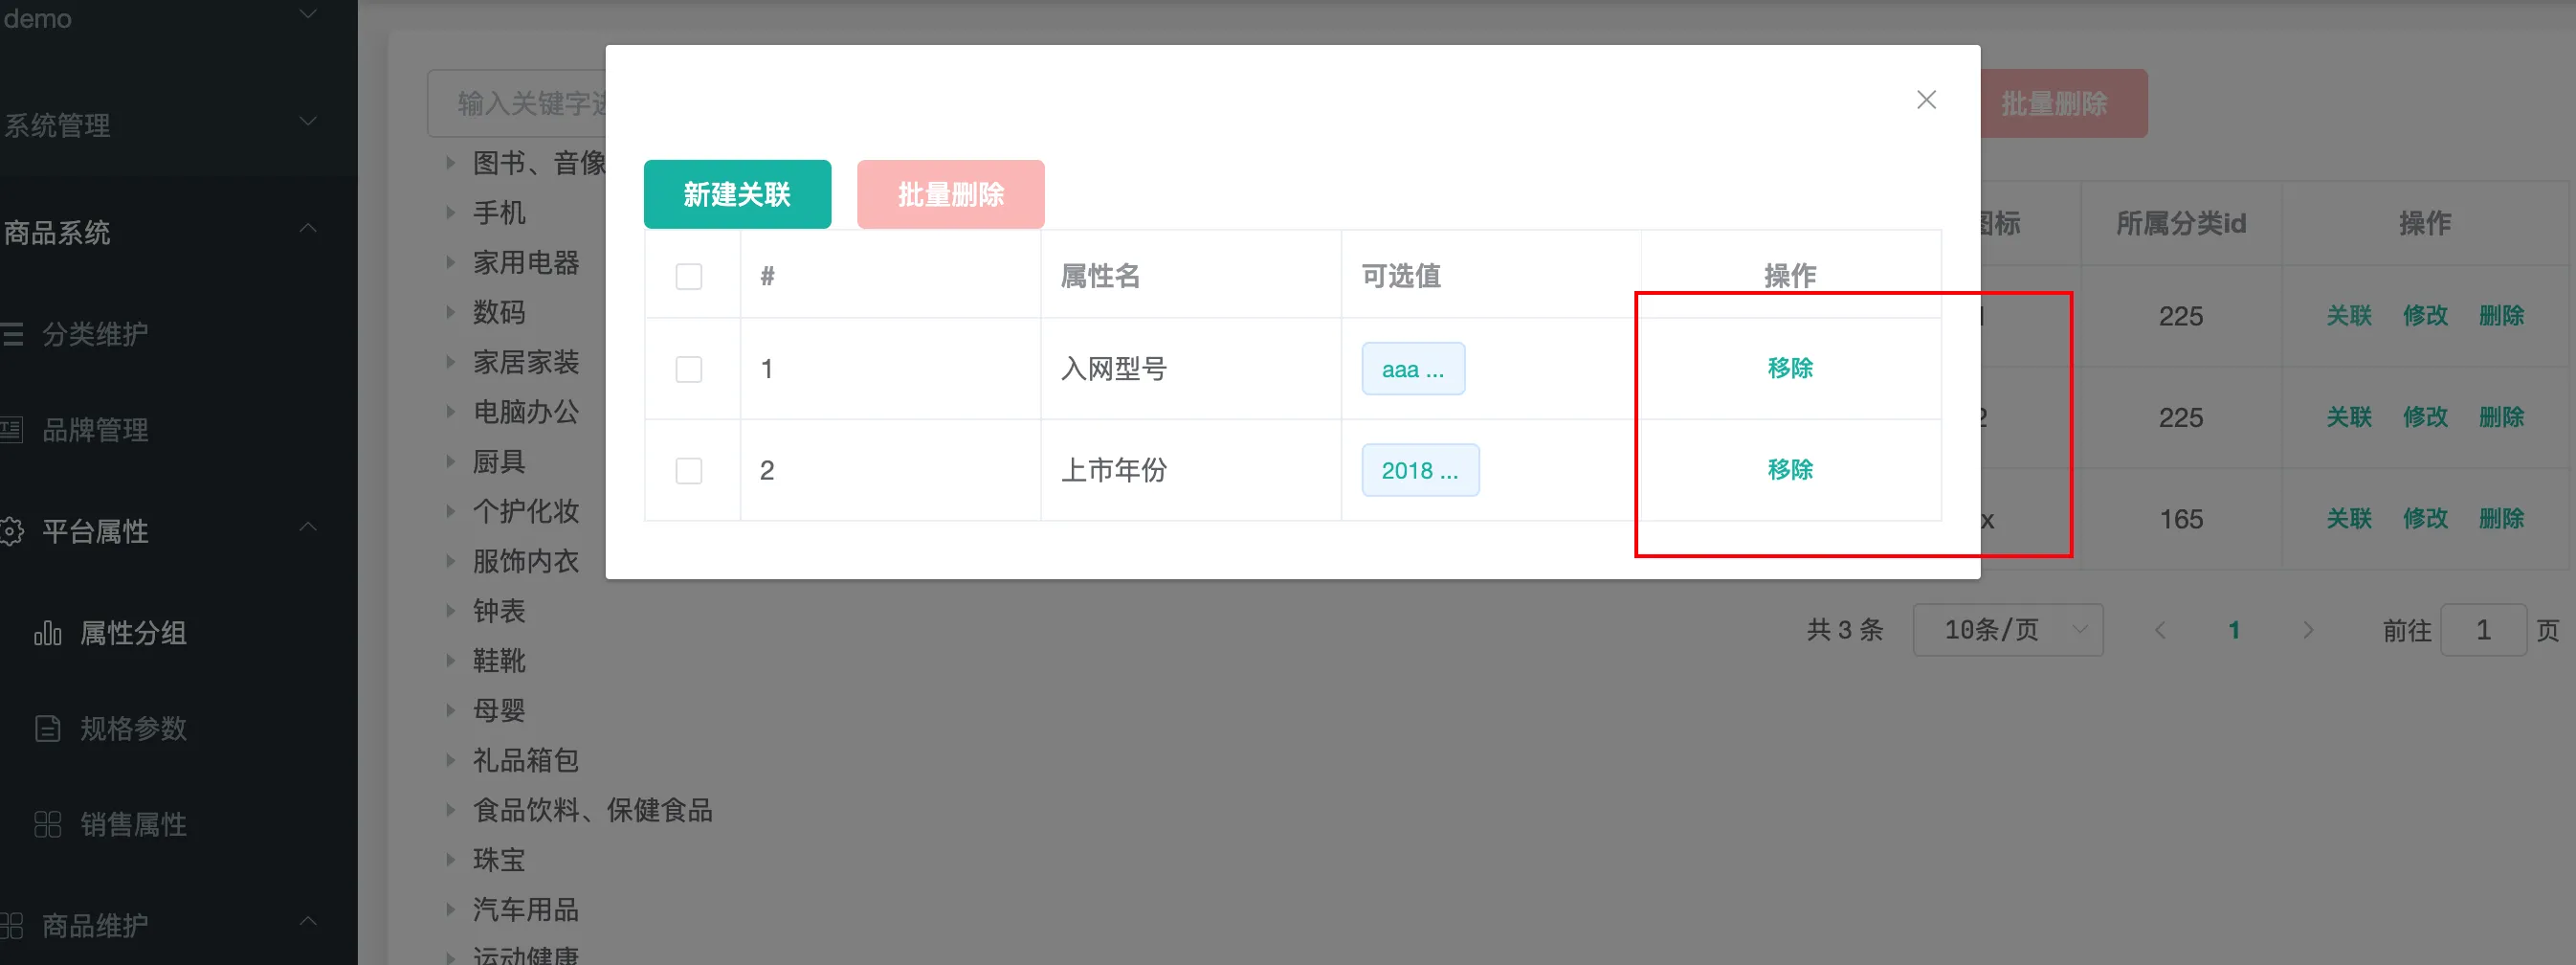
@PostMapping("/attr/relation/delete")
public R deleteRelation(@RequestBody AttrGroupRelationVo[] vos) {
    attrService.deleteRelation(vos);
    return R.ok();
}
@Override
public void deleteRelation(AttrGroupRelationVo[] vos) {
    List<AttrAttrgroupRelationEntity> entities = Arrays.asList(vos).stream().map((item) -> {
        AttrAttrgroupRelationEntity entity = new AttrAttrgroupRelationEntity();
        BeanUtils.copyProperties(item, entity);
        return entity;
    }).collect(Collectors.toList());
    relationDao.deleteBatchRelation(entities);
}
void deleteBatchRelation(@Param("entities") List<AttrAttrgroupRelationEntity> entities);
<delete id="deleteBatchRelation">
    delete
    from gulimall_pms.pms_attr_attrgroup_relation
    where
    <foreach collection="entities" item="item" separator=" or ">
        ( attr_id =#{item.attrId} and attr_group_id =#{item.attrGroupId} )
    </foreach>
</delete>
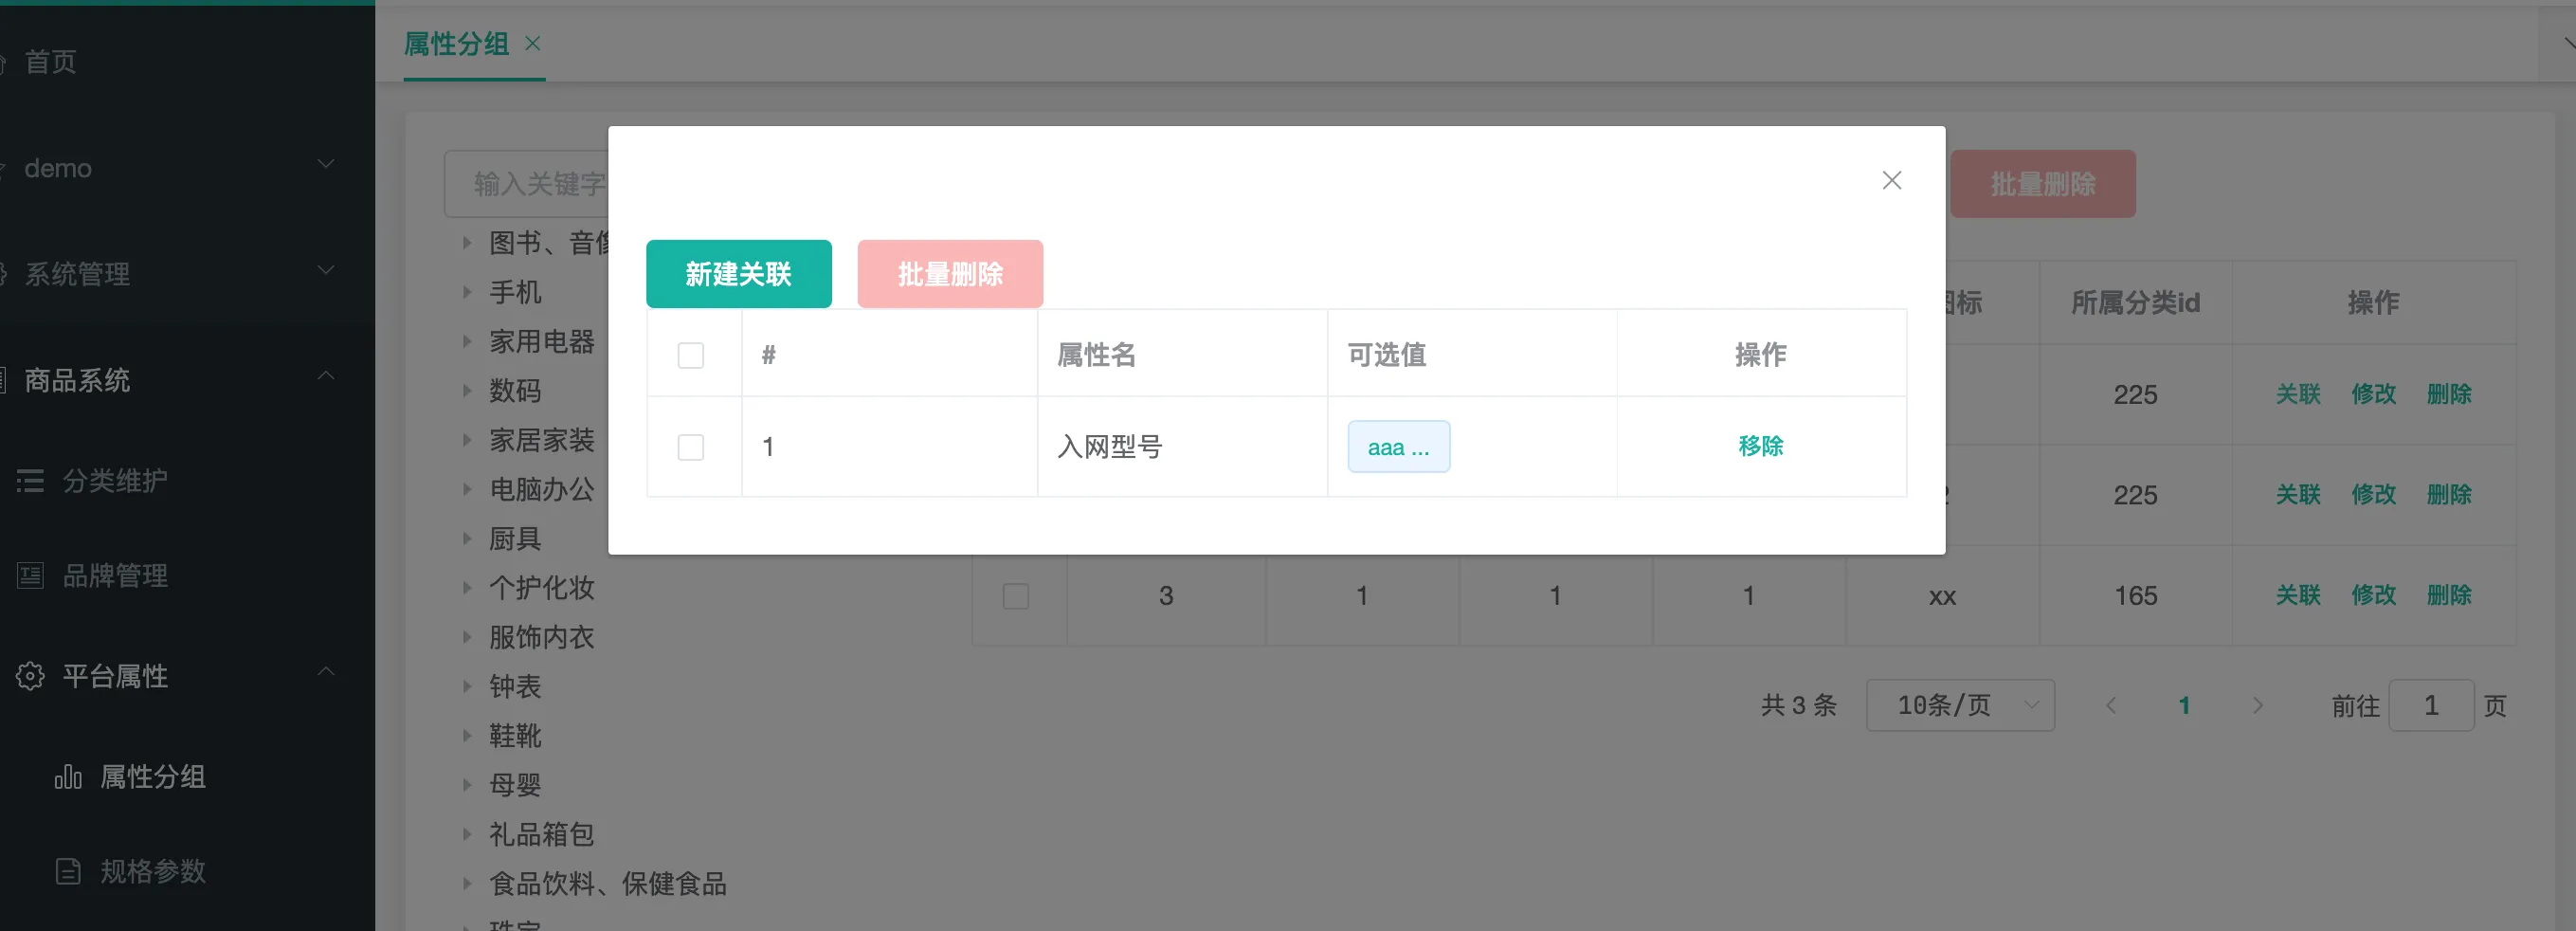
获取当前分组还没有关联的属性
一个属性只能被一个一个分组使用,
所以这里新建关联的时候查询的应该是当前分类的其他分组没有使用过的,以及自己没有用过的
@GetMapping("/{attrGroupId}/noattr/relation")
public R attrNoRelation(@PathVariable("attrGroupId") Long attrGroupId,
                        @RequestParam Map<String, Object> params) {
    //获取当前分组没有关联的所有属性
    PageUtils page = attrService.getNoRelationAttr(params,attrGroupId);
    return R.ok().put("page", page);
}
@Override
public PageUtils getNoRelationAttr(Map<String, Object> params, Long attrGroupId) {
    //当前分组只能关联自己所属分组里面的所有属性
    AttrGroupEntity attrGroupEntity = attrGroupDao.selectById(attrGroupId);
    //当前分类的id
    Long catelogId = attrGroupEntity.getCatelogId();

    //当前分组只能关联别的分组没有引用的属性
    List<AttrGroupEntity> group = attrGroupDao.selectList(new LambdaQueryWrapper<AttrGroupEntity>()
            .eq(AttrGroupEntity::getCatelogId, catelogId));
    //所有的分组id
    List<Long> collect = group.stream().map(AttrGroupEntity::getAttrGroupId).collect(Collectors.toList());
    //这些分组的关联属性
    List<AttrAttrgroupRelationEntity> groupId = relationDao.selectList(new LambdaQueryWrapper<AttrAttrgroupRelationEntity>()
            .in(AttrAttrgroupRelationEntity::getAttrGroupId, collect));
    List<Long> attrIds = groupId.stream().map((AttrAttrgroupRelationEntity::getAttrId)).collect(Collectors.toList());
    //从当前分类的所有属性中移除这些属性
    LambdaQueryWrapper<AttrEntity> wrapper = new LambdaQueryWrapper<AttrEntity>()
            .eq(AttrEntity::getCatelogId, catelogId)
            .eq(AttrEntity::getAttrType, ProductConstant.AttrEnum.ATTR_TYPE_BASE.getCode());
    if (attrIds != null && attrIds.size() > 0) {
        wrapper.notIn(AttrEntity::getAttrId, attrIds);
    }

    //模糊,分页查询
    String key = (String) params.get("key");
    if (StringUtils.isNotEmpty(key)) {
        wrapper.and((obj) -> {
            obj.eq(AttrEntity::getAttrId, key).or().like(AttrEntity::getAttrName, key);
        });
    }
    IPage<AttrEntity> page = this.page(new Query<AttrEntity>().getPage(params), wrapper);
    return new PageUtils(page);
}
新增商品
前端出现报错PubSub is not definded:
npm install --save pubsub-js
再新加一句话

同时下面删除this

查询指定分类里的所有品牌信息:
/**
 *查询指定分类里的所有品牌信息
 */
@GetMapping("/brands/list")
public R relationBrandsList(@RequestParam(value = "catId") Long catId) {
    List<BrandEntity> vos = categoryBrandRelationService.getBrandsByCatId(catId);
    List<BrandVo> collect = vos.stream().map(item -> {
        BrandVo brandVo = new BrandVo();
        brandVo.setBrandId(item.getBrandId());
        brandVo.setBrandName(item.getName());
        return brandVo;
    }).collect(Collectors.toList());
    return R.ok().put("data", collect);
}
controller一共做三件事情:
- 处理请求,接受和校验数据
- service接受controller传来的数据,进行业务处理
- controller接受service处理完的数据,封装页面指定的vo
保存新增商品
  /**
   * 保存
   */
  @RequestMapping("/save")
  //@RequiresPermissions("product:spuinfo:save")
  public R save(@RequestBody SpuSaveVo vo){
spuInfoService.saveSpuInfo(vo);

      return R.ok();
  }
业务逻辑:
    @Override
    @Transactional
    public void saveSpuInfo(SpuSaveVo vo) {

        //1.保存spu基本信息 pms_spu_info
        SpuInfoEntity spuInfoEntity = new SpuInfoEntity();
        BeanUtils.copyProperties(vo, spuInfoEntity);
        spuInfoEntity.setCreateTime(new Date());
        spuInfoEntity.setUpdateTime(new Date());
        this.saveBaseSpInfo(spuInfoEntity);

        //2.保存spu描述图片 pms_spu_info_desc
        List<String> decript = vo.getDecript();
        SpuInfoDescEntity descEntity = new SpuInfoDescEntity();
        descEntity.setSpuId(spuInfoEntity.getId());
        descEntity.setDecript(String.join(",", decript));
        spuInfoDescService.saveSpuInfoDesc(descEntity);

        //3.保存spu图片集 pms_spu_images
        List<String> images = vo.getImages();
        spuImagesService.saveImages(spuInfoEntity.getId(), images);

        //4.保存spu规格参数 pms_product_attr_value
        List<BaseAttrs> baseAttrs = vo.getBaseAttrs();
        List<ProductAttrValueEntity> collect = baseAttrs.stream().map(attr -> {
            ProductAttrValueEntity entity = new ProductAttrValueEntity();
            entity.setSpuId(spuInfoEntity.getId());
            entity.setAttrId(attr.getAttrId());
            AttrEntity attrEntity = attrService.getById(attr.getAttrId());
            entity.setAttrName(attrEntity.getAttrName());
            entity.setAttrValue(attr.getAttrValues());
            entity.setQuickShow(attr.getShowDesc());
            return entity;
        }).collect(Collectors.toList());
        productAttrValueService.saveProductAttr(collect);

        //5.保存spu的积分信息 gulimall_sms->sms_spu_bounds
        Bounds bounds = vo.getBounds();
        SpuBoundTo spuBoundTo = new SpuBoundTo();
        BeanUtils.copyProperties(bounds, spuBoundTo);
        spuBoundTo.setSpuId(spuInfoEntity.getId());
        //todo 调用远程服务
        R r = couponFeignService.saveSpuBounds(spuBoundTo);
        if (r.getCode() != 0) {
            log.error("远程保存spu积分信息失败");
        }

        //5.保存当前spu对应的所有sku信息 pms_sku_info
        List<Skus> skus = vo.getSkus();
        if (skus != null && skus.size() > 0) {
            skus.forEach(item -> {
                String defaultImage = "";
                for (Images image : item.getImages()) {
                    if (image.getDefaultImg() == 1) {
                        defaultImage = image.getImgUrl();
                    }
                }
                SkuInfoEntity entity = new SkuInfoEntity();
                BeanUtils.copyProperties(item, entity);
                entity.setSpuId(spuInfoEntity.getId());
                //todo sku介绍描述 skuDesc
                entity.setCatalogId(spuInfoEntity.getCatalogId());
                entity.setBrandId(spuInfoEntity.getBrandId());
                entity.setSkuDefaultImg(defaultImage);
                //todo saleCount
                //5.1 sku基本信息 pms_sku_info
                skuInfoService.saveSkuInfo(entity);

                List<SkuImagesEntity> skuImagesEntities = item.getImages().stream().map(img -> {
                    SkuImagesEntity skuImagesEntity = new SkuImagesEntity();
                    skuImagesEntity.setSkuId(entity.getSkuId());
                    skuImagesEntity.setImgUrl(img.getImgUrl());
                    skuImagesEntity.setDefaultImg(img.getDefaultImg());
                    return skuImagesEntity;
                }).filter(entity2 -> {
                    return StringUtils.isNotEmpty(entity2.getImgUrl());
                }).collect(Collectors.toList());
                //5.2 sku的图片信息 pms_sku_images
                skuImagesService.saveBatch(skuImagesEntities);

                //5.3 sku的销售属性信息 pms_sku_sale_attr_value
                List<Attr> attr = item.getAttr();
                List<SkuSaleAttrValueEntity> collect1 = attr.stream().map(attr1 -> {
                    SkuSaleAttrValueEntity skuSaleAttrValueEntity = new SkuSaleAttrValueEntity();
                    BeanUtils.copyProperties(attr1, skuSaleAttrValueEntity);
                    skuSaleAttrValueEntity.setSkuId(entity.getSkuId());
                    return skuSaleAttrValueEntity;
                }).collect(Collectors.toList());
                skuSaleAttrValueService.saveBatch(collect1);
                //5.4 sku的优惠、满减等信息 gms_sku_ladder gms_sku_full_reduction gms_member_price
                SkuReductionTo skuReductionTo = new SkuReductionTo();
                BeanUtils.copyProperties(item, skuReductionTo);
                skuReductionTo.setSkuId(entity.getSkuId());
                if (skuReductionTo.getFullCount() > 0 ||
                        skuReductionTo.getFullPrice().compareTo(new BigDecimal(0)) > 0) {
                    //满减
                    R r1 = couponFeignService.saveSkuReductionTo(skuReductionTo);
                    if (r1.getCode() != 0) {
                        log.error("远程保存sku优惠信息失败");
                    }
                }
            });
        }
    }

    @Override
    public void saveBaseSpInfo(SpuInfoEntity spuInfoEntity) {
        this.baseMapper.insert(spuInfoEntity);
    }

feign调用超时了
第一次调用可能要初始化很多东西,重新试一下即可
spu管理:

总是会出现publish错误:
main.js中:
import PubSub from 'pubsub-js'
Vue.prototype.PubSub = PubSub
/**
 * 列表
 */
@RequestMapping("/list")
//@RequiresPermissions("product:spuinfo:list")
public R list(@RequestParam Map<String, Object> params){
    PageUtils page = spuInfoService.queryPageByCondition(params);

    return R.ok().put("page", page);
}
@Override
public PageUtils queryPageByCondition(Map<String, Object> params) {
    LambdaQueryWrapper<SpuInfoEntity> wrapper = new LambdaQueryWrapper<>();
    String key = (String) params.get("key");
    if (StringUtils.isNotEmpty(key)) {
        wrapper.and((obj) -> {
            obj.eq(SpuInfoEntity::getId, key).or().like(SpuInfoEntity::getSpuName, key);
        });
    }

    String status = (String) params.get("status");
    if (StringUtils.isNotEmpty(status)) {
        wrapper.eq(SpuInfoEntity::getPublishStatus, status);
    }

    String brandId = (String) params.get("brandId");
    if (StringUtils.isNotEmpty(brandId)) {
        wrapper.eq(SpuInfoEntity::getBrandId, brandId);
    }

    String catelogId = (String) params.get("catelogId");
    if (StringUtils.isNotEmpty(catelogId)) {
        wrapper.eq(SpuInfoEntity::getCatalogId, catelogId);
    }

    IPage<SpuInfoEntity> page = this.page(
            new Query<SpuInfoEntity>().getPage(params),
            wrapper
    );
    return new PageUtils(page);
}

时间后端来格式化
spring:
	jackson:
	  date-format: yyyy-MM-dd HH:mm:ss
商品管理:
@Override
public PageUtils queryPageByCondition(Map<String, Object> params) {
    /**
     * key:
     * catelogId: 0
     * brandId: 0
     * min: 0
     * max: 0
     */
    LambdaQueryWrapper<SkuInfoEntity> wrapper = new LambdaQueryWrapper<>();
    String key = (String) params.get("key");
    if (StringUtils.isNotEmpty(key)) {
        wrapper.and(obj -> {
            obj.eq(SkuInfoEntity::getSkuId, key).or().like(SkuInfoEntity::getSkuName, key);
        });
    }
    String catelogId = (String) params.get("catelogId");
    if (StringUtils.isNotEmpty(catelogId) && !"0".equals(catelogId)) {
        wrapper.eq(SkuInfoEntity::getCatalogId, catelogId);
    }
    String brandId = (String) params.get("brandId");
    if (StringUtils.isNotEmpty(brandId) && !"0".equals(brandId)) {
        wrapper.eq(SkuInfoEntity::getBrandId, brandId);
    }
    String min = (String) params.get("min");
    if (StringUtils.isNotEmpty(min)) {
        wrapper.ge(SkuInfoEntity::getPrice, min);
    }
    String max = (String) params.get("max");
    if (StringUtils.isNotEmpty(max)) {
        try {
            BigDecimal bigDecimal = new BigDecimal(max);
            if (bigDecimal.compareTo(new BigDecimal("0")) > 0) {
                wrapper.le(SkuInfoEntity::getPrice, max);
            }
        } catch (Exception e) {
            e.printStackTrace();
        }
    }
    IPage<SkuInfoEntity> page = this.page(
            new Query<SkuInfoEntity>().getPage(params),
            wrapper
    );
    return new PageUtils(page);
}


