谷粒商城分布式高级篇
谷粒商城分布式高级篇
ElasticSearch全文检索
基本概念
- 索引index
动词,相当于mysql的insert
名词,相当于mysql的databse
- 类型type
在index索引中,可以定义一个或者多个类型
类似于mysql的table,每一种类型的数据放在一起
- 文档Document
文档是json格式
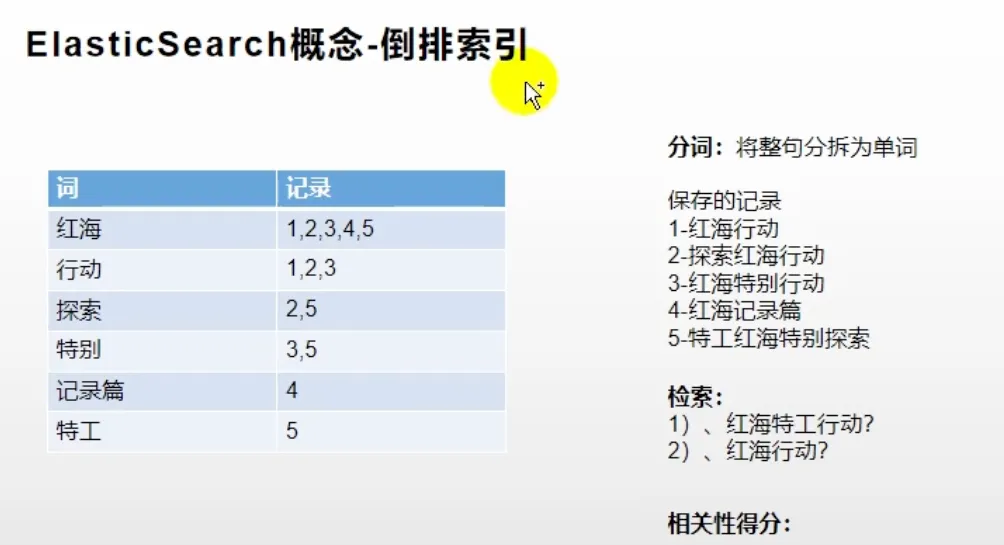
- 倒排索引
Docker安装ES环境
docker pull elasticsearch:7.17.17 #存储和检索数据
docker pull kibana:7.17.17 #可视化检索数据
创建挂载目录~/tools/docker-volumes/elasticsearch:
- config文件夹,里面放一个
elasticsearch.yml文件,写入http.host: 0.0.0.0注意冒号后面要加空格 - data文件夹
运行容器
docker run --name elasticsearch -p 9200:9200 -p 9300:9300 \
-e "discovery.type=single-node" \
-e ES_JAVA_OPTS="-Xms64m -Xmx512m" \
-v ~/tools/docker-volumes/elasticsearch/config/elasticsearch.yml:/usr/share/elasticsearch/config/elasticsearch.yml \
-v ~/tools/docker-volumes/elasticsearch/data:/usr/share/elasticsearch/data \
-v ~/tools/docker-volumes/elasticsearch/plugins:/usr/share/elasticsearch/plugins \
-d elasticsearch:7.17.17
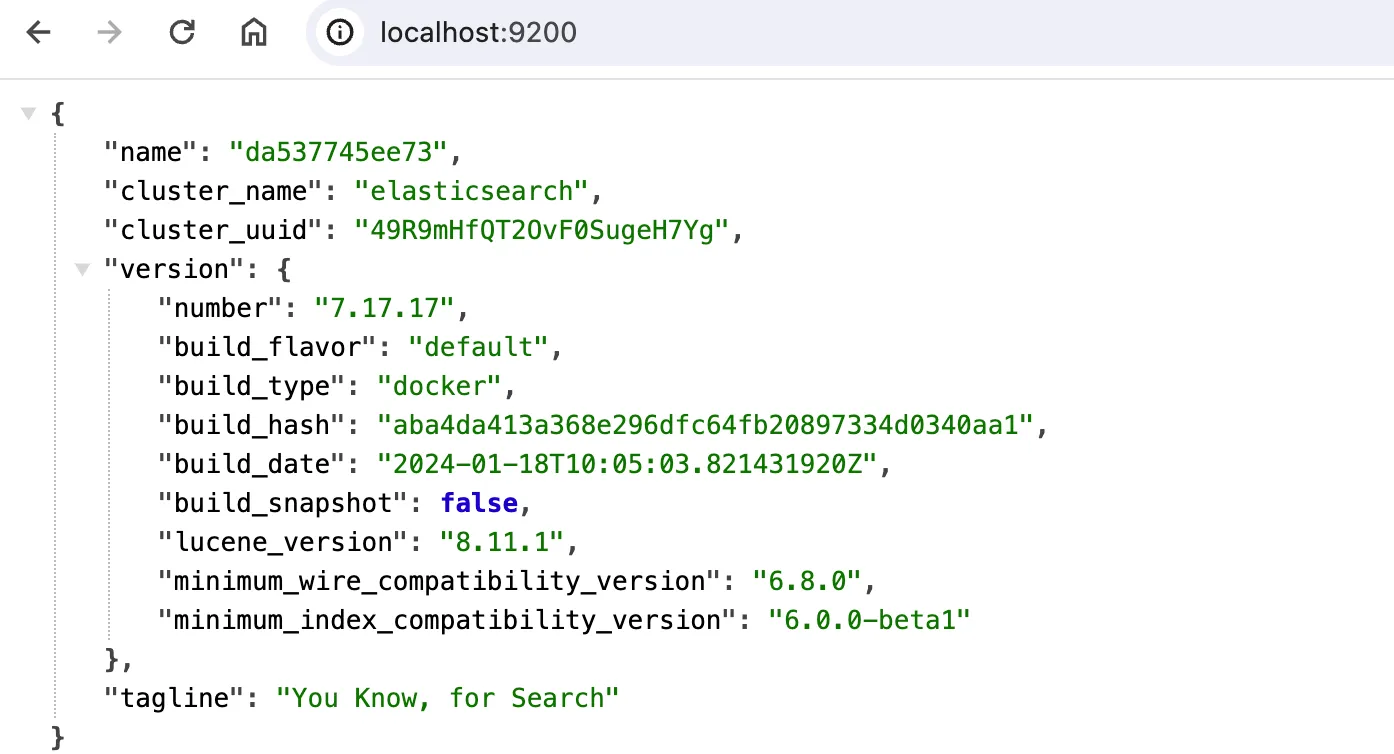
访问:http://localhost:9200/,看到下面界面成功
运行kibana:
docker run --name kibana -e ELASTICSEARCH_HOSTS="http://192.168.1.11:9200" -p 5601:5601 \
-d kibana:7.17.17
注意:
ip不可以使用localhost,否则会一直出现Kibana server is not ready yet
使用ifconfig查看本机ip
初步检索
- cat
GET http://localhost:9200/_cat/nodes 查看所有节点
GET http://localhost:9200/_cat/health 查看es健康状况
GET http://localhost:9200/_cat/master 查看主节点信息
GET http://localhost:9200/_cat/indices 查看所有的索引
- 索引文档(保存)POST/PUT
PUT http://localhost:9200/customer/external/1
{
    "name": "John Doe"
}
PUT 和 POST 都可以,
- POST 新增。如果不指定 id,会自动生成 id。指定 id 就会修改这个数据,并新增版本号PUT 可以新增可以修改。
- PUT 必须指定 id;由于 PUT 需要指定 id,我们一般都用来做修改操作,不指定 id 会报错。
- 查询文档GET
{
    "_index": "customer", //在哪个索引
    "_type": "external", //在哪个类型
    "_id": "1", //记录 id
    "_version": 2, //版本号
    "_seq_no": 1, //并发控制字段,每次更新就会+1,用来做乐观锁
    "_primary_term": 1, //同上,主分片重新分配,如重启,就会变化
    "found": true,
    "_source": { //真正的内容
        "name": "John Doe"
    }
}
- 更新文档POST/PUT
POST customer/external/1/_update
{
    "doc": {
        "name": "John Doew"
    }
}
或者:
POST customer/external/1
{
    "name": "John Doe2"
}
POST 操作会对比源文档数据,如果相同不会有什么操作,文档version 不增加
PUT 操作总会将数据重新保存并增加 version 版本;
带_update 对比元数据如果一样就不进行任何操作
或者:
PUT customer/external/1
{
    "name": "John Doe"
}
- 删除DELETE
删除文档
DELETE customer/external/1
删除索引
DELETE customer
- bulk批量API
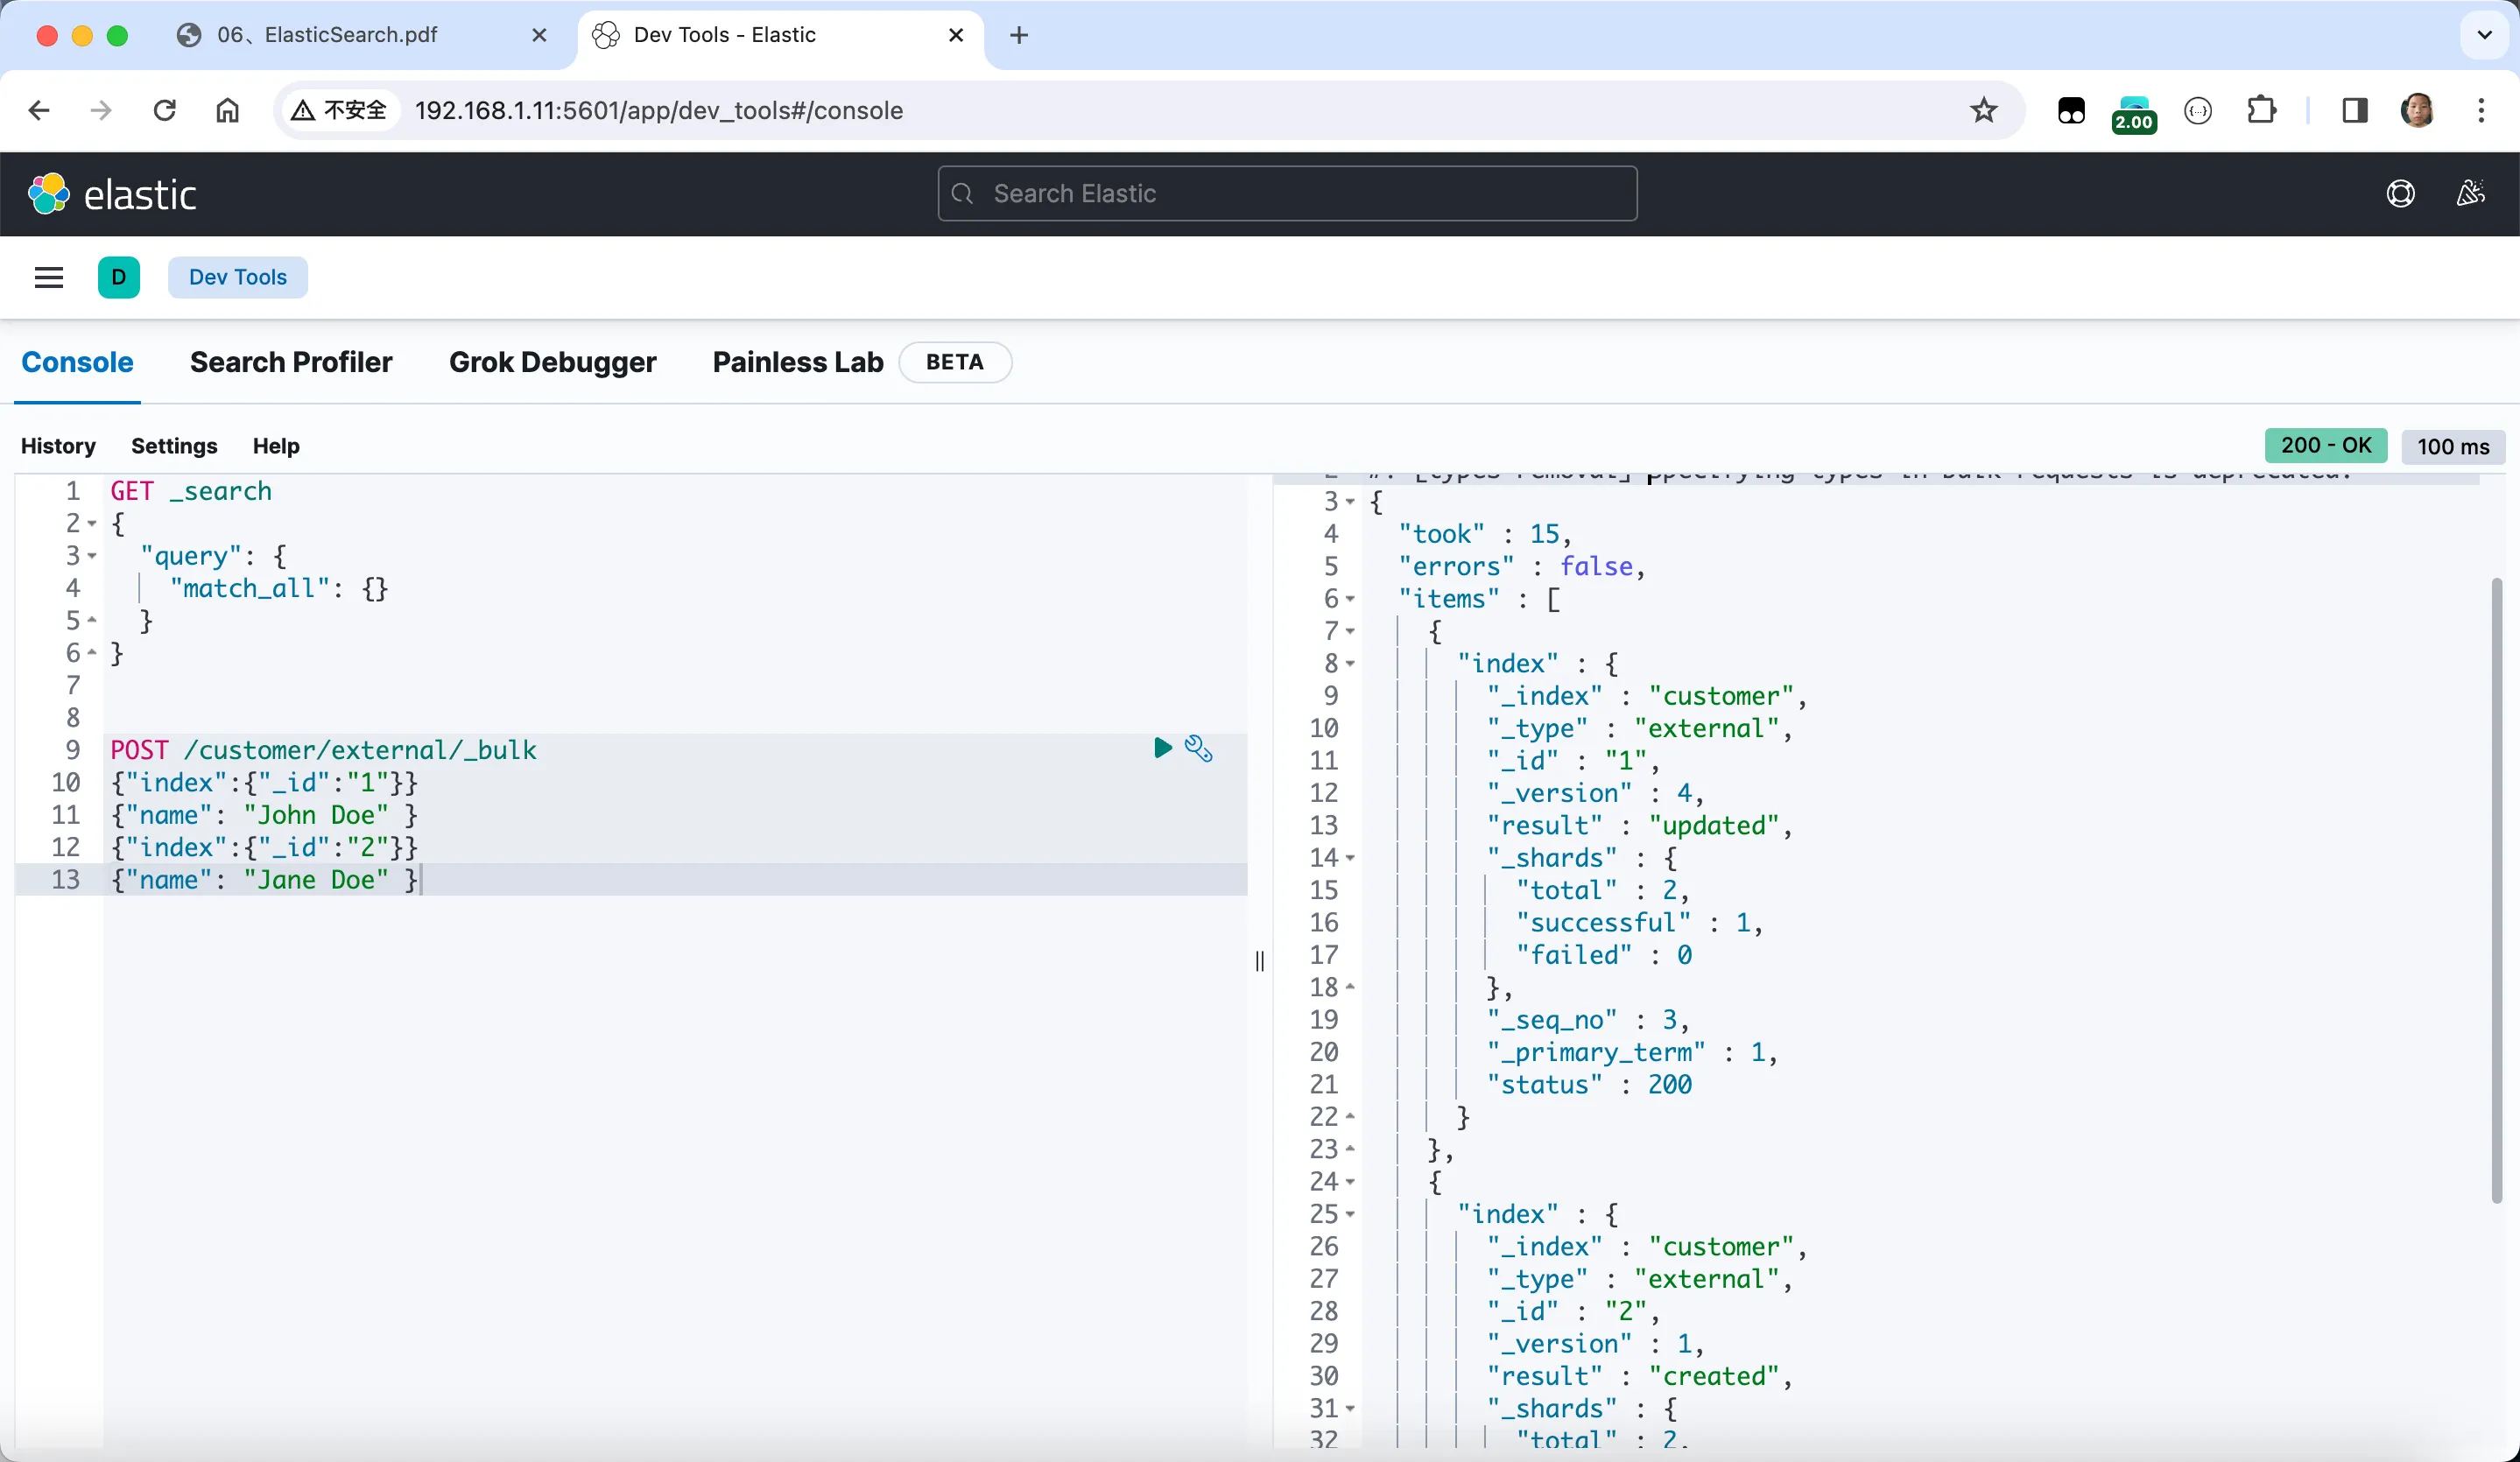
POST /customer/external/_bulk
{"index":{"_id":"1"}}
{"name": "John Doe" }
{"index":{"_id":"2"}}
{"name": "Jane Doe" }
使用kibana
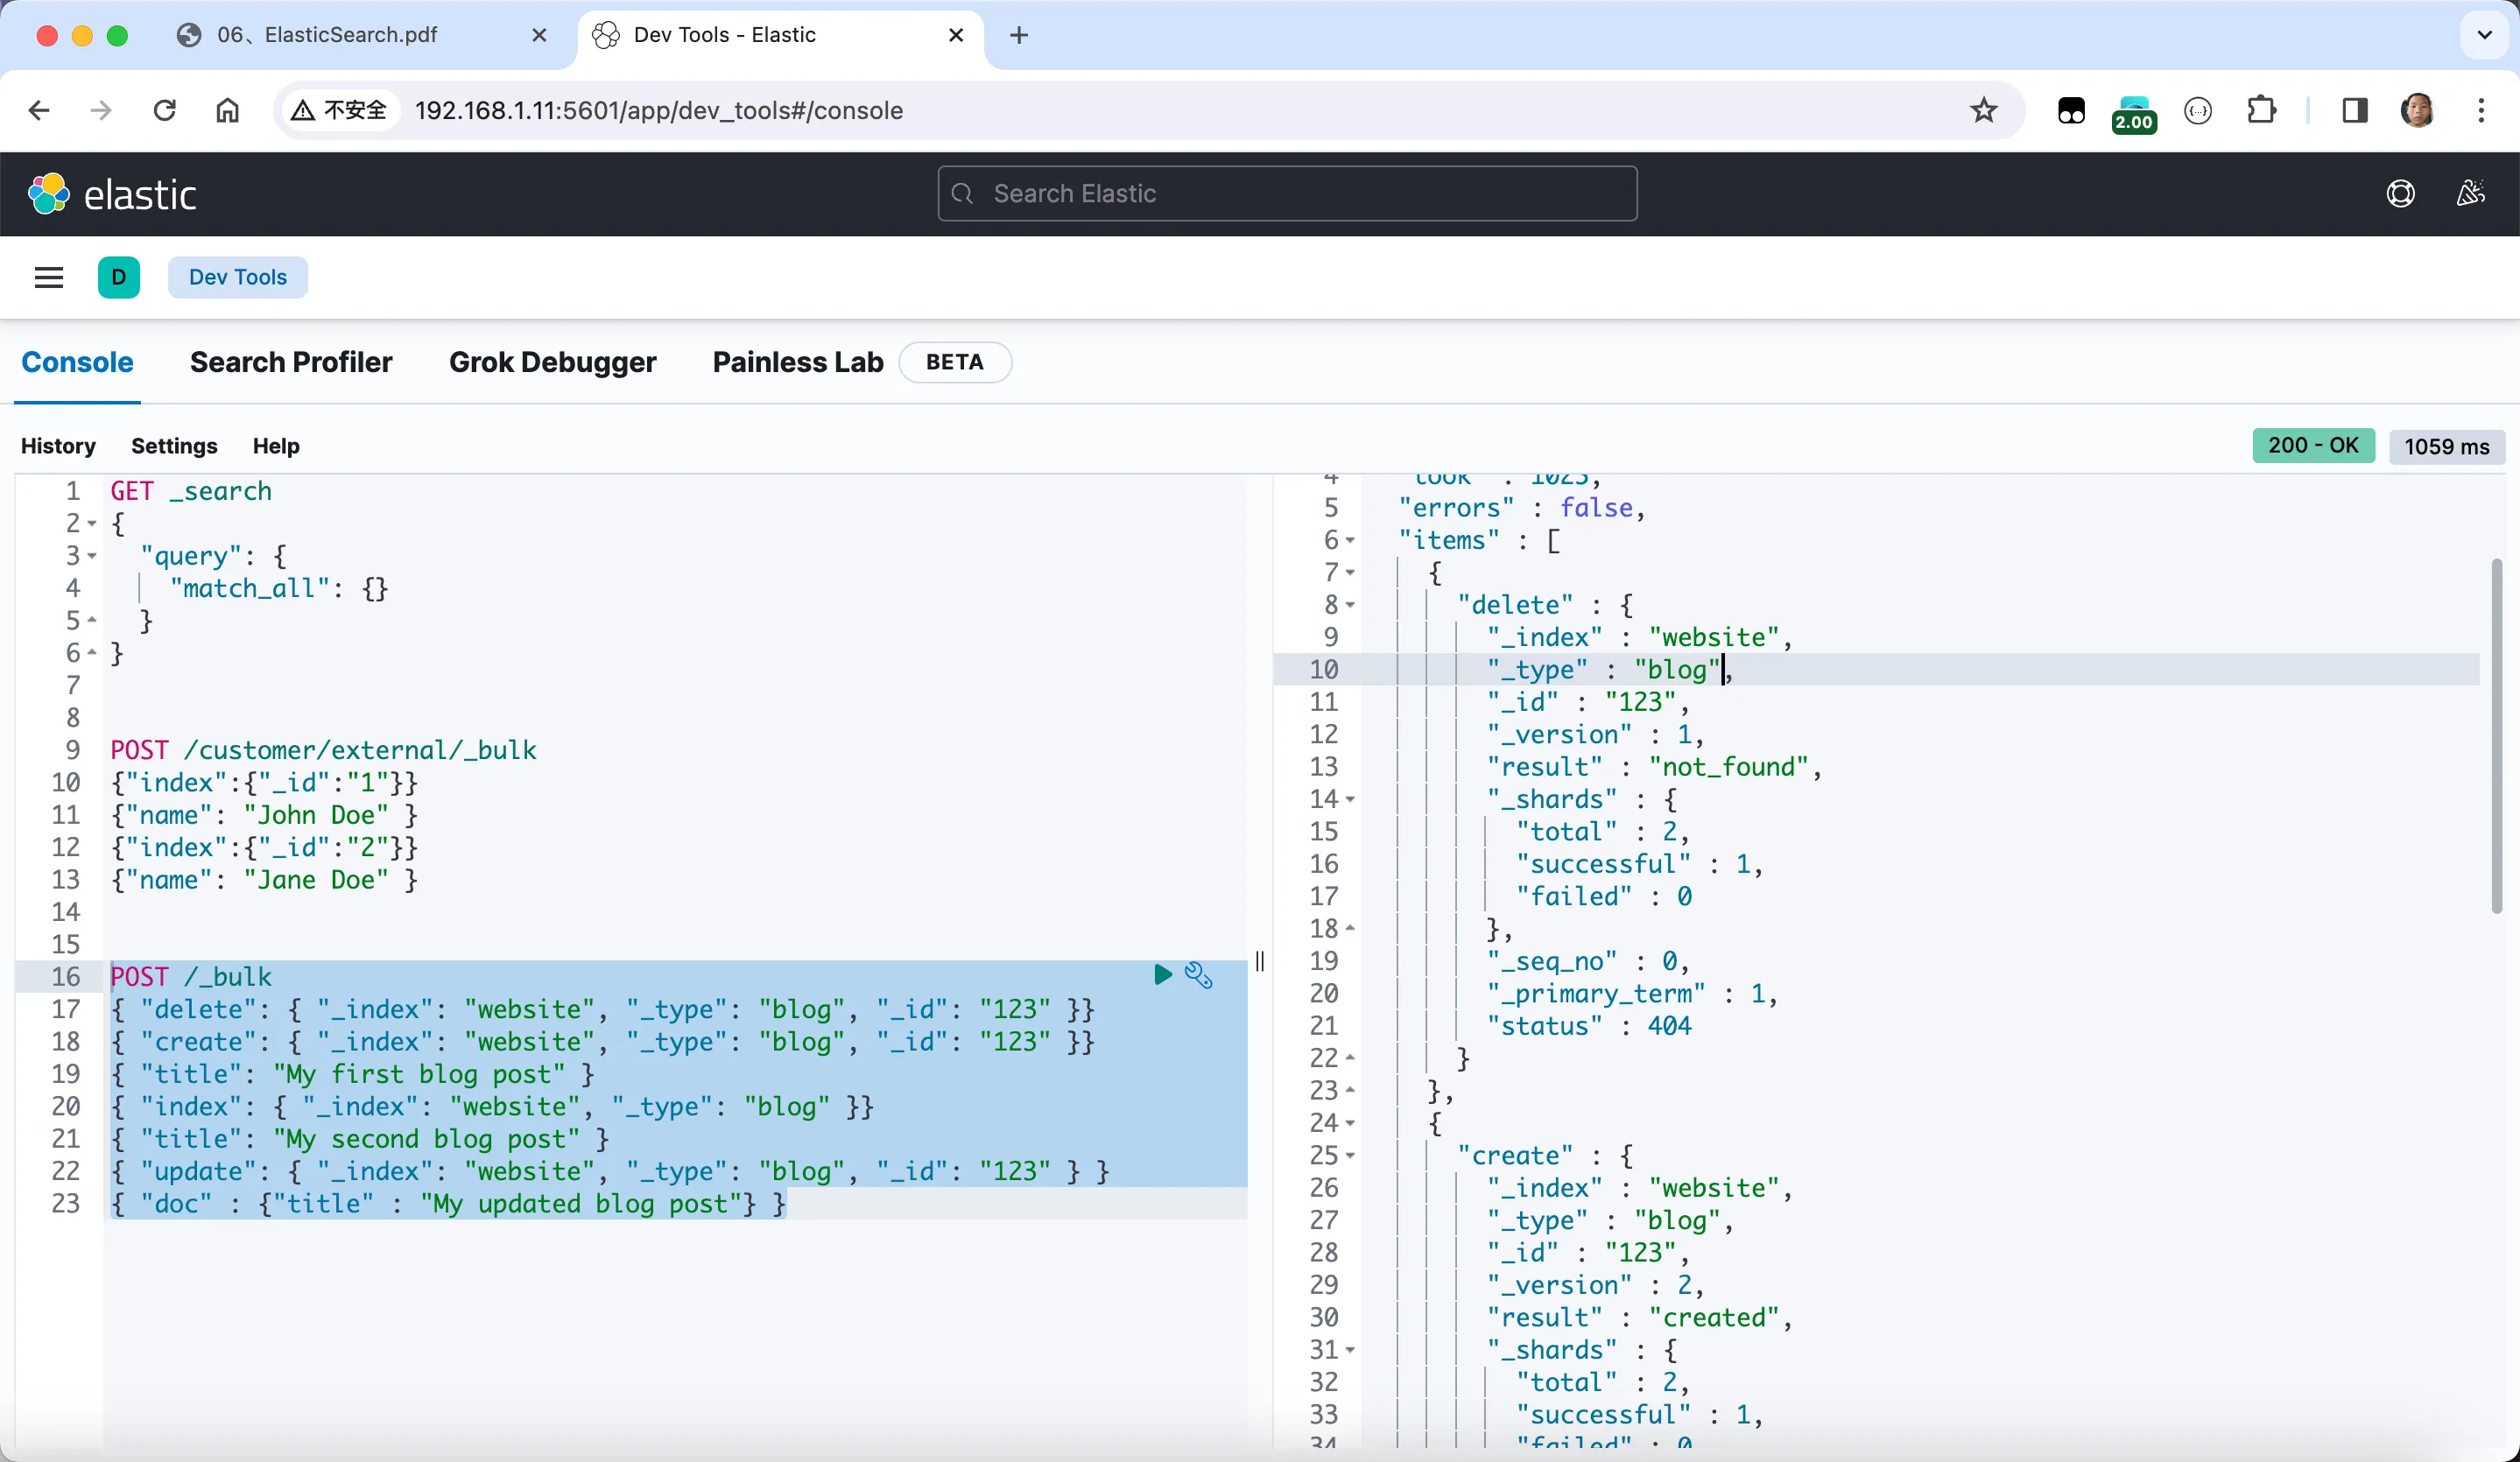
复杂操作:
POST /_bulk
{ "delete": { "_index": "website", "_type": "blog", "_id": "123" }}
{ "create": { "_index": "website", "_type": "blog", "_id": "123" }}
{ "title": "My first blog post" }
{ "index": { "_index": "website", "_type": "blog" }}
{ "title": "My second blog post" }
{ "update": { "_index": "website", "_type": "blog", "_id": "123" } }
{ "doc" : {"title" : "My updated blog post"} }
测试数据:
https://github.com/elastic/elasticsearch/blob/7.4/docs/src/test/resources/accounts.json
POST /bank/account/_bulk
+数据
进阶检索
SearchAPI
- 请求方式检索:
GET bank/_search?q=*&sort=account_number:asc
- uri+请求体进行检索
GET bank/_search
{
    "query": {
        "match_all": {}
    },
    "sort": [
        {
            "account_number": {
                "order": "desc"
            }
        },
        {
           "balance": "desc"
        }
    ]
}
Query DSL
基本语法:
GET bank/_search
{
  "query": {
    "match_all": {}
  },
  "sort": [
    {
      "balance": {
        "order": "desc"
      }
    }
  ],
  "from": 1,
  "size": 3,
  "_source": ["balance","firstname"]
}
说明:
GET bank/_search: 这是Elasticsearch中执行搜索操作的基本语法。正在请求bank索引中的文档。"query": {"match_all": {}}: 这个查询部分指定了搜索的条件。在这里,使用了match_all查询,表示你想要匹配所有文档,即检索所有数据。"sort": [{"balance": {"order": "desc"}}]: 这个部分用于对结果进行排序。希望按照balance字段降序排序,这意味着余额最高的文档将排在前面。"from": 1: 这个参数指定了从搜索结果的第几条文档开始返回。在这里,从第二条文档开始返回(因为Elasticsearch使用0-based索引)。"size": 3: 这个参数定义了返回的文档数量,即最多返回3条匹配的文档。"_source": ["balance", "firstname"]: 这个参数用于指定返回结果中包含的字段。在这里,只关心balance和firstname字段的值,其他字段将不会包含在结果中。
match匹配查询:
- 基本类型,非字符串精确匹配
GET /bank/_search
{
  "query": {
    "match": {
      "account_number": "20"
    }
  }
}
- 字符串,全文检索(倒排索引)计算相关性得分
GET /bank/_search
{
  "query": {
    "match": {
      "address": "mill"
    }
  }
}
- 字符串,分词检索
GET /bank/_search
{
  "query": {
    "match": {
      "address": "mill road"
    }
  }
}
- match_phrase短语匹配
GET /bank/_search
{
  "query": {
    "match_phrase": {
      "address": "mill road"
    }
  }
}
和上面的区别是:
- match_phrase 匹配 必须包含
mill road- match匹配
mill或者road或者mill road
- multi_match 多字段匹配
GET /bank/_search
{
  "query": {
    "multi_match": {
      "query": "mill",
      "fields": ["state","address"]
    }
  }
}
- bool复合查询
must必须达到的所有条件
GET /bank/_search
{
  "query": {
    "bool": {
      "must": [
        {"match": {"address": "mill"}},
        {"match": {"gender": "M"}}
      ]
    }
  }
}
should:应该达到的条件,符合会加分
GET /bank/_search
{
  "query": {
    "bool": {
      "must": [
        {"match": {"address": "mill"}},
        {"match": {"gender": "M"}}
      ],
      "should": [
        {"match": {
          "address": "lane"
        }}
      ]
    }
  }
}
must_not必须不是指定的情况:
GET /bank/_search
{
  "query": {
    "bool": {
      "must": [
        {"match": {"address": "mill"}},
        {"match": {"gender": "M"}}
      ],
      "should": [
        {"match": {
          "address": "lane"
        }}
      ],
      "must_not": [
        {"match": {
          "email": "baluba.com"
        }}
      ]
    }
  }
}
- filter结果过滤
GET /bank/_search
{
  "query": {
    "bool": {
      "must": [
        {"match": {
          "address": "mill"
        }}
      ],
      "filter": [
        {"range": {
          "balance": {
            "gte": 10000,
            "lte": 20000
          }
        }}
      ]
    }
  }
}
- term,匹配某个属性的值,精确匹配
全文检索字段用match,其他非text用term
GET /bank/_search
{
  "query": {
    "bool": {
      "must": [
        {"term": {
          "age": {
            "value": "28"
          }
        }
        }
      ]
    }
  }
}
- aggregations执行聚合
GET /bank/_search
{
  "query": {
    "match": {
    "address": "mill"
  }},
  "aggs": {
    "ageAgg": {
      "terms": {
        "field": "age",
        "size": 10
      }
    },
    "ageAvg":{
      "avg": {
        "field": "age"
      }
    },
    "balanceAvg":{
      "avg": {
        "field": "balance"
      }
    }
  },
  "size": 0
}
"aggs": {...}: 这是聚合部分,用于对结果进行汇总分析。
"ageAgg": {...}: 这是一个名为ageAgg的聚合,使用了terms聚合,它将文档按照age字段的值分组,并且设置了size为10,表示只返回前10个分组。"ageAvg": {...}: 这是计算age字段的平均值的聚合。"balanceAvg": {...}: 这是计算balance字段的平均值的聚合。"size": 0: 这个参数表示不返回文档,只返回聚合结果。
复杂聚合:
查年龄分布和这个年龄的平均薪资
GET /bank/_search
{
  "query": {
    "match_all": {}
  },
  "aggs": {
    "ageAgg": {
      "terms": {
        "field": "age",
        "size": 100
      },
      "aggs": {
        "ageAvg": {
          "avg": {
            "field": "balance"
          }
        }
      }
    }
  }
}
查出所有年龄分布,并且这些年龄段中M的平均薪资和F的平均薪资以及这个年龄段的总体平均薪资
GET /bank/_search
{
  "query": {"match_all": {}}
  , "aggs": {
    "ageAgg": {
      "terms": {
        "field": "age",
        "size": 100
      },
      "aggs": {
        "genderAgg": {
          "terms": {
            "field": "gender.keyword",
            "size": 10
          }
          ,
          "aggs": {
            "balanceAgg": {
              "avg": {
                "field": "balance"
              }
            }
          }
        },
        "ageBalanceAvg":{
          "avg": {
            "field": "balance"
          }
        }
      }
    }
  }
}
Mapping映射
创建时可以指定字段的类型
PUT /my_index
{
  "mappings": {
    "properties": {
      "age":{
        "type": "integer"
      },
      "email":{
        "type": "keyword"
      },
      "name":{
        "type": "text"
      }
    }
  }
}
添加新的映射:
PUT /my_index/_mapping
{
  "properties":{
    "employee_id":{
      "type":"keyword",
      "index":false
    }
  }
}
更新:
索引不可以更新,只可以重新创建
数据迁移:
POST _reindex
{
  "source": {
    "index": "bank",
    "type": "account"
  },
  "dest": {
    "index": "newbank"
  }
}
分词器
POST _analyze
{
  "analyzer": "standard",
  "text": "The 2 QUICK Brown-Foxes jumped over the lazy dog's bone."
}
这种分词器只能对英文有用,需要安装中文分词器ik
https://github.com/medcl/elasticsearch-analysis-ik/releases

将下载好的文件放到自己电脑挂载的plugins目录下面,如果版本不一致可以修改 plugin-descriptor.properties文件中的最后一行。
改为自己的elasticsearch版本,此时可以进行分词
POST _analyze
{
  "analyzer": "ik_smart",
  "text": "我是中国人"
}
使用docker安装nginx
在html/es目录下面创建fenci.txt文件
编辑配置:

修改分词文件位置:
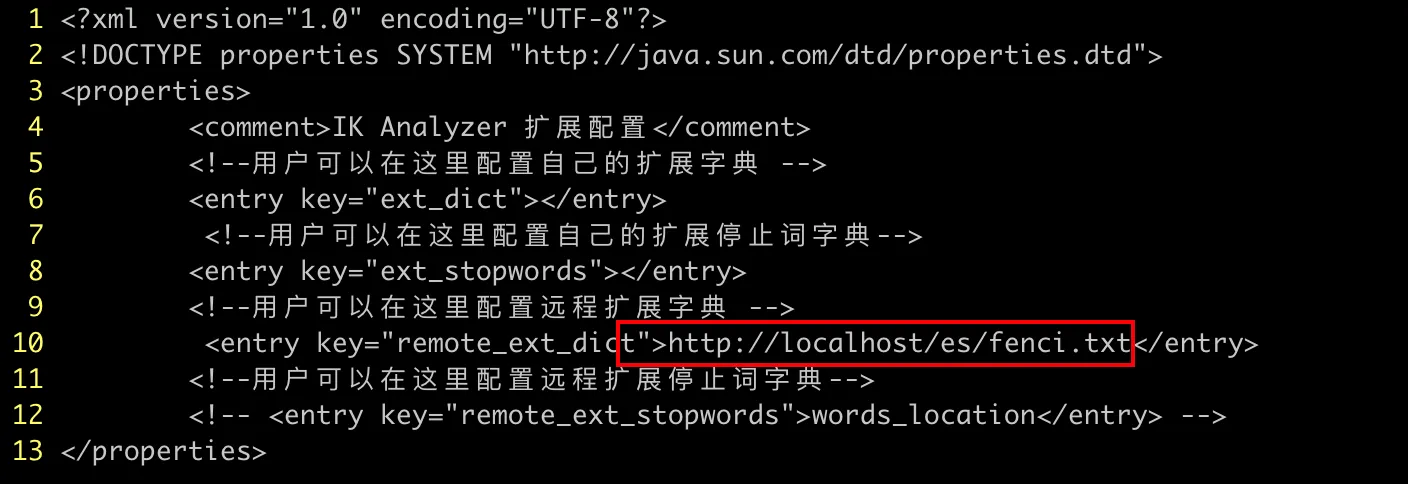
此时重启elasticsearch
Elasticsearch整合springboot
导入maven依赖:
<dependency>
    <groupId>org.elasticsearch.client</groupId>
    <artifactId>elasticsearch-rest-high-level-client</artifactId>
    <version>7.17.17</version>
</dependency>
注意需要更换版本
<elasticsearch.version>7.17.17</elasticsearch.version>
创建配置类官网:
@Configuration
public class GulimallElasticSearchConfig {

    public static final RequestOptions COMMON_OPTIONS;
    static {
        RequestOptions.Builder builder = RequestOptions.DEFAULT.toBuilder();
//        builder.addHeader("Authorization", "Bearer " + TOKEN);
//        builder.setHttpAsyncResponseConsumerFactory(
//                new HttpAsyncResponseConsumerFactory
//                        .HeapBufferedResponseConsumerFactory(30 * 1024 * 1024 * 1024));
        COMMON_OPTIONS = builder.build();
    }

    @Bean
    public RestHighLevelClient esRestClient() {
        RestHighLevelClient client = new RestHighLevelClient(
                RestClient.builder(
                        new HttpHost("192.168.1.11", 9200, "http")));
        return client;
    }
}
测试,检索数据:
    @Test
    public void indexData() throws IOException {
        IndexRequest indexRequest = new IndexRequest("users");
        indexRequest.id("1");
//        indexRequest.source("userName","zhangsan","age",18,"gender","男");
        User user = new User();
        user.setUserName("zhangsan");
        user.setAge(18);
        user.setGender("男");
        String jsonString = JSON.toJSONString(user);
        indexRequest.source(jsonString, XContentType.JSON);
        IndexResponse index = client.index(indexRequest, GulimallElasticSearchConfig.COMMON_OPTIONS);
        System.out.println(index);


    }
    @Data
    class User{
        private String userName;
        private Integer age;
        private String gender;
    }
复杂搜索:
    @Test
    public void searchData() throws Exception {
        //创建检索请求
        SearchRequest searchRequest = new SearchRequest();
        //指定索引
        searchRequest.indices("bank");
        //构建检索条件
        SearchSourceBuilder searchSourceBuilder = new SearchSourceBuilder();

        searchSourceBuilder.query(QueryBuilders.matchQuery("address", "mill"));//匹配查询
        TermsAggregationBuilder ageAgg = AggregationBuilders.terms("ageAgg").field("age").size(10);
        AvgAggregationBuilder balanceAvg = AggregationBuilders.avg("balanceAvg").field("balance");
        searchSourceBuilder.aggregation(ageAgg);//聚合查询
        searchSourceBuilder.aggregation(balanceAvg);//聚合查询
        System.out.println("检索条件" + searchSourceBuilder.toString());

        searchRequest.source(searchSourceBuilder);

        //执行检索
        SearchResponse searchResponse = client.search(searchRequest, GulimallElasticSearchConfig.COMMON_OPTIONS);
        System.out.println(searchResponse.toString());
        SearchHits hits = searchResponse.getHits();
        SearchHit[] searchHits = hits.getHits();
        for (SearchHit hit : searchHits) {
            String sourceAsString = hit.getSourceAsString();
            Account account = JSON.parseObject(sourceAsString, Account.class);
            System.out.println("account = " + account);
        }

        //获取分析数据
        Aggregations aggregations = searchResponse.getAggregations();
        for (Aggregation aggregation : aggregations.asList()) {
            String name = aggregation.getName();
            System.out.println("当前聚合name = " + name);
        }
        Terms ageAgg1 = aggregations.get("ageAgg");
        for (Terms.Bucket bucket : ageAgg1.getBuckets()) {
            String keyAsString = bucket.getKeyAsString();
            System.out.println("年龄 = " + keyAsString);
        }
        Avg balanceAvg1 = aggregations.get("balanceAvg");
        System.out.println("平均薪资 = " + balanceAvg1.getValue());
    }
商品上架
@PostMapping("/{spuId}/up")
public R spuUp(@PathVariable("spuId") Long spuId){
    spuInfoService.up(spuId);
    return R.ok();
}
逻辑:
    @Override
    public void up(Long spuId) {
        //1.查出当前spuId对应的所有sku信息,品牌的名字
        List<SkuInfoEntity> skuInfoEntities = skuInfoService.getSkuInfoBySpuId(spuId);

        //todo 4.查询当前sku的所有可以被用来检索的规格属性
        List<ProductAttrValueEntity> baseAttr = productAttrValueService.baseAttrlistforspu(spuId);
        List<Long> attrIds = baseAttr.stream().map(attr -> {
            return attr.getAttrId();
        }).collect(Collectors.toList());
        List<Long> searchAttrIds = attrService.selectSearchAttrIds(attrIds);
        HashSet<Long> idSet = new HashSet<>(searchAttrIds);


        List<SkuEsModel.Attrs> attrsList = baseAttr.stream().filter(item -> {
            return idSet.contains(item.getAttrId());
        }).map(item -> {
            SkuEsModel.Attrs attrs = new SkuEsModel.Attrs();
            BeanUtils.copyProperties(item, attrs);
            return attrs;
        }).collect(Collectors.toList());


        //todo 1.发送远程调用 ,查询库存系统是否有库存 hasStock
        Map<Long, Boolean> collect = null;
        try {
            List<Long> skuIdList = skuInfoEntities.stream().map(SkuInfoEntity::getSkuId).collect(Collectors.toList());
            R<List<SkuHasStockVo>> skuHasStock = wareFeignService.getSkuHasStock(skuIdList);
            collect = skuHasStock.getData()
                    .stream().collect(Collectors.toMap(SkuHasStockVo::getSkuId, SkuHasStockVo::getHasStock));
        } catch (Exception e) {
            log.error("库存服务查询异常,原因:{}",e);
        }


        //2.封装每个sku的信息
        Map<Long, Boolean> finalCollect = collect;
        List<SkuEsModel> upProducts = skuInfoEntities.stream().map(sku -> {
            SkuEsModel esModel = new SkuEsModel();
            BeanUtils.copyProperties(sku, esModel);
            //skuPrice,skuImg,hasStock,hotScore,brandName,brandImg,catalogName,attrs
            //    public static class Attr {
            //        private Long attrId;
            //        private String attrName;
            //        private String attrValue;
            //    }
            esModel.setSkuPrice(sku.getPrice());
            esModel.setSkuImg(sku.getSkuDefaultImg());
            if (finalCollect ==null){
                esModel.setHasStock(true);
            }else{
                esModel.setHasStock(finalCollect.get(sku.getSkuId()));
            }
            //todo 2.热度评分 0
            esModel.setHotScore(0L);
            //todo 3.查询品牌和分类的名字信息
            BrandEntity brand = brandService.getById(esModel.getBrandId());
            esModel.setBrandName(brand.getName());
            esModel.setBrandImg(brand.getLogo());
            CategoryEntity category = categoryService.getById(esModel.getCatalogId());
            esModel.setCatalogName(category.getName());
            esModel.setAttrs(attrsList);
            return esModel;
        }).collect(Collectors.toList());
//        todo 5.将数据发送给es进行保存
        R r = searchFeignService.productStatusUp(upProducts);
        if (r.getCode() == 0) {
            //远程调用成功
            //todo 6.修改当前spu的状态
            this.baseMapper.updateSpuStatus(spuId, ProductConstant.StatusEnum.SPU_UP.getCode());
        } else {
            //远程调用失败
            //todo 7.重复调用?接口幂等性,重试机制
        }

    }
ElasticSearchController
@RequestMapping("/search/save")
@RestController
@Slf4j
public class ElasticSaveController {

    @Autowired
    private ProductSaveService productSaveService;

    //上架商品
    @PostMapping("/product")
    public R productStatusUp(@RequestBody List<SkuEsModel> skuEsModels) {
        try {
            boolean b = productSaveService.productStatusUp(skuEsModels);
            if (b) {
                return R.ok();
            } else {
                return R.error(BizCodeEnum.PRODUCT_UP_EXCEPTION.getCode(), BizCodeEnum.PRODUCT_UP_EXCEPTION.getMsg());
            }
        } catch (IOException e) {
            log.error("ElasticSaveController controller商品上架错误:{}", e);
            return R.error(BizCodeEnum.PRODUCT_UP_EXCEPTION.getCode(), BizCodeEnum.PRODUCT_UP_EXCEPTION.getMsg());
        }
    }
}
逻辑实现:
@Service
@Slf4j
public class ProductSaveServiceImpl implements ProductSaveService {

    @Autowired
    private RestHighLevelClient restHighLevelClient;

    @Override
    public boolean productStatusUp(List<SkuEsModel> skuEsModels) throws IOException {

        //保存到es
        //1.给es中建立索引。product,建立好映射关系

        //2.给es中保存这些数据
        BulkRequest bulkRequest = new BulkRequest();
        for (SkuEsModel skuEsModel : skuEsModels) {
            //构造保存请求
            IndexRequest indexRequest = new IndexRequest(EsConstant.PRODUCT_INDEX);
            indexRequest.id(skuEsModel.getSkuId().toString());
            String jsonString = JSON.toJSONString(skuEsModel);
            indexRequest.source(jsonString, XContentType.JSON);
            bulkRequest.add(indexRequest);
        }
        BulkResponse bulk = restHighLevelClient.bulk(bulkRequest, GulimallElasticSearchConfig.COMMON_OPTIONS);
        //TODO 如果批量错误
        boolean b = bulk.hasFailures();
        List<String> collect = Arrays.stream(bulk.getItems()).map(BulkItemResponse::getId).collect(Collectors.toList());
        log.error("商品上架错误:{}",collect);
        return b;
    }
}
商城业务
首页
product模块使用模版引擎
<!-- 模板引擎 -->
<dependency>
    <groupId>org.springframework.boot</groupId>
    <artifactId>spring-boot-starter-thymeleaf</artifactId>
</dependency>
关闭缓存:
spring:
	thymeleaf:
	  cache: false
拷贝页面:
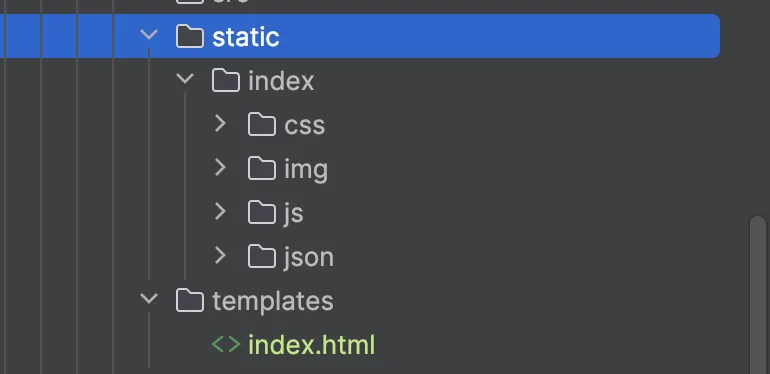
devtools热部署
<!-- https://mvnrepository.com/artifact/org.springframework.boot/spring-boot-devtools -->
<dependency>
    <groupId>org.springframework.boot</groupId>
    <artifactId>spring-boot-devtools</artifactId>
    <optional>true</optional>
</dependency>
快捷键command+shift+F9
首页三级分类接口:
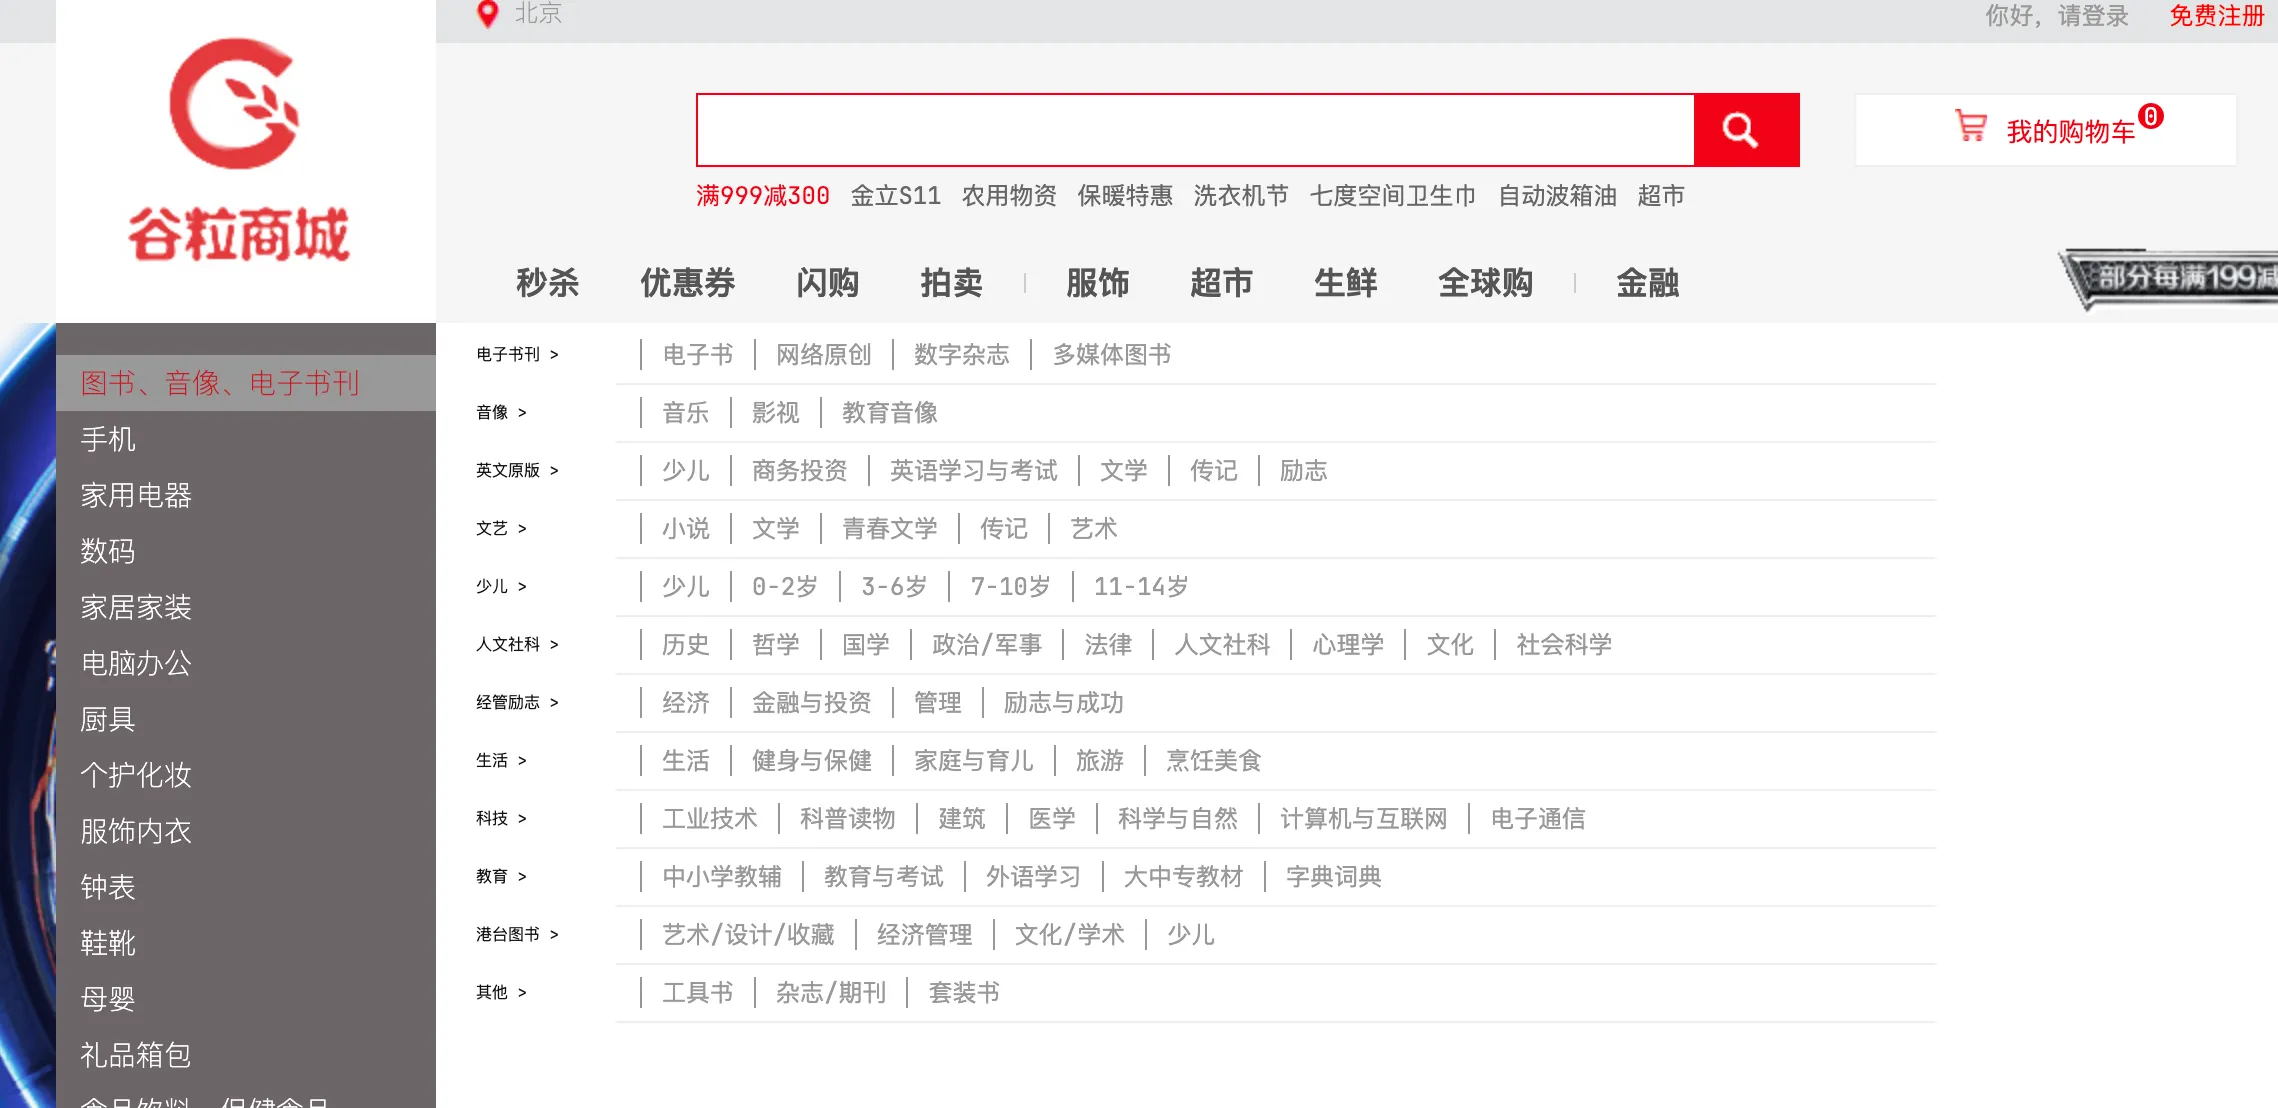
//index/catalog.json
@GetMapping("/index/catalog.json")
@ResponseBody
public Map<String, List<Catelog2Vo>> getCatalogJson() {
    Map<String, List<Catelog2Vo>> catalogJson = categoryService.getCatalogJson();
    return catalogJson;
}
@Override
public Map<String, List<Catelog2Vo>> getCatalogJson() {
    //查出所有1级分类
    List<CategoryEntity> level1Categories = this.getLevel1Categories();

    //封装数据
    Map<String, List<Catelog2Vo>> parentCid = level1Categories.stream().collect(Collectors.toMap(k -> {
        return k.getCatId().toString();
    }, v -> {
        //每一个1级分类,查到这个一级分类的二级分类
        List<CategoryEntity> categoryEntities = this.baseMapper.selectList(new LambdaQueryWrapper<CategoryEntity>()
                .eq(CategoryEntity::getParentCid, v.getCatId()));
        //封装数据
        List<Catelog2Vo> collect = null;
        if (categoryEntities != null) {
            collect = categoryEntities.stream().map(level2 -> {
                Catelog2Vo catelog2Vo = new Catelog2Vo(v.getCatId().toString(), null,
                        level2.getCatId().toString(), level2.getName());
                //找当前二级分类的三级分类封装成vo
                List<CategoryEntity> level3Catelog = baseMapper.selectList(new LambdaQueryWrapper<CategoryEntity>()
                        .eq(CategoryEntity::getParentCid, level2.getCatId()));
                if (level3Catelog != null) {
                    List<Catelog2Vo.Catalog3Vo> catalog3Vos = level3Catelog.stream().map(level3 -> {
                        Catelog2Vo.Catalog3Vo catalog3Vo = new Catelog2Vo.Catalog3Vo(level2.getCatId().toString(),
                                level3.getCatId().toString(), level3.getName());
                        return catalog3Vo;
                    }).collect(Collectors.toList());
                    catelog2Vo.setCatalog3List(catalog3Vos);
                }
                return catelog2Vo;
            }).collect(Collectors.toList());
        }
        return collect;
    }));
    return parentCid;
}
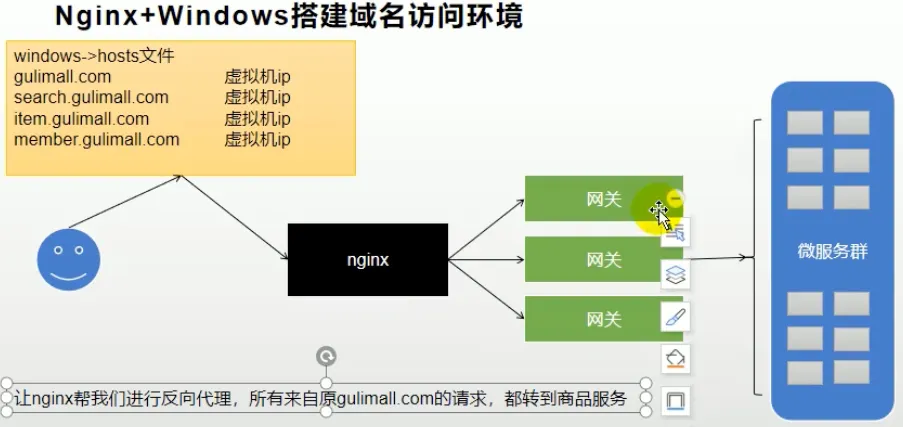
nginx配置域名
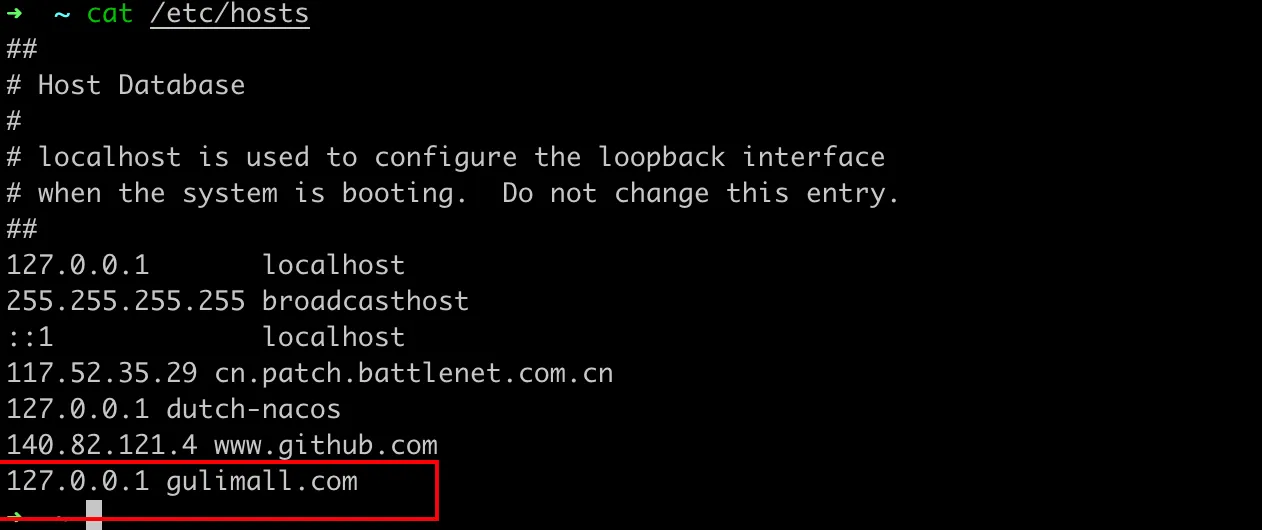
下次访问项目,可以直接用gulimall.com进行访问
server {
    listen       80;
    server_name  gulimall.com;

    #access_log  /var/log/nginx/host.access.log  main;

    location / {
        proxy_pass http://192.168.1.11:10001;
    }

    #error_page  404              /404.html;

    # redirect server error pages to the static page /50x.html
    #
    error_page   500 502 503 504  /50x.html;
    location = /50x.html {
        root   /usr/share/nginx/html;
    }

    # proxy the PHP scripts to Apache listening on 127.0.0.1:80
    #
    #location ~ \.php$ {
    #    proxy_pass   http://127.0.0.1;
    #}

    # pass the PHP scripts to FastCGI server listening on 127.0.0.1:9000
    #
    #location ~ \.php$ {
    #    root           html;
    #    fastcgi_pass   127.0.0.1:9000;
    #    fastcgi_index  index.php;
    #    fastcgi_param  SCRIPT_FILENAME  /scripts$fastcgi_script_name;
    #    include        fastcgi_params;
    #}

    # deny access to .htaccess files, if Apache's document root
    # concurs with nginx's one
    #
    #location ~ /\.ht {
    #    deny  all;
    #}
}
配置nginx负载均衡
在总配置nginx.conf中,http块下面:
    upstream gulimall {
        server 192.168.1.11:88;
    }
在gulimall.conf中,server块下面:
server {
    listen       80;
    server_name  gulimall.com;

    #access_log  /var/log/nginx/host.access.log  main;

    location / {
        proxy_pass http://gulimall;
    }
}
此时访问gulimall.com代理不了,但是访问http://gulimall.com/api/product/attrattrgrouprelation/list却可以
这是因为nginx在代理给网关的时候,会丢失请求的host信息
修改配置:
    location / {
        proxy_set_header Host $host;
        proxy_pass http://gulimall;
    }
性能压测
Jmeter官网:https://jmeter.apache.org/
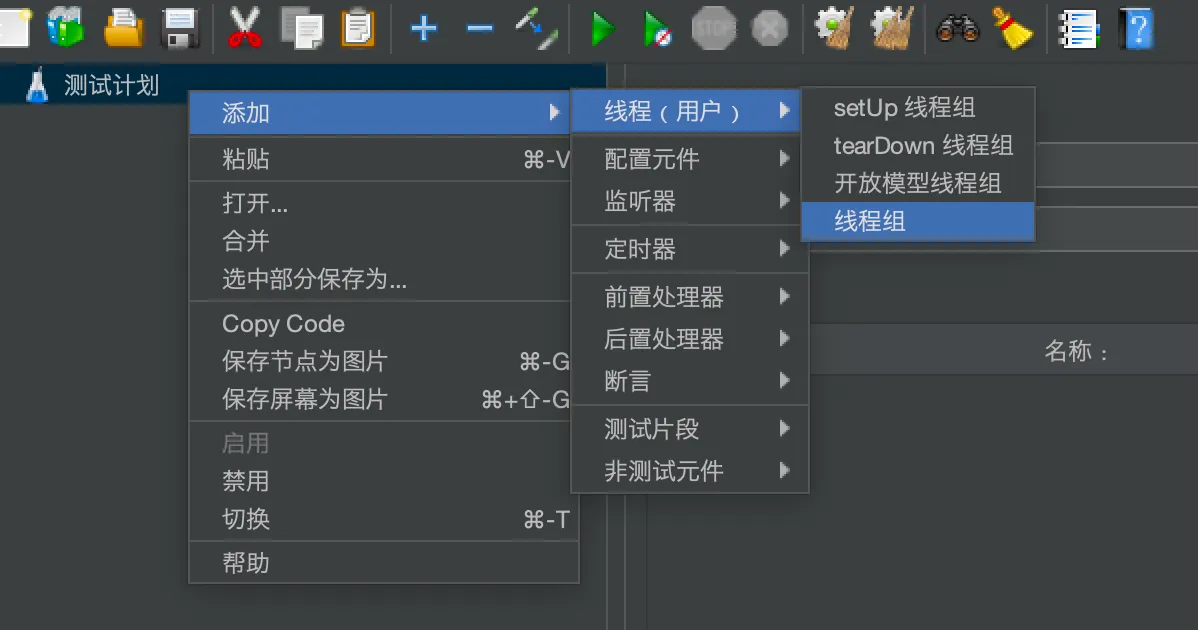
添加线程组:
添加取样器:

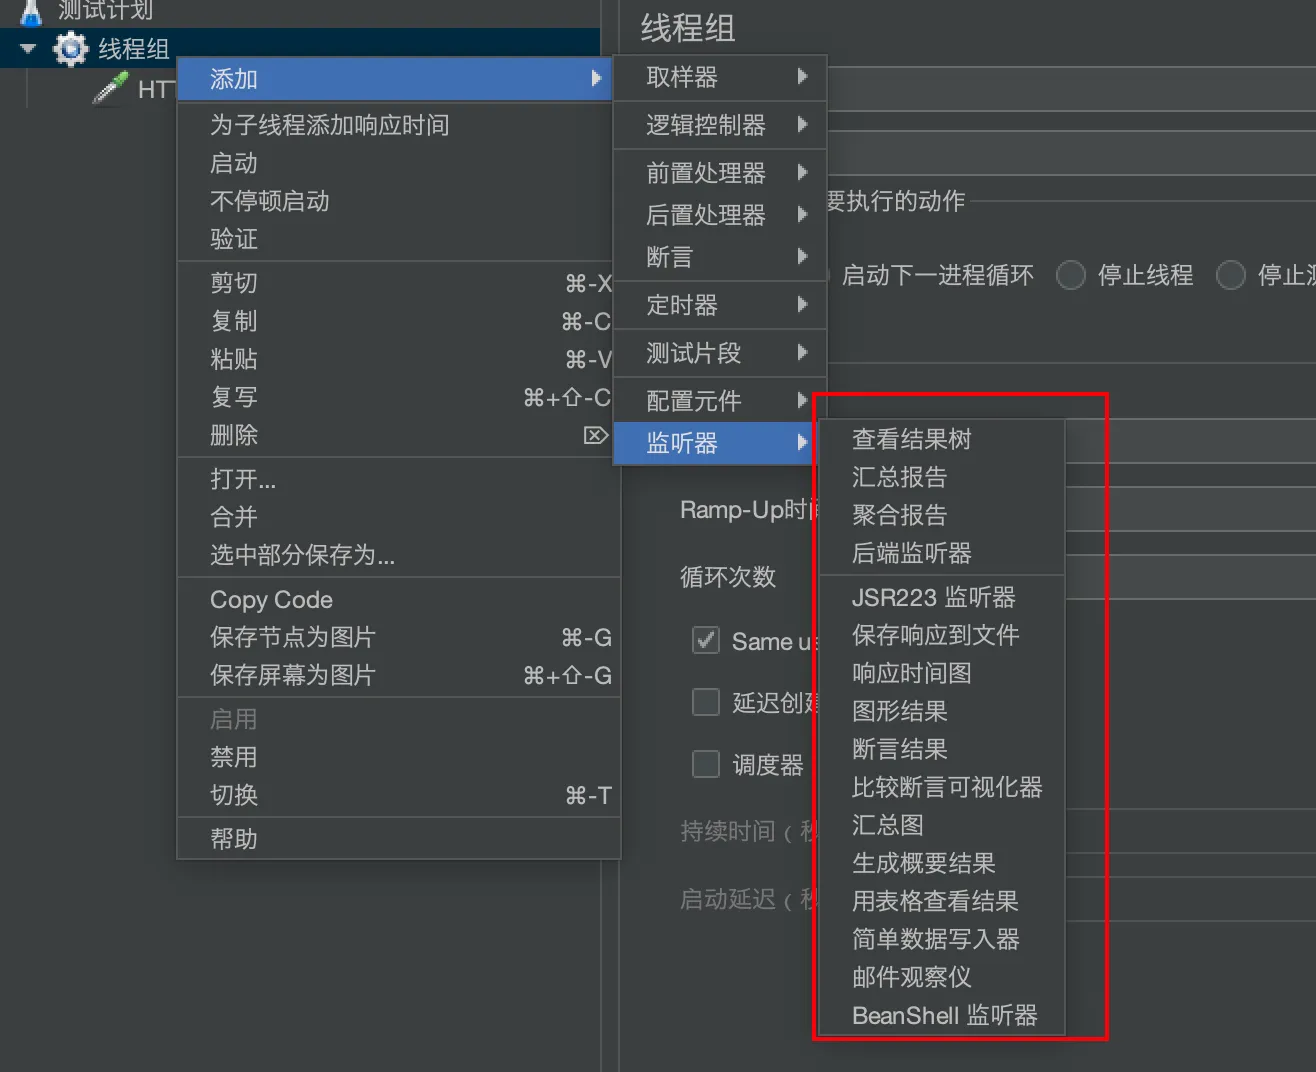
添加监听器,用来查看结果:
性能监控
JVM内存模型
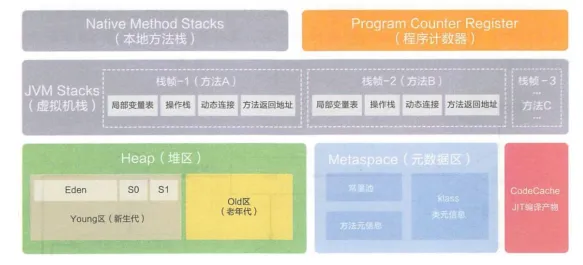
Java虚拟机(JVM)内存模型是Java应用程序在运行时使用的内存组织方式。它主要分为两部分:堆内存和方法区。
- 堆内存(Heap): 用于存储对象实例。堆内存被所有线程共享,其中包含了新生代和老年代两部分。新生代主要存放新创建的对象,而老年代则存放经过多次垃圾回收后仍然存活的对象。
- 方法区(Method Area): 存储类的元数据信息,如类的结构、字段、方法、接口等。与堆内存一样,方法区也是被所有线程共享的。
JVM内存模型中的其他重要概念包括:
- 栈内存(Stack): 为每个线程分配一个私有的栈,用于存储线程执行方法时的局部变量、操作数栈、动态链接、方法出口等信息。
- 程序计数器(Program Counter): 每个线程都有一个程序计数器,用于记录当前线程执行的字节码行号。在线程切换时,程序计数器的值被恢复,保证线程能够正确地执行。
- 本地方法栈(Native Method Stack): 与栈内存类似,但用于执行本地方法。在使用JNI(Java Native Interface)调用本地方法时,会使用本地方法栈。
- 直接内存(Direct Memory): 不是JVM内部的一部分,但与JVM密切相关。在使用NIO(New I/O)时,可以使用直接内存来提高I/O性能。直接内存不受JVM堆内存限制,但受操作系统的限制。
jconsole和jvisualvm
控制台输入jconsole即可启动
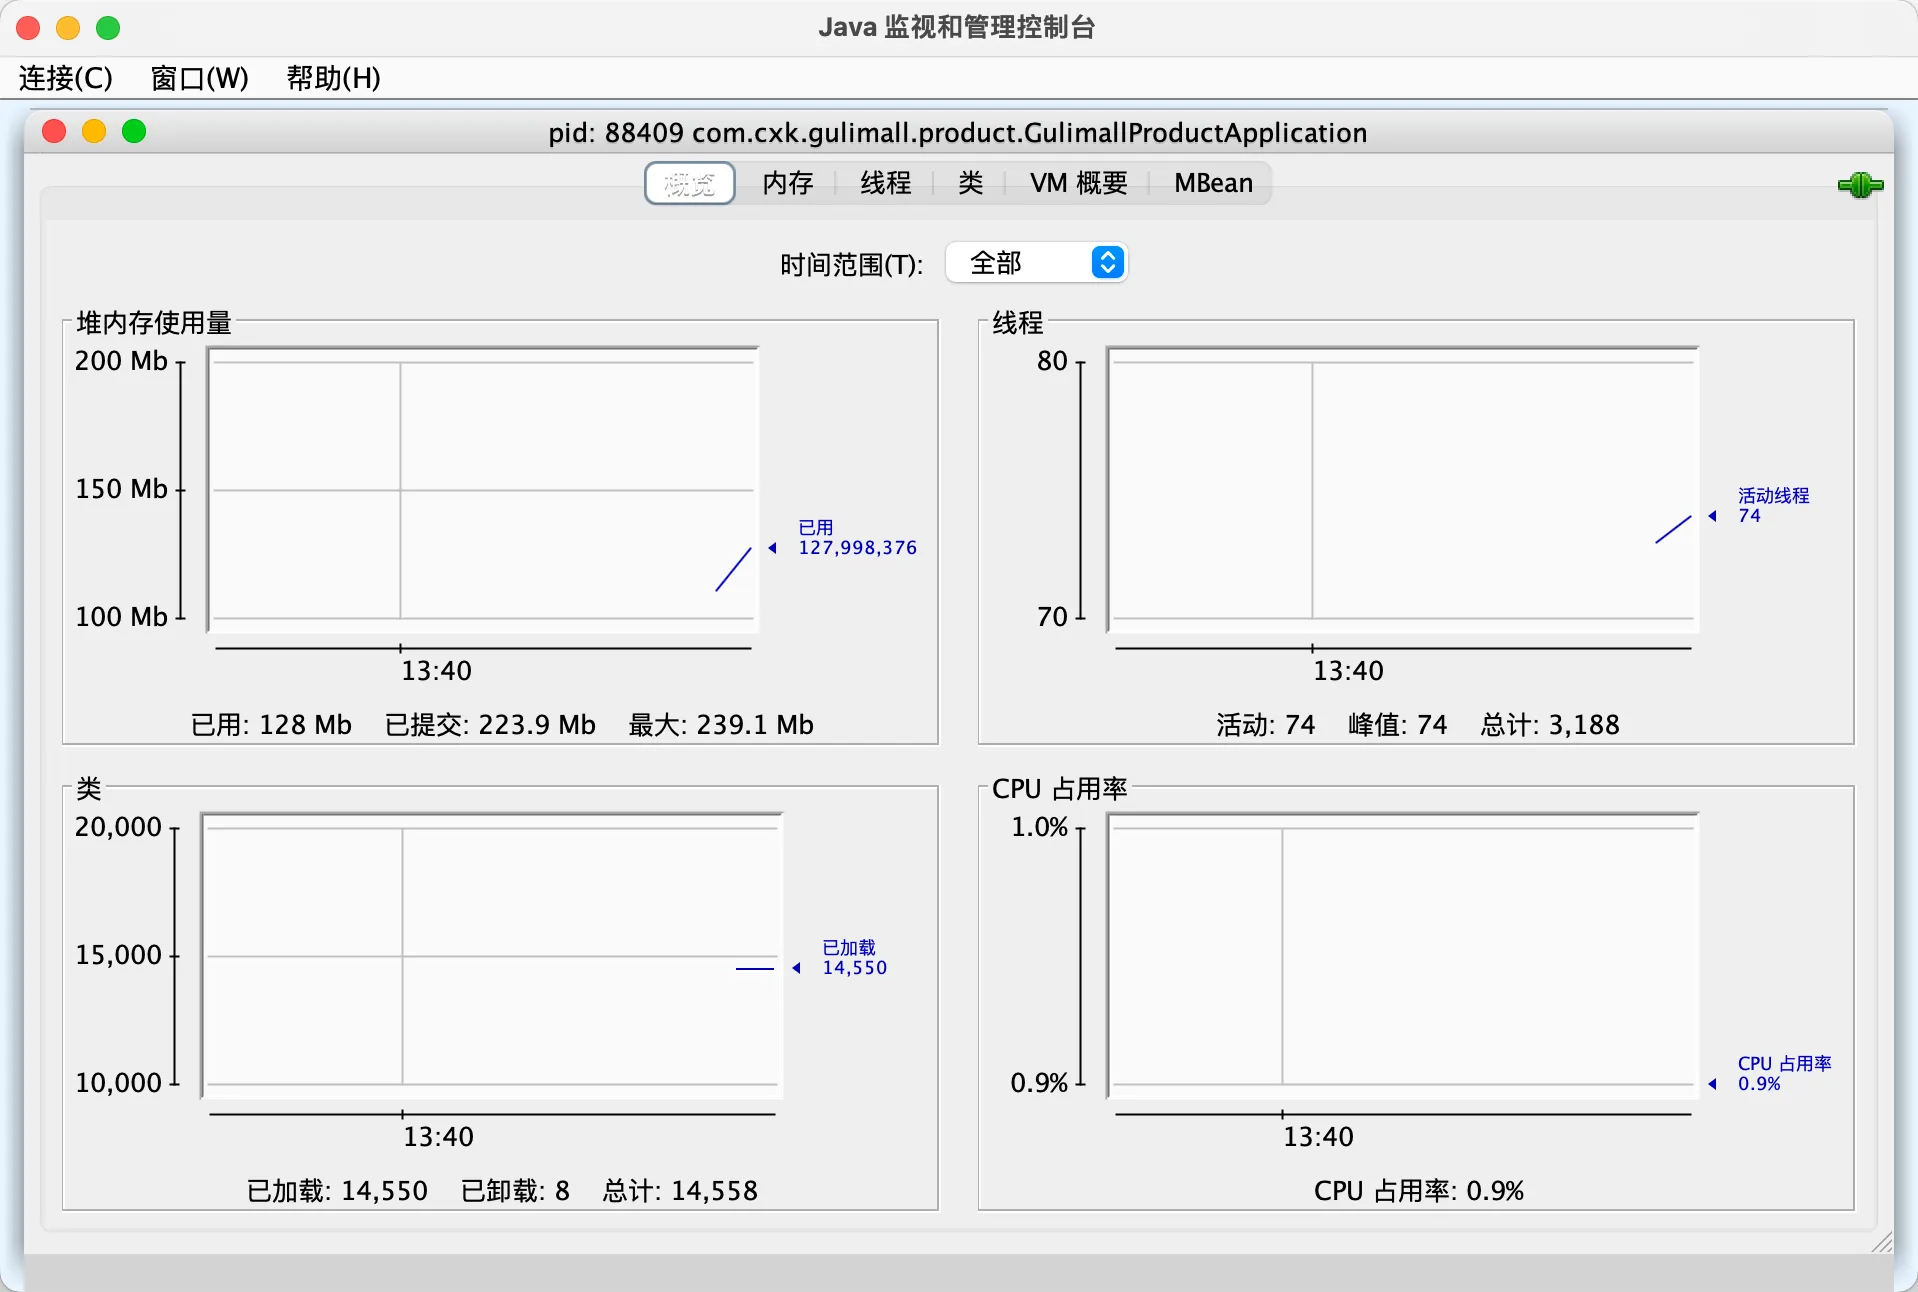
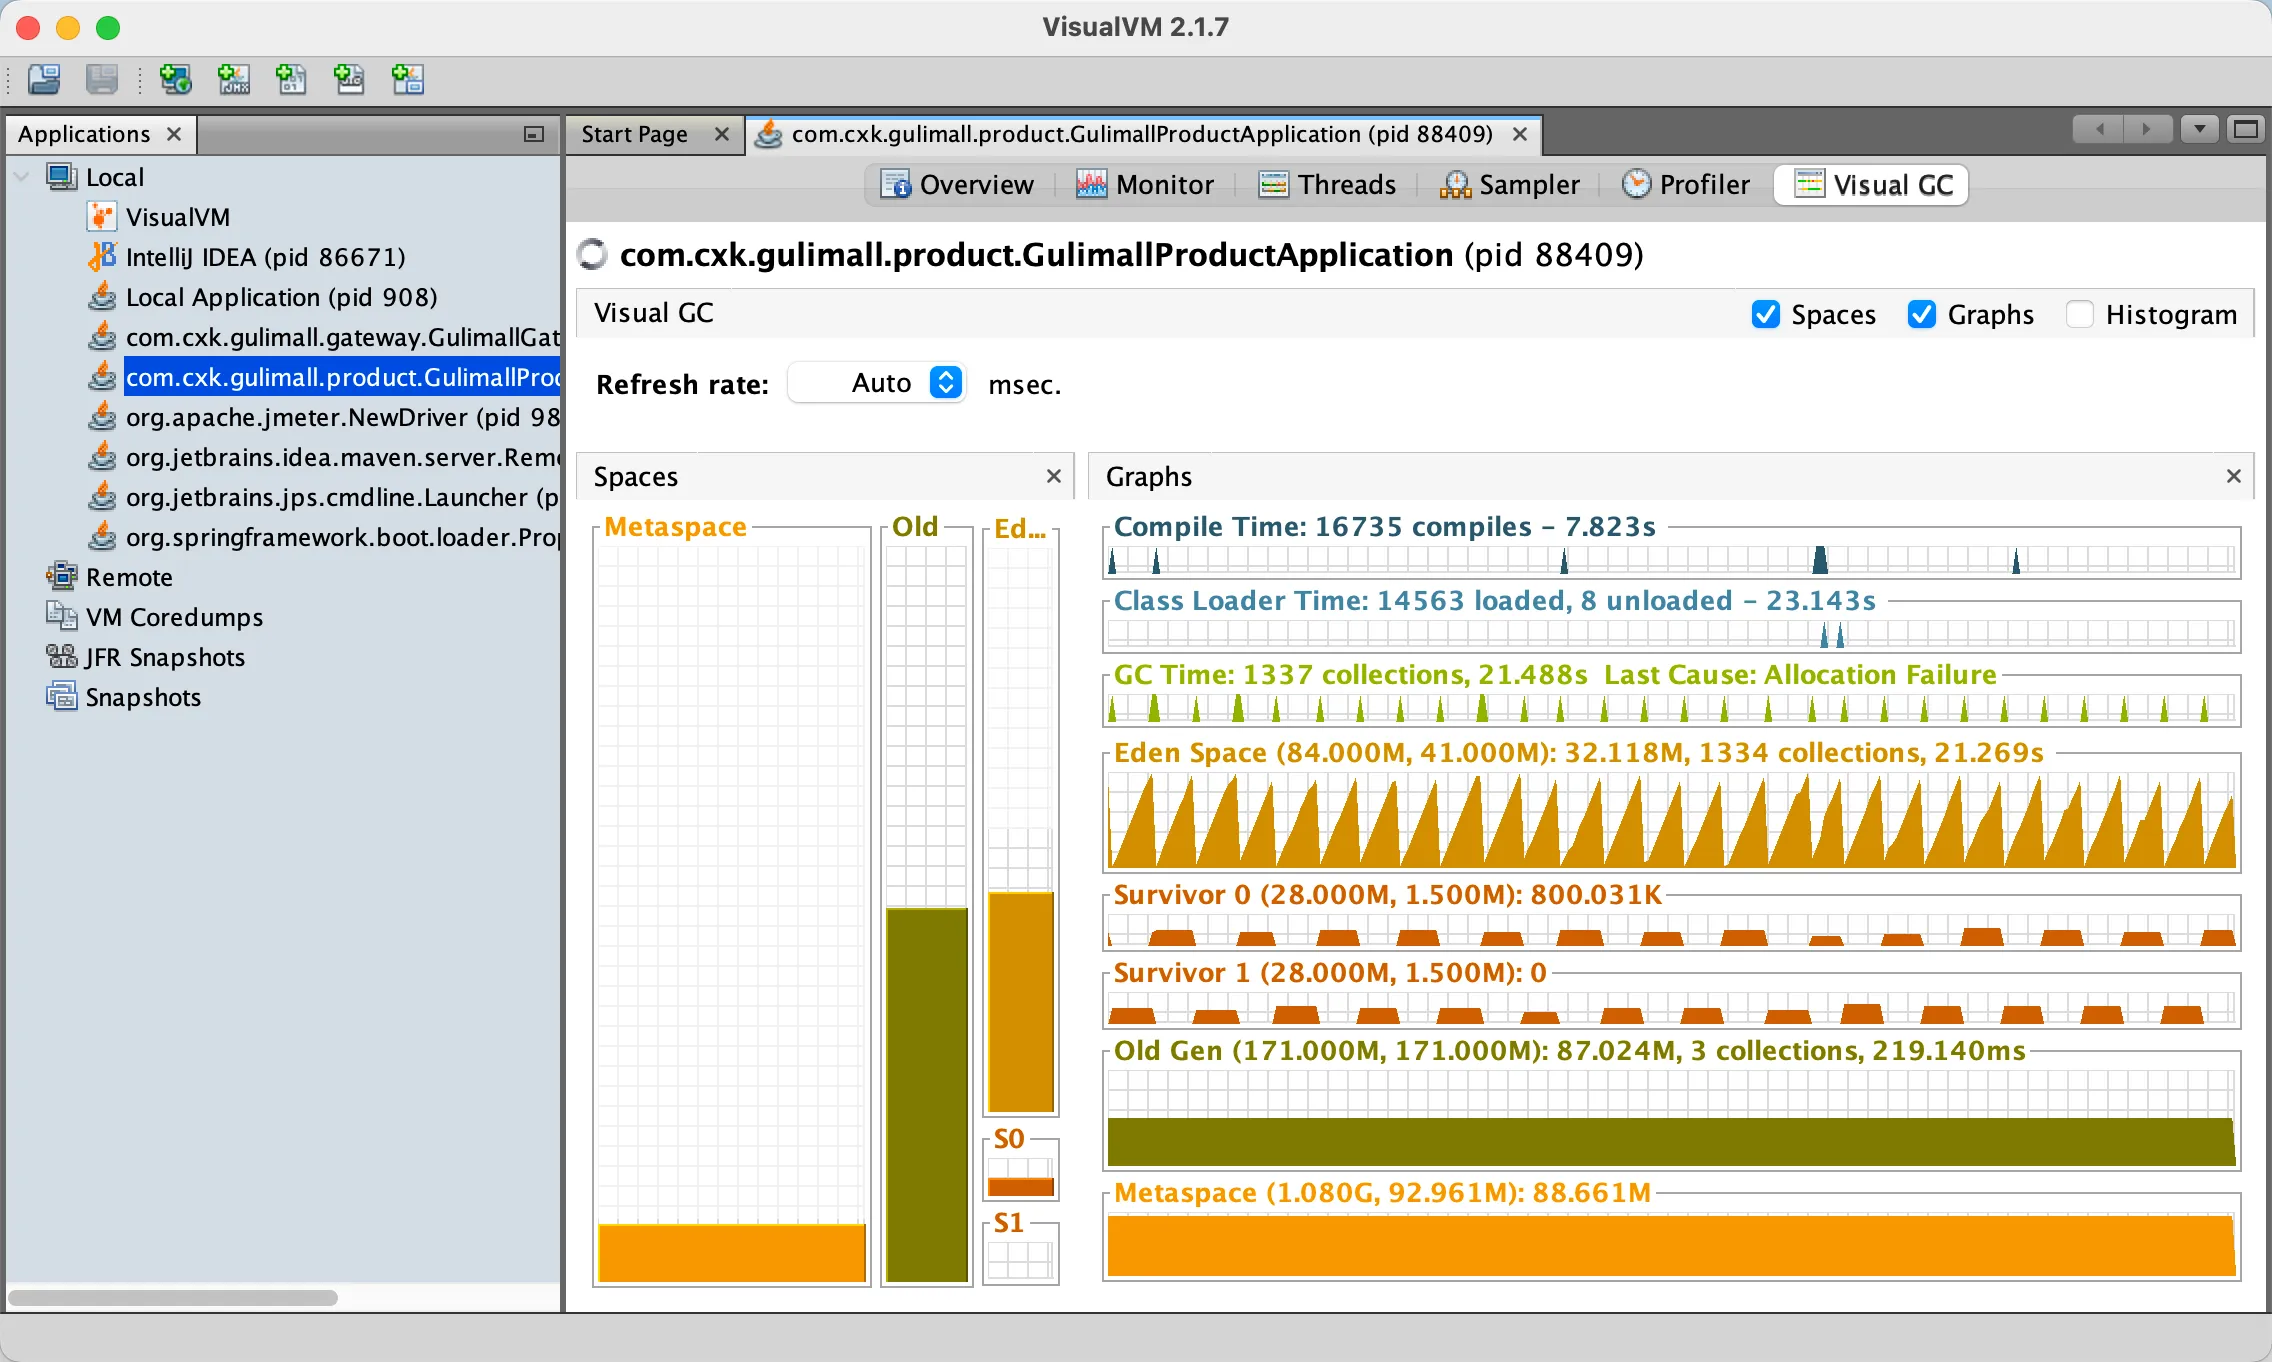
jvisualvm在高版本的java(Java8_361以上)需要下载
https://visualvm.github.io/download.html
中间件性能测试
请求的过程:

nginx测试:
使用docker stats 检测nginx性能
初始状态:

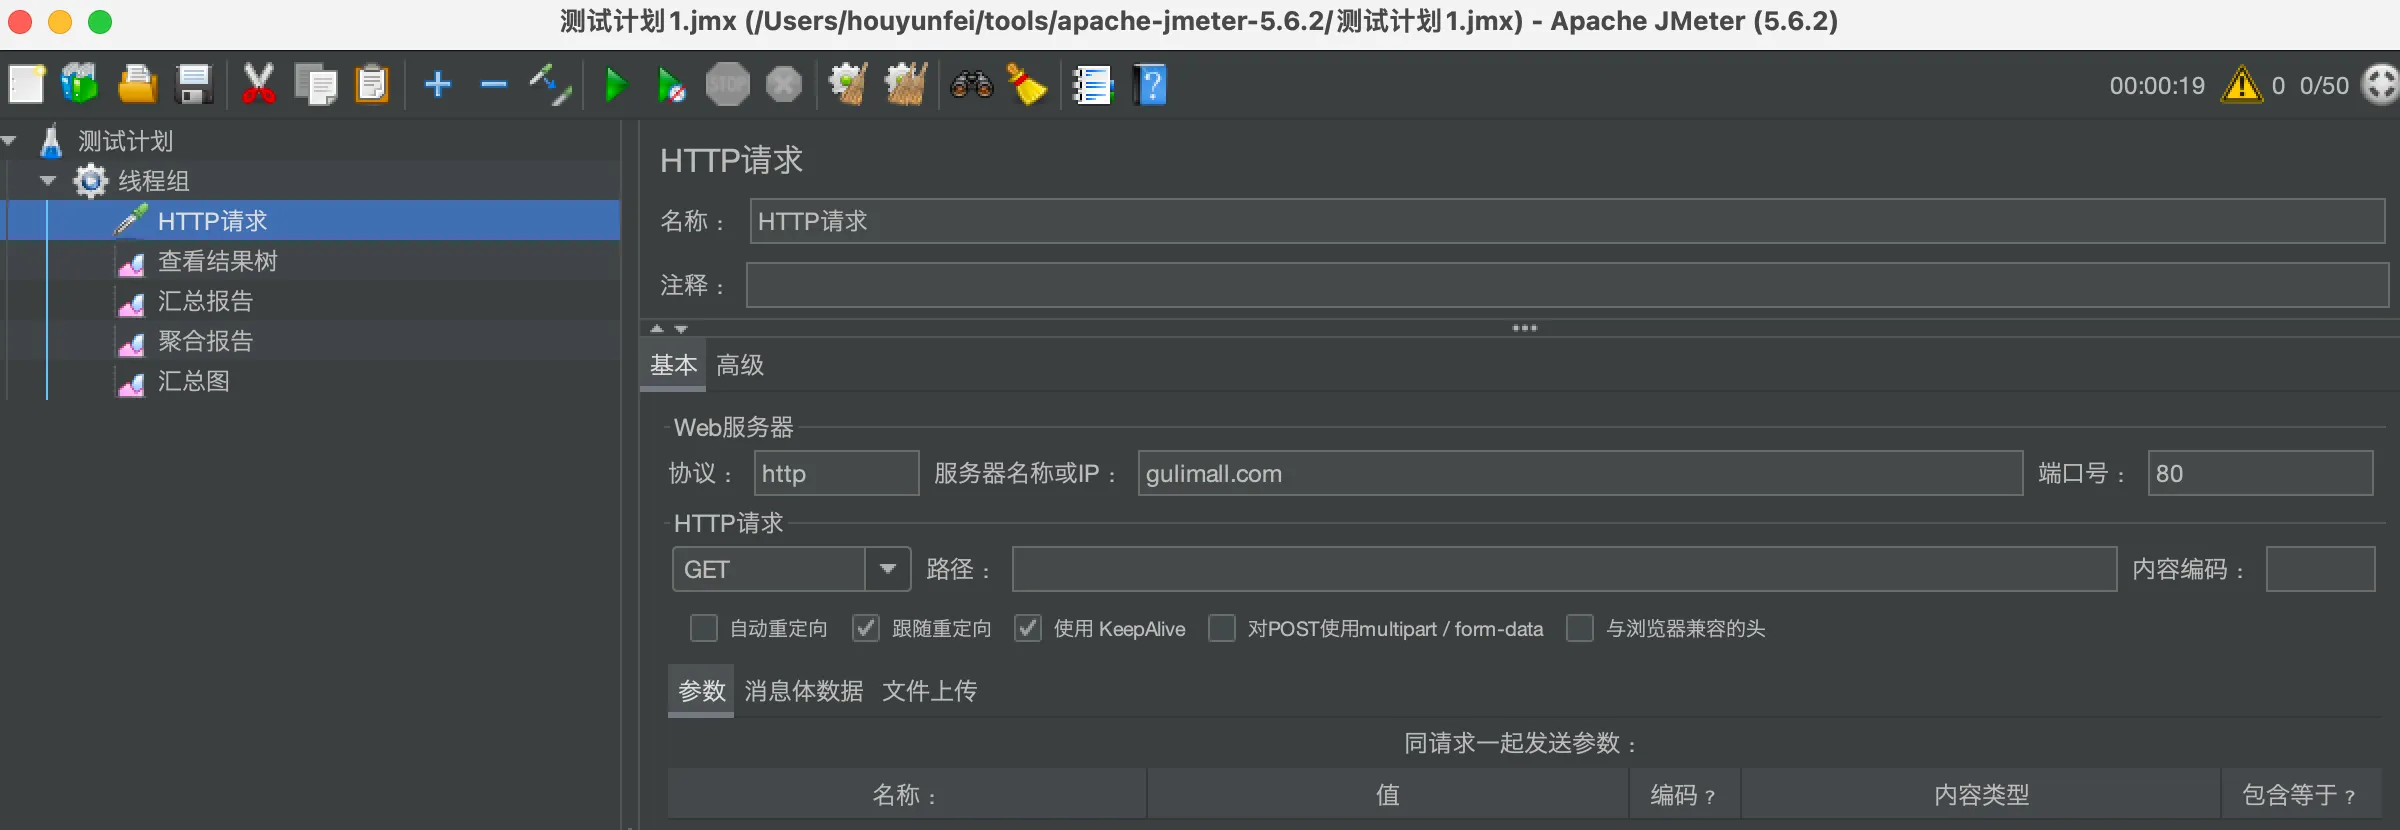
开启jmeter

网关测试:
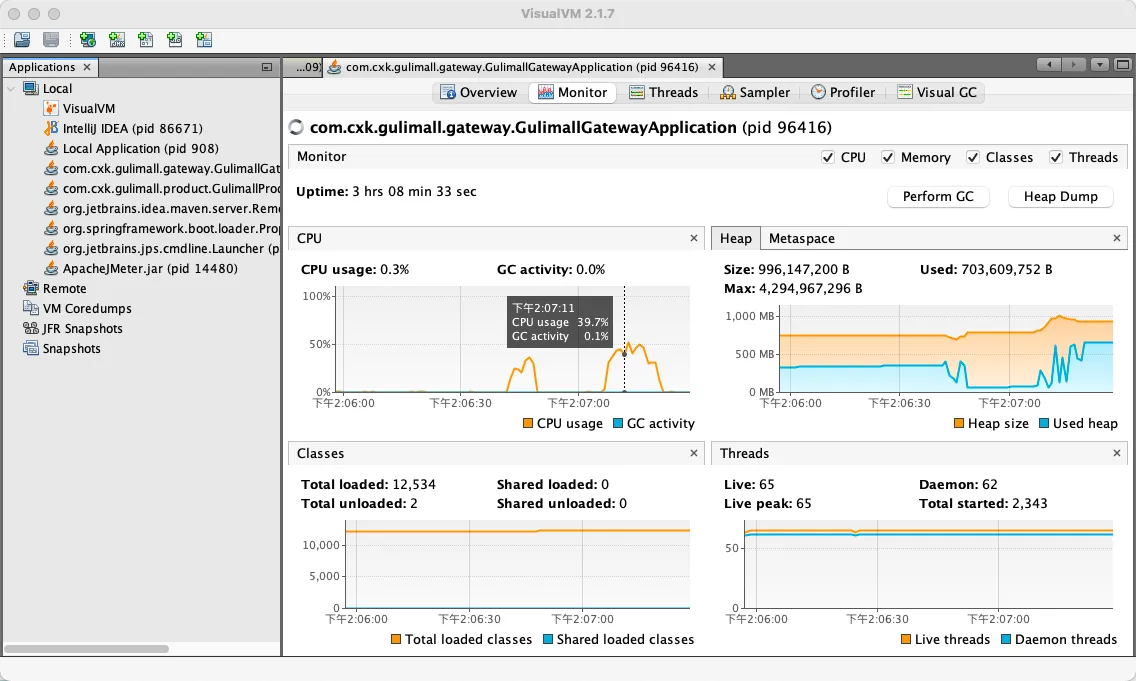
中间件越多,性能损失越大,大多都损失在网络交互了:
业务:
- db
- 模版的渲染速度(缓存)
- 静态资源
压测统计(线程数50):
| 压测内容 | 吞吐量/s | 90%响应时间 | 99%响应时间 |
|---|---|---|---|
| 简单服务 | 6537 | 11 | 68 |
| 首页一级菜单渲染 | 336 | 296 | 501 |
| 首页一级菜单渲染(开缓存) | 707 | 152 | 375 |
| 首页一级菜单渲染(开缓存,sql优化,日志优化) | 832 | 125 | 280 |
首页一级菜单渲染(开缓存,sql优化,日志优化)
  thymeleaf:
    cache: true
logging:
  level:
    org.org.springframework.web: error
    com.cxk.gulimall: error
统计sql用时
@Override
public List<CategoryEntity> getLevel1Categories() {
    long l = System.currentTimeMillis();
    List<CategoryEntity> categoryEntities = this.baseMapper.selectList(new LambdaQueryWrapper<CategoryEntity>()
            .eq(CategoryEntity::getParentCid, 0));
    System.out.println("消耗时间:"+(System.currentTimeMillis() - l));
    return categoryEntities;
}

给字段加索引:

nginx动静分离
将前端页面放在自己挂载的nginx/static目录下面
修改配置
    location /static/ {
        root /usr/share/nginx/html;
    }

    location / {
        proxy_set_header Host $host;
        proxy_pass http://gulimall;
    }
重启docker
优化代码,少于数据库做交互:
@Override
public Map<String, List<Catelog2Vo>> getCatalogJson() {
    List<CategoryEntity> selectedList = baseMapper.selectList(null);
    //查出所有1级分类
    List<CategoryEntity> level1Categories = this.getLevel1Categories();

    //封装数据
    Map<String, List<Catelog2Vo>> parentCid = level1Categories.stream().collect(Collectors.toMap(k -> {
        return k.getCatId().toString();
    }, v -> {
        //每一个1级分类,查到这个一级分类的二级分类
        List<CategoryEntity> categoryEntities = getParentCid(selectedList,v.getCatId());
        //封装数据
        List<Catelog2Vo> collect = null;
        if (categoryEntities != null) {
            collect = categoryEntities.stream().map(level2 -> {
                Catelog2Vo catelog2Vo = new Catelog2Vo(v.getCatId().toString(), null,
                        level2.getCatId().toString(), level2.getName());
                //找当前二级分类的三级分类封装成vo
                List<CategoryEntity> level3Catelog = getParentCid(selectedList,level2.getCatId());
                if (level3Catelog != null) {
                    List<Catelog2Vo.Catalog3Vo> catalog3Vos = level3Catelog.stream().map(level3 -> {
                        Catelog2Vo.Catalog3Vo catalog3Vo = new Catelog2Vo.Catalog3Vo(level2.getCatId().toString(),
                                level3.getCatId().toString(), level3.getName());
                        return catalog3Vo;
                    }).collect(Collectors.toList());
                    catelog2Vo.setCatalog3List(catalog3Vos);
                }
                return catelog2Vo;
            }).collect(Collectors.toList());
        }
        return collect;
    }));
    return parentCid;
}

private List<CategoryEntity> getParentCid(List<CategoryEntity> selectList, Long v) {
    List<CategoryEntity> collect = selectList.stream().filter(item ->
            item.getParentCid().equals(v)).collect(Collectors.toList());
    return collect;
}
Redis缓存
导入redis
<!-- 引入redis -->
<dependency>
    <groupId>org.springframework.boot</groupId>
    <artifactId>spring-boot-starter-data-redis</artifactId>
</dependency>
配置:
spring:
	redis:
    	host: localhost
	    port: 6379
测试:
@Autowired
StringRedisTemplate stringRedisTemplate;

@Test
public void testStringRedisTemplate(){
    ValueOperations<String, String> ops = stringRedisTemplate.opsForValue();
    ops.set("hello", "world"+ UUID.randomUUID().toString());
    String hello = ops.get("hello");
    System.out.println("redxis中保存的值是:"+hello);
}
修改获取三级分类菜单,使用redis做缓存:
@Override
public Map<String, List<Catelog2Vo>> getCatalogJsonFromRedis() {
    //1.加入缓存 给缓存中放json字符串,方便以后使用
    String catalogJson = stringRedisTemplate.opsForValue().get("catalogJson");
    if (StringUtils.isEmpty(catalogJson)) {
        //缓存中没有数据,查询数据库
        Map<String, List<Catelog2Vo>> catalogJsonFromDb = getCatalogJsonFromDb();
        //转为json放入缓存中
        String jsonString = JSON.toJSONString(catalogJsonFromDb);
        stringRedisTemplate.opsForValue().set("catalogJson", jsonString);
        return catalogJsonFromDb;
    }
    Map<String, List<Catelog2Vo>> result = JSON.parseObject(
            catalogJson,
            new TypeReference<Map<String, List<Catelog2Vo>>>() {});
    return result;
}
一开始压力测试没问题,时间久了会报错:

这是因为springboot2.0以后默认使用lettuce作为操作redis的客户端。它使用netty进行网络通信。
lettucel的bug导致nettyi堆外内存溢出-Xmx300m;netty如果没有指定堆外内存,默认使用-Xmx300m
可以通过-Dio.netty.maxDirectMemoryi进行设置
解决方案:不能使用-Dio.netty.maxDirectMemory只去调大堆外内存。
- 升级lettuce客户端。
- 或者切换使用jedis
<!-- 引入redis -->
<dependency>
    <groupId>org.springframework.boot</groupId>
    <artifactId>spring-boot-starter-data-redis</artifactId>
    <exclusions>
       <exclusion>
          <groupId>io.lettuce</groupId>
          <artifactId>lettuce-core</artifactId>
       </exclusion>
    </exclusions>
</dependency>
<dependency>
    <groupId>redis.clients</groupId>
    <artifactId>jedis</artifactId>
</dependency>
缓存穿透
缓存穿透是指在缓存中找不到需要的数据,导致每次请求都要查询数据库或其他存储系统,从而影响性能。这通常发生在请求的键值对在存储系统中不存在,但被频繁地查询。
为了解决缓存穿透问题,可以考虑以下方法:
- 空值缓存: 当查询数据库或存储系统后,如果发现数据不存在,可以将这个空值也存入缓存,但设置一个较短的过期时间,防止频繁查询。
- 布隆过滤器: 使用布隆过滤器来快速判断一个键值是否存在于缓存中。这样可以在缓存层面快速拦截掉那些明显不存在于存储系统中的请求。
- 预热缓存: 在系统启动时或数据更新时,可以通过预热缓存来提前将热门数据加载到缓存中,减少冷启动时的缓存穿透问题。
- 限制频繁查询: 对于频繁查询但不会经常变化的数据,可以考虑在缓存层面添加限制,例如采用缓存击穿的防护机制,防止大量请求同时穿透到存储系统。
缓存雪崩
缓存雪崩是指缓存中大量的缓存数据在同一时间失效或过期,导致大量的请求直接访问底层存储系统,从而导致存储系统负载激增,影响系统性能。
为了避免缓存雪崩,可以采取以下一些措施:
- 过期时间随机化: 设置缓存数据的过期时间时,可以考虑添加一些随机因素,防止大量缓存在同一时刻过期,减缓对底层系统的冲击。
- 持久化缓存: 对于一些重要的缓存数据,可以考虑使用永不过期或较长时间的过期时间,确保即使发生缓存失效,系统也能够继续提供服务。
- 分布式锁: 在缓存失效时,可以使用分布式锁来保证只有一个线程或节点可以重新加载缓存,防止大量请求同时击穿。
- 多级缓存: 使用多级缓存架构,将缓存数据分布在不同的缓存层级中,即使某一层缓存失效,其他层仍然可以提供部分数据,减轻雪崩效应。
- 异步加载: 缓存的异步加载机制可以在缓存失效时,通过异步任务去加载缓存,而不是同步地直接访问底层存储系统,从而减少对底层系统的冲击。
缓存击穿
缓存击穿是指某个缓存键对应的数据在缓存中不存在,但多个并发请求同时请求这个不存在的数据,导致请求穿透到底层存储系统,增加了系统负载。
为了避免缓存击穿,可以采取以下措施:
- 缓存预加载: 在系统启动时或数据更新时,可以通过预加载缓存来将热门数据加载到缓存中,避免在请求到来时才去加载。这样可以减少对底层系统的冲击。
- 使用互斥锁: 在查询缓存时,可以使用互斥锁来保证只有一个线程或请求可以进行缓存的查询操作。这样可以防止多个请求同时穿透到底层存储系统。
- 缓存穿透检测: 在缓存层面可以添加一些检测机制,判断某个键是否存在于缓存中,如果不存在,可以通过一定的策略(如设置一个临时的占位值)防止多个请求同时穿透。
- 设置短暂的缓存过期时间: 对于一些不常变化的数据,可以设置一个较短的缓存过期时间,以保证缓存数据能够及时更新,降低缓存失效的概率。
- 使用分布式锁: 在缓存失效时,可以使用分布式锁来保证只有一个线程或节点可以重新加载缓存,防止多个请求同时穿透。
使用本地锁
    public Map<String, List<Catelog2Vo>> getCatalogJsonFromDb() {
        //只要是同一把锁,就能锁住所有的线程
        //synchronized (this):SpringBoot所有的组件在容器中都是单例的
        //todo 本地锁 synchronized ,JUC锁 Lock ,在分布式情况下,使用分布式锁 zookeeper redis
        synchronized (this){
            //得到锁以后,再去缓存中确定是否有数据
            String catalogJson = stringRedisTemplate.opsForValue().get("catalogJson");
            if (!StringUtils.isEmpty(catalogJson)) {
                //缓存中有数据,直接返回
                Map<String, List<Catelog2Vo>> result = JSON.parseObject(
                        catalogJson,
                        new TypeReference<Map<String, List<Catelog2Vo>>>() {});
                return result;
            }
            //查出剩余结果。。。

            String jsonString = JSON.toJSONString(parentCid);
            stringRedisTemplate.opsForValue().set("catalogJson", jsonString,1, TimeUnit.HOURS);
            return parentCid;
        }
    }
问题:
本地锁只会锁住这台机器,但是分布式系统下面有多台机器,在高并发情况下吗,每台机器还是会都查询一次数据库
分布式锁
set key value nx:NX -- Only set the key if it does not already exist.
public Map<String, List<Catelog2Vo>> getCatalogJsonFromDbWithRedisLock() {
    //1.占分布式锁
    Boolean lock = stringRedisTemplate.opsForValue().setIfAbsent("lock", "111");
    if (lock) {
        //加锁成功
        Map<String, List<Catelog2Vo>> dataFromDb = getDataFromDb();
        //删除锁
        stringRedisTemplate.delete("lock");
        return dataFromDb;
    } else {
        //加锁失败,重试 自旋
        return getCatalogJsonFromDbWithRedisLock();
    }
}
这样写的问题是:在getDataFromDb中如果出现异常,则不会删除锁,导致出现死锁,解决办法,设置过期时间
public Map<String, List<Catelog2Vo>> getCatalogJsonFromDbWithRedisLock() {
    //1.占分布式锁
    Boolean lock = stringRedisTemplate.opsForValue().setIfAbsent("lock", "111");
    if (lock) {
        //加锁成功
        //设置过期时间,防止死锁
        stringRedisTemplate.expire("lock", 30, TimeUnit.SECONDS);
        Map<String, List<Catelog2Vo>> dataFromDb = getDataFromDb();
        //删除锁
        stringRedisTemplate.delete("lock");
        return dataFromDb;
    } else {
        //加锁失败,重试 自旋
        return getCatalogJsonFromDbWithRedisLock();
    }
}
这样设置过期时间,问题是还没执行到设置过期时间的时候,出现问题,导致死锁,因此抢锁和设置过期时间应该是一个原子操作
    public Map<String, List<Catelog2Vo>> getCatalogJsonFromDbWithRedisLock() {
        //1.占分布式锁
        Boolean lock = stringRedisTemplate.opsForValue().setIfAbsent("lock", "111", 30, TimeUnit.SECONDS);
        if (lock) {
            //加锁成功
            //设置过期时间,防止死锁
//            stringRedisTemplate.expire("lock", 30, TimeUnit.SECONDS);
            Map<String, List<Catelog2Vo>> dataFromDb = getDataFromDb();
            //删除锁
            stringRedisTemplate.delete("lock");
            return dataFromDb;
        } else {
            //加锁失败,重试 自旋
            return getCatalogJsonFromDbWithRedisLock();
        }
    }
删除锁的时候问题,业务代码非常耗时,例如达到了50s,但是锁的过期时间只有30s,此时就会自动释放锁,导致其他线程进来,当第一个线程执行完的时候,他会去释放第二个线程的锁
解决办法,使用UUID作为值,保证只能删除自己的锁
    public Map<String, List<Catelog2Vo>> getCatalogJsonFromDbWithRedisLock() {
        //1.占分布式锁
        String uuid= UUID.randomUUID().toString();
        Boolean lock = stringRedisTemplate.opsForValue().setIfAbsent("lock", uuid, 30, TimeUnit.SECONDS);
        if (lock) {
            //加锁成功
            //设置过期时间,防止死锁
//            stringRedisTemplate.expire("lock", 30, TimeUnit.SECONDS);
            Map<String, List<Catelog2Vo>> dataFromDb = getDataFromDb();
            String lockValue = stringRedisTemplate.opsForValue().get("lock");
            //删除锁
            if (uuid.equals(lockValue)){
                stringRedisTemplate.delete("lock");
            }
            return dataFromDb;
        } else {
            //加锁失败,重试 自旋
            return getCatalogJsonFromDbWithRedisLock();
        }
    }
问题:由于获取值+对比成功删除=原子操作,当对比值成功的时候,将要删除锁的时候,锁过期了,这时候别人进来了,又会删除别人的锁,
解决办法,使用lua脚本
    public Map<String, List<Catelog2Vo>> getCatalogJsonFromDbWithRedisLock() {
        //1.占分布式锁
        String uuid = UUID.randomUUID().toString();
        Boolean lock = stringRedisTemplate.opsForValue().setIfAbsent("lock", uuid, 30, TimeUnit.SECONDS);
        if (lock) {
            Map<String, List<Catelog2Vo>> dataFromDb;
            try {
                dataFromDb = getDataFromDb();
            } finally {
                //使用lua脚本解锁
                String script = "if redis.call('get', KEYS[1]) == ARGV[1] then return redis.call('del',KEYS[1]) else return 0 end";
                stringRedisTemplate.execute(new DefaultRedisScript<Long>(script, Long.class), Arrays.asList("lock"), uuid);
            }
            return dataFromDb;
        } else {
            //加锁失败,重试 自旋
            try {
                Thread.sleep(1000);
            }catch (Exception e){
                e.printStackTrace();
            }
            return getCatalogJsonFromDbWithRedisLock();
        }
    }
至此,问题解决,接下来会使用别人封装好的工具(redisson)来操作
Redisson
<!-- 以后使用Redisson作为所有分布式锁 -->
<dependency>
    <groupId>org.redisson</groupId>
    <artifactId>redisson</artifactId>
    <version>3.12.0</version>
</dependency>
配置:https://github.com/redisson/redisson/wiki/2.-Configuration
@Configuration
public class MyRedissonConfig {
    @Bean(destroyMethod="shutdown")
    public RedissonClient redisson() throws IOException {
        Config config = new Config();
        config.useSingleServer().setAddress("localhost:6379");
        return Redisson.create(config);
    }
}
分布式锁:
@GetMapping("/hello")
@ResponseBody
public String hello() {
    RLock lock = redissonClient.getLock("my-lock");
    lock.lock(); //阻塞式等待,默认加的锁都是30s时间
    //1.锁的自动续期,如果业务超长,运行期间自动给锁续上新的30s,不用担心业务时间长,锁自动过期被删掉
    //2.加锁的业务只要运行完成,就不会给当前锁续期,即使不手动解锁,锁也会在30s后自动删除
    try {
        System.out.println("加锁成功,执行业务..." + Thread.currentThread().getId());
        Thread.sleep(30000);
    } catch (Exception e) {
        throw new RuntimeException(e);
    } finally {
        lock.unlock();
    }
    return "hello";
}
Redisson有看门狗机制
最佳实战,指定过期时间,不使用续期
lock.lock(10, TimeUnit.SECONDS);
如果指定了过期时间,自动解锁时间一定要大于业务执行时间,因为不会自动续期
读写锁,保证可以读到最新数据:
@GetMapping("/write")
@ResponseBody
public String writeValue() {
    RReadWriteLock lock = redissonClient.getReadWriteLock("my-lock");
    String s="";
    RLock rLock = lock.writeLock();
    try {
        rLock.lock();
        s= UUID.randomUUID().toString();
        System.out.println("写锁加锁成功,执行业务..." + Thread.currentThread().getId());
        Thread.sleep(30000);
        stringRedisTemplate.opsForValue().set("writeValue",s);
    } catch (Exception e) {
        throw new RuntimeException(e);
    } finally {
        rLock.unlock();
    }
    return s;
}

@GetMapping("/read")
@ResponseBody
public String readValue() {
    RReadWriteLock lock = redissonClient.getReadWriteLock("my-lock");
    String s="";
    RLock rLock = lock.readLock();
    try {
        rLock.lock();
        s= stringRedisTemplate.opsForValue().get("writeValue");
        System.out.println("读锁加锁成功,执行业务..." + Thread.currentThread().getId());
        Thread.sleep(30000);
    } catch (Exception e) {
        throw new RuntimeException(e);
    } finally {
        rLock.unlock();
    }
    return s;
}
闭锁,可以用于分布式限流:
@GetMapping("/lockDoor")
@ResponseBody
public String lockDoor() throws InterruptedException {
    RCountDownLatch door = redissonClient.getCountDownLatch("door");
    door.trySetCount(5);
    door.await();
    return "放假了...";
}

@GetMapping("/gogogo/{id}")
@ResponseBody
public String gogogo(@RequestBody String id) {
    RCountDownLatch door = redissonClient.getCountDownLatch("door");
    door.countDown();
    return id;
}
信号量,可以做限流
@GetMapping("/park")
@ResponseBody
public String park() throws Exception{
    RSemaphore park = redissonClient.getSemaphore("park");
    park.acquire();;//获取一个信号,获取一个值-1
    return "ok";
}

@GetMapping("/go")
@ResponseBody
public String go() throws Exception{
    RSemaphore park = redissonClient.getSemaphore("park");
    park.release();;//归还一个信号,获取一个值+1
    return "ok";
}
使用redisson修改上面获取三级分类的业务代码:
public Map<String, List<Catelog2Vo>> getCatalogJsonFromDbWithRedissonLock() {
    //1.锁的名字要有业务名字区分
    RLock lock = redissonClient.getLock("catalogJson-lock");
    lock.lock();
    Map<String, List<Catelog2Vo>> dataFromDb;
    try {
        dataFromDb = getDataFromDb();
    } finally {
        lock.unlock();
    }
    return dataFromDb;
}
缓存数据一致性
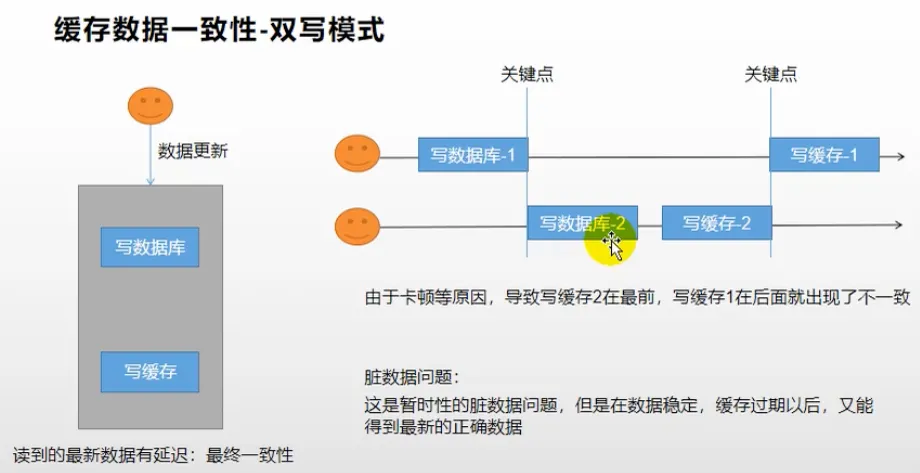
双写模式:
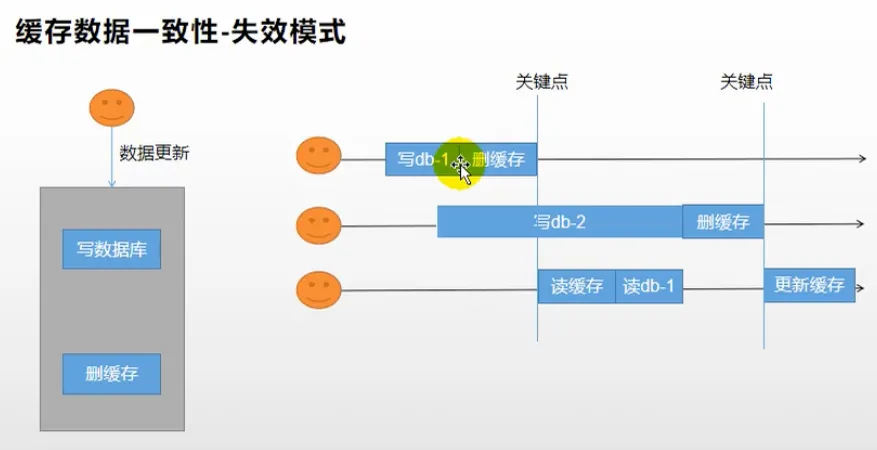
失效模式:
我们系统的一致性解决方案:
1、缓存的所有数据都有过期时间,数据过期下一次查询触发主动更新
2、读写数据的时候,加上分布式的读写锁。经常写,经常读
SpringCache
<dependency>
    <groupId>org.springframework.boot</groupId>
    <artifactId>spring-boot-starter-cache</artifactId>
</dependency>
配置:
spring.cache.type=redis
几个注解:
- Cacheable保存缓存
- CacheEvict删除
- CachePut更新
- Caching组合以上多个操作
- CacheConfig共享缓存
开启缓存
@EnableCaching
@SpringBootApplication
@MapperScan("com.cxk.gulimall.product.dao")
@EnableDiscoveryClient
@EnableFeignClients(basePackages = "com.cxk.gulimall.product.feign")
public class GulimallProductApplication {
    public static void main(String[] args) {
       SpringApplication.run(GulimallProductApplication.class, args);
    }
}
使用:
   //每一个需要缓存的数据我们都来指定要放到哪个名字的缓存中
    @Cacheable({"category"})//代表当前方法的结果需要缓存,如果缓存中有,方法不用调用,如果缓存中没有,会调用方法,最后将方法的结果放入缓存
    @Override
    public List<CategoryEntity> getLevel1Categories() {
//        long l = System.currentTimeMillis();
        List<CategoryEntity> categoryEntities = this.baseMapper.selectList(new LambdaQueryWrapper<CategoryEntity>()
                .eq(CategoryEntity::getParentCid, 0));
//        System.out.println("消耗时间:"+(System.currentTimeMillis() - l));
        return categoryEntities;
    }
key默认自动生成,缓存名字::SimpleKey
默认的value值,默认使用jdk序列化机制,将序列化后存储redis
默认时间-1
自定义:
- 指定生产的缓存使用key
- 指定存活时间,配置文件中修改ttl
spring.cache.redis.time-to-live=60000- 数据保存为json格式
配置为json格式
@Configuration
@EnableConfigurationProperties(CacheProperties.class)
public class MyCacheConfig {

    @Bean
    RedisCacheConfiguration redisCacheConfiguration(CacheProperties cacheProperties) {
        RedisCacheConfiguration config = RedisCacheConfiguration.defaultCacheConfig();
        config=config.serializeKeysWith(RedisSerializationContext.SerializationPair.fromSerializer(new StringRedisSerializer()));
        config=config.serializeValuesWith(RedisSerializationContext.SerializationPair.fromSerializer(new GenericJackson2JsonRedisSerializer()));
        //将配置文件中的所有配置都生效
        CacheProperties.Redis redisProperties = cacheProperties.getRedis();
        if (redisProperties.getTimeToLive() != null) {
            config=config.entryTtl(redisProperties.getTimeToLive());
        }
        if (redisProperties.getKeyPrefix() != null) {
            config=config.prefixKeysWith(redisProperties.getKeyPrefix());
        }
        if (!redisProperties.isCacheNullValues()) {
            config=config.disableCachingNullValues();
        }
        if (!redisProperties.isUseKeyPrefix()) {
            config=config.disableKeyPrefix();
        }
        return config;
    }
}
修改后删除缓存,CacheEvict:
@CacheEvict(value = {"category"},key = "'getLevel1Categories'")
@Override
@Transactional
public void updateCascade(CategoryEntity category) {
    this.updateById(category);
    if (!StringUtils.isEmpty(category.getName())) {
        categoryBrandRelationService.updateCategory(category.getCatId(), category.getName());
        //TODO 同步更新其他关联表的数据
    }
}
删除多个缓存:
@Caching(evict = {
        @CacheEvict(value = {"category"},key = "'getLevel1Categories'"),
        @CacheEvict(value = {"category"},key = "'getCatalogJson'"),
})
SpringCache的不足
- 读模式:
- 缓存穿透,查询null数据,解决:缓存空数据spring.cache.redis.cache-null-values=true
- 缓存击穿,大量并发查一个数据,解决:加锁,默认是无加锁的
- 缓存雪崩,大量的key同时过期,解决,加随机时间spring.cache.redis.time-to-live=60000
